Creating a New Correlation in the Formula Tool
Aim
In this tutorial, you will create a formula titled Undrained Shear Strength 6, which is the same as Undrained Shear Strength 3. For more details on the correlation refer to Undrained Shear Strength 3 section in this user guide.
For quick reference, the equation is as below:
| s_u=0.5 \cdot sin \Phi' \cdot OCR^ \Lambda \cdot \sigma'_{vo} |
Procedure
Start by creating the fields necessary to support this correlation.
- Go to the DATA DESIGN | Project Database tab, and then select File > Open File > Current Project.
- Select CPT_DATA from the yellow table drop down list from the top, and then add a new field by clicking on the New button.
Fill in the fields with the following values, and click OK when finished.
Field Name
Value
Name
Undrained_Shear_Strength_6
Caption
Su 6 Tutorial
Type
Double
Description
Undrained shear strength from CSSM (method 6), Su = 0.5 * sin phi' * OCR^lambda * sig vo'; phi' is taken from the first of these fields with data: Friction_Angle_3 and Friction_Angle_1; OCR is taken from Overconsolidation_Ratio_1; Lambda stored on CPT_POINT_MATERIAL_PROPERTIES, CPT_POINT_CORRELATION _PARAMETERS and CPT_PROJECT_CORRELATION_PARAMETERS tables
Units
kPa
Cell Color
Field - Calculated
- Select CPT_PROJECT_CORRELATION_PARAMETERS from the yellow table drop down list from the top, and then add a new field by clicking on the New button.
Fill in the fields with the following values, and click OK when finished.
Field Name
Value
Name
Undrained_Shear_Strength_6_Lambda
Type
Double
Description
Undrained shear strength from CSSM (method 6), Su = 0.5 * sin phi' * OCR^lambda * sig vo'; phi' is taken from the first of these fields with data: Friction_Angle_3 and Friction_Angle_1; OCR is taken from Overconsolidation_Ratio_1; This field represents lambda; Typically low to medium sensitivity clays are 0.7 <= lambda <= 0.8 , and sensitive and structured clays are 0.9 <= lambda <= 1.0
Default Value
0.85
Cell Color
Field – Enter Data
Copy this field into the CPT_POINT_CORRELATION_PARAMETERS table.
- Select CPT_POINT_ CORRELATION_PARAMETERS from the yellow drop down list from the top.
- Select Tables > Merge Fields from Current File. Select CPT_PROJECT_CORRELATION_PARAMETERS and click OK. Then select Undrained_Shear_Strength_6_Lambda and click OK. Clear the Default Value. Click Save to save the changes.
- Go back to the INPUT tab and launch the Formula Tool Configuration Form, by calling the command Add-Ins > Datgel CPT Tool > Formula Tool Configuration.

The Formula Tool Configuration Form should appear.
- Change the Location drop down to Project. Click on the new
 Icon to create a new blank formula.
Use the Table Field Data Tool to insert a table field reference to the configuration. - In the Configuration Group, click on the Write Value To text field so that the cursor is blinking in the text field. Click on the Table drop down list, and select CPT_DATA_CORRELATION. Then click on the Field drop down list, and select Undrained_Shear_Strength_6.
The Table Field Drop Down list should look like the following:
Click on the Paste
 button. <<CPT_DATA_CORRELATION.Undrained_Shear_Strength_6>> should have been pasted in the Write Value To fieldYou are free to type the table field references. However, using the Table Field Data Tool eliminates typographical errors which will cause errors and unexpected results further down the track. Hence, you are encouraged to use the Table Field Data Tool to insert table field references, as typographical errors can be difficult to find afterwards.
Field Name
Value
Name
Undrained Shear Strength 6
Iteration
1
Description
Undrained shear strength from CSSM (method 6), Su = 0.5 * sin phi' * OCR^lambda * sig vo'; phi' is taken from the first of these fields with data: Friction_Angle_3 and Friction_Angle_1; OCR is taken from Overconsolidation_Ratio_1; Lambda stored on CPT_POINT_MATERIAL_PROPERTIES, CPT_POINT_CORRELATION_PARAMETERS and CPT_PROJECT_CORRELATION_PARAMETERS tables
Book: NCHRP Synthesis 368 pp39Write Value To
<<CPT_DATA.Undrained_Shear_Strength_6>>
Enabled
Check this option.
Formatting Type
Decimal Places
Value
1
In the Configuration Group, fill in the following values.
Click on the Variable Name column, first row. Type in PhiD1 minding the case of each character.Enter the variables in the Table/Field References to Variables Grid.
- Click on the Expression column, first row. Go to the Table Field Data Tool, and select the CPT_DATA_CORRELATION table, Friction_Angle_1 field. Click on the Paste button, and this should insert <<CPT_DATA_CORRELATION.Friction_Angle_1>> in the cell in the first row of the Expression column.
- Click on the Validation Value column, first row. Enter 15 in the cell.
You have now entered one variable, PhiD1 which represents ϕ' from the equation.
Repeat the last three steps to enter the rest of the variables listed below:Variable Name
Expression
Unit
Validation Value Represents Variable in the Equation PhiD1
<<CPT_DATA_CORRELATION.Friction_Angle_1>>
deg
15 \Phi'
PhiD3
<<CPT_DATA_CORRELATION.Friction_Angle_3>>
deg
10 \Phi'
OCR
<<CPT_DATA_CORRELATION.Overconsolidation_Ratio_1>>
3 OCR
SigDV0
<<CPT_DATA_CORRELATION.Effective_Stress>>
kPa
100 \sigma'_{v0}
PjLambda
<<CPT_PROJECT_CORRELATION_PARAMETERS.Undrained_Shear_Strength_6_Lambda>>
0.7 \Lambda
PtLambda
<<CPT_POINT_CORRELATION_PARAMETERS.Undrained_Shear_Strength_6_Lambda>>
0.8 \Lambda
SoilType
<<CPT_DATA.Soil_Type_1>>
Fine You can use the up down arrows adjacent to the Variable Grid on the left to change the order the variables appear in the Grid. The order does not affect the formula calculation in any way.
You can now write the Formula. Click on the Formula text field so that the cursor is blinking in the text field. Go to the Function Data Tool, select Miscellaneous as the Type, then select the If() function.
The Function Data Tool should look like the following:
Click on the Paste
button. if(cond, trueval, falseval) should have been pasted in the Formula field.You are free to type the function names. However, using the Function Data Tool eliminates typographical errors which will cause errors and unexpected results further down the track. Additionally, it helps you to set up the proper function syntax for the formula. Hence you are encouraged to use the Function Data Tool to insert functions, as typographical errors can be difficult to find afterwards. Parameters and Functions are case sensitive.Enter the following text in the formula field, using the Function Data Tool when needed:
if(
  SoilType == "Fine" || SoilType == "Mixed" || SoilType == ""
,
  0.5 * sin(first(PhiD3,PhiD1)/180*pi) * OCR^ first(PtLambda,PjLambda) * SigDV0
,
  ""
)
An explanation of the formula is as below:If( SoilType == "Fine" || SoilType == "Mixed" || SoilType == "" ...
Check to see if the Soil Type is either "Fine", "Mixed" or empty. If it is, then evaluate the equation, otherwise, return empty. || denotes an OR logical operation, and == denotes an EQUAL TO text comparison.
first(PhiD3,PhiD1)
The first() function returns the first non-empty value (from left to right) in the list of parameters. If both PhiD3 and PhiD1 have values, then the first value, PhiD3 is returned.
sin(first(PhiD3,PhiD1)/180*pi)
The parameter for the sine function in the Formula Tool must be in radians. PhiD3 and PhiD1 are in Degrees, so the value is converted to radians by dividing by 180, then multiplying by pi.
You can use spaces and carriage returns (new line) to format, and space out your formula for better readability. The formatting method used in this tutorial separates the function name, parameters, parameter delimiters and closing bracket in a new line, and the parameters are indented by two spaces.
For example,FunctionName(Parameter1,Parameter2,FunctionName2(Parameter1,Parameter2))
Becomes:
FunctionName(
  Parameter1
,
  Parameter2
,
  FunctionName2(
    Parameter1
  ,
    Parameter2
  )
)
Using a consistent formatting standard throughout your collection of formulas will allow you to quickly read and understand a formula, and enables you to find errors easily.
Set the Result Unit as kPa.
Your screen should look similar to the following: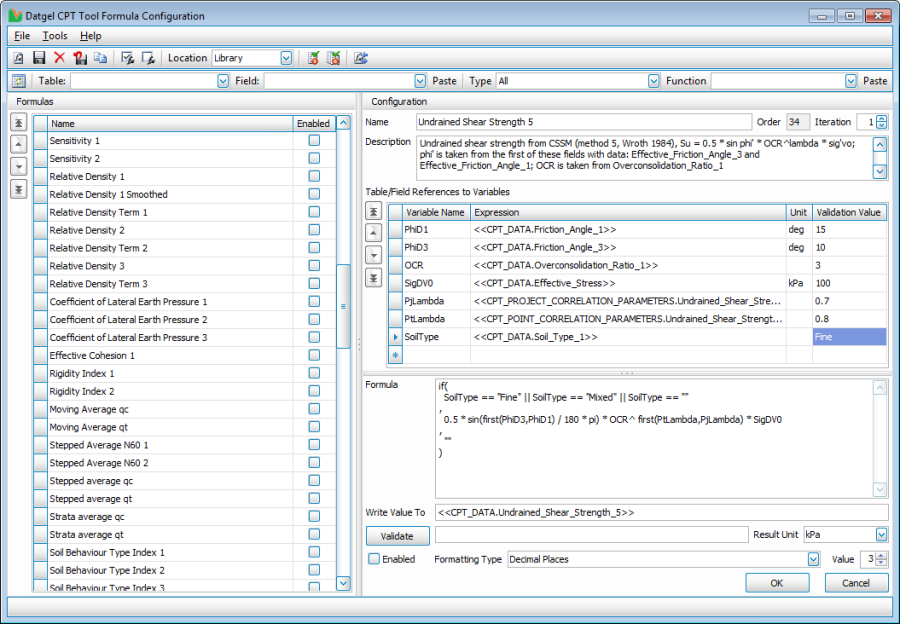
Click the save
 button to save the formula to your Project. After saving, the formula name should be visible in the Formulas Grid on the left side.
Avoid Errors. Divide by zero and null parameter errors slow the calculations noticeably. You should check for the possibility of these situations in the formula code For example, add the code in red
if(
(SoilType == "Fine" || SoilType == "Mixed" || SoilType == "") && first(PhiD3,PhiD1) !="" && OCR !="" && SigDV0 !=""
,
0.5 * sin(first(PhiD3,PhiD1) / 180 * pi) * OCR^ first(PtLambda,PjLambda) * SigDV0
,
""
)You can check if formulas are causing errors:1. Call Add-Ins > Datgel CPT Tool > Settings, and set Log Formula Exceptions to True. 2. Do a batch calculation with 2 or more strokes, and when the calculation is complete click on the Report… button. Errors will be listed in the More Information tab.
You can now validate the formula. Click on the Validate
 button. This will substitute variables in the Formula with the corresponding value in the Validation Value column in the Variables Grid, and then evaluate the equation.
If everything has been correctly entered, a value of 20.9 will appear in the text field adjacent to the Validate button. Otherwise, an error message will show, detailing why the validation failed. Read the error message carefully and fix your configuration accordingly. Then click the Validate button again to validate the configuration. Repeat until no errors are shown, and the correct value is returned.
The details of our formula can be saved to a text file, so that it may be archived, printed or distributed. Click on the Generate Validation Report for Current Formula button. Specify a file name and path for the new text file and click Save.
The text file will be created, and will be automatically opened in your default text editor.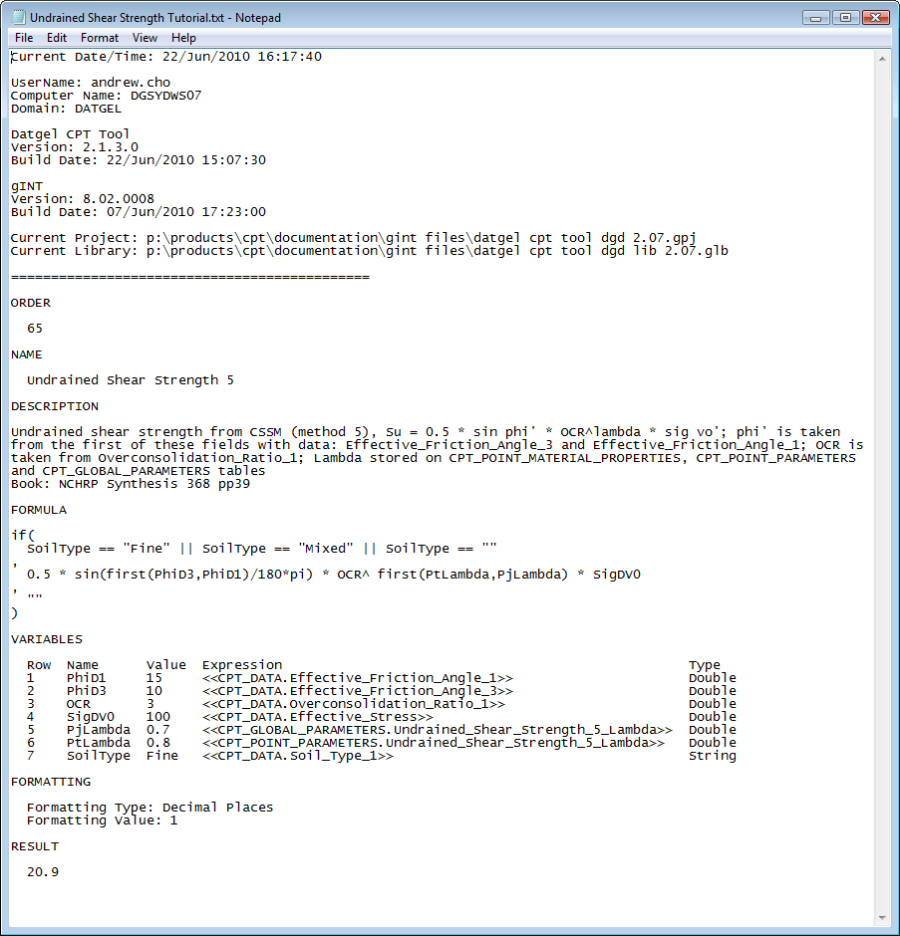
Return to the Formula Tool Configuration form, and click OK to close the form.
Calculate the Undrained Shear Strength 6 correlation in the CPT_DATA_CORRELATION table:- Go to INPUT | CPT | CPT Global Parameters tab, and enter 0.7 in the Undrained_Shear_Strength_6_Lambda field.
- Go to INPUT | CPT | CPT Data tab, and select GEF_01 as the PointID. Click on the bottom half of the screen and change a value to enable the Save button.
Click Save. Assuming that you have entered a value in all table fields referenced in the Variables Grid, and there is a value in the Effective_Stress field, and Soil_Type_1 is either "Fine", "Mixed" or empty, you should see a value in the newly created Undrained_Shear_Strength_6 field.
Over 50 working correlations in the Formula Tool have been provided to you with the CPT Tool standard gINT Files. A good way to learn how to use the Formula Tool is by learning from example. You may use these existing correlations as a basis to create new correlations that suit your requirements. The Copy Formula button on the Formula Configuration form is useful feature to quickly create multiple formulas that have only small differences.
You may also copy rows in the parameter grid to other correlations.Add the new correlation to the CPT Symbology tables:
- Go to DATA DESIGN | Library Data tab and select DG_CPT_SYMBOLOGY from the yellow table drop down list.
Correctly assign the Data Template field, and then add a new row at the bottom with the following values, using the Data Tool when appropriate:
Column Name
Value Parameter
Undrained Shear Strength 6 gINT Field Name
<<CPT_DATA.Undrained_Shear_Strength_6>> SQL Field Name
[CPT_DATA].[Undrained_Shear_Strength_6] Unit
kPa Line Colour
Very Light Magenta Line Type
Solid Line Thickness
0.2 Data Marker
8 Data Marker Height Log
0 Data Marker Height Graph
Minimum Scale
0 Maximum Scale
500 Automatic Scale
Automatic Scale Round To
Show on Report
True Remark
Name
Undrained Shear Strength Abbreviation
S<<SUB>>u<<SUB>> Reference
Wroth (1984) Reference Short - Go to DATA DESIGN | Library Data tab and select DG_CPT_SYMBOLOGY_SCALES_UNITS from the yellow table drop down list.
Scroll down to the very last 'Undrained Shear Strength 6' and insert 4 lines below it. Each row will define the units and scales for the new correlation. The new lines added should look like the following image
- Go to INPUT | CPT | CPT Project Symbology. Scroll to the bottom, and select Undrained Shear Strength 6 from the drop down list in the Parameter column. For the Undrained Shear Strength 3 parameter, Set the Show on Report column value to false.
Values entered in this table will take precedence over the values in the DG_CPT_SYMBOLOGY library table. Therefore, The Undrained Shear Strength 3 parameter will not be shown on reports generated with this project file.
Output a dynamic report showing the calculated values in our newly created su field: - Go to OUTPUT | Logs tab, and select the CPT DYNAMIC A4P log report from the yellow drop down list. Select GEF_01 in PointID field.
Click on the Print or Preview button, and the User Report Variables window will show. Fill in the following values and click OK.
Name
Value Column 1
QT QC FT FS WITH MINOR
Column 2
RF SLOPE INDICATOR
Column 3
UNDRAINED SHEAR STRENGTH
Column 4
Column 5
Column 6
Column 7
Column 8
Column 9
Column 10
Width 1 (mm)
Width 2 (mm)
45 Width 3 (mm)
45 Width 4 (mm)
Width 5 (mm)
Width 6 (mm)
Width 7 (mm)
Width 8 (mm)
Width 9 (mm)
Width 10 (mm)
Show qc qt Average Legend
Check this option.
Show Dissipation Legend
Check this option.
Show Design Line Legend
Check this option.
Legend 1
UNDRAINED SHEAR STRENGTH
Legend 2
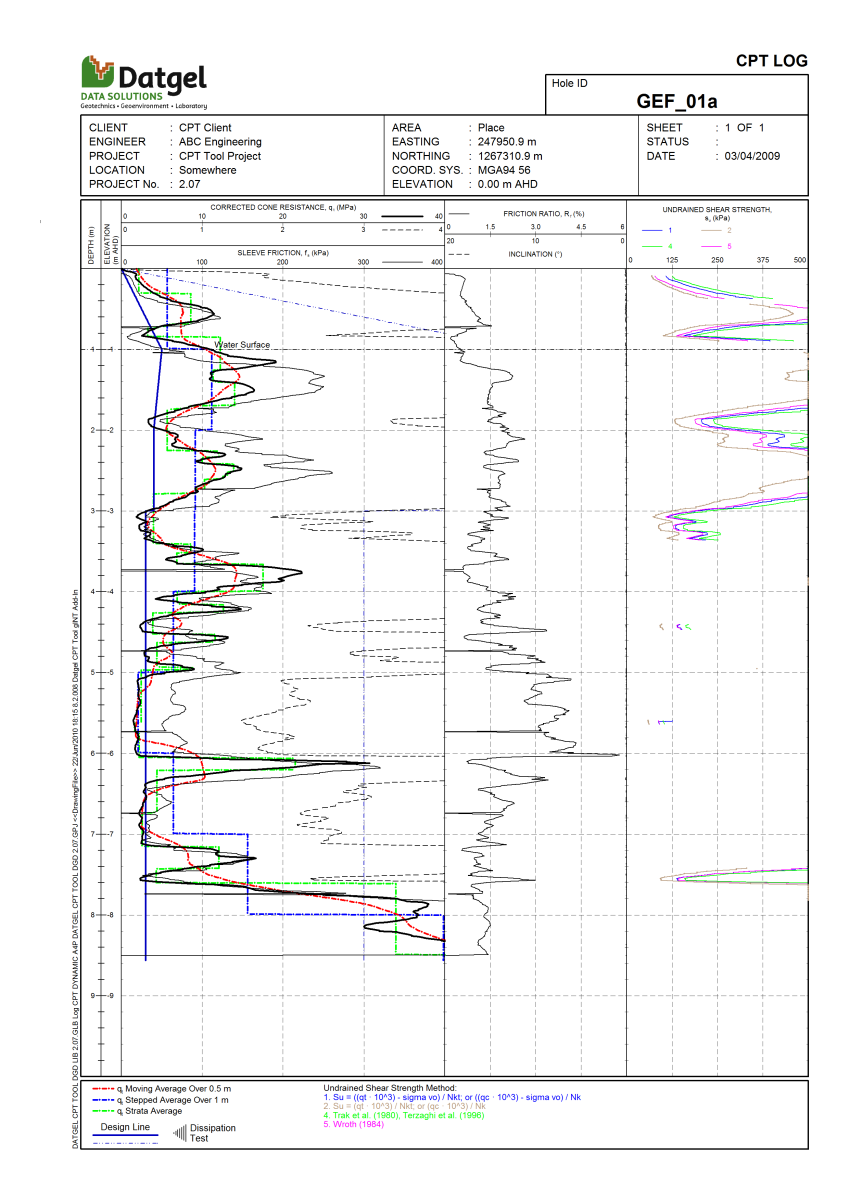
Below is an output of the report, exported as a png file.