Creating a Log and Fence Report Column for a new Correlation
Aim
In this tutorial, you will be creating a dynamic log column and fence column for the correlation Undrained Shear Strength, s_u. This tutorial assumes that the relevant fields and formula calculations have been created for Undrained Shear Strength as specified in Creating a New Correlation in the Formula Tool.
Creating the User System Data
Go to DATA DESIGN | User System Data and select File > New. Enter DG CPT Param Undrained Shear Strength in the Name, optionally enter a description and click OK.

Enter the following code in the Data or Expression field then click Save.
<<Let(Param = <<ListBuildSepTrim(" ","Undrained Shear Strength",<<Get(ParamIndex)>>)>>)>>
Your screen should look similar to the following: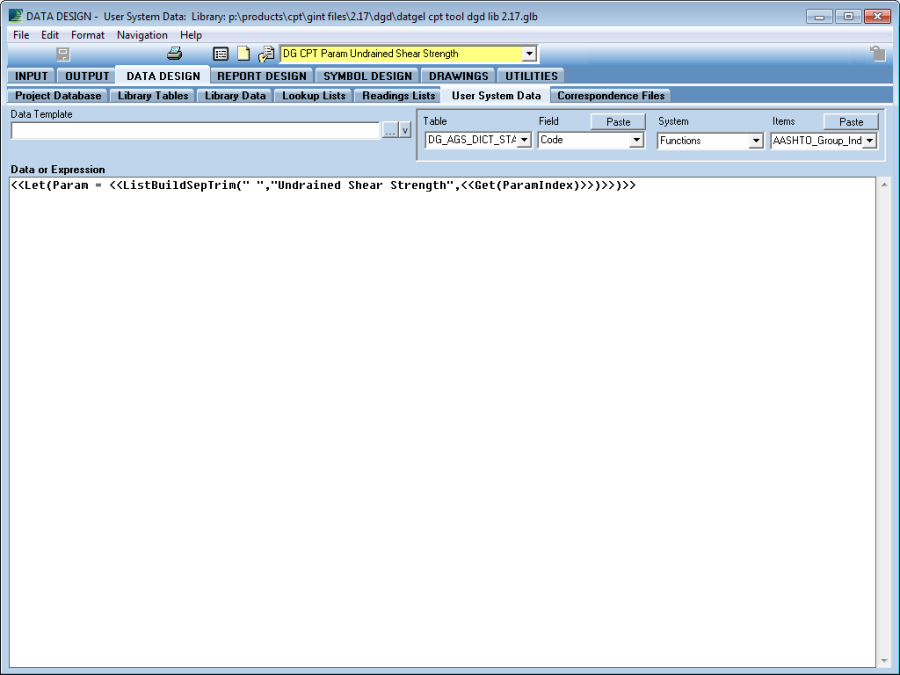
Adding the Configuration to the Library Table
This step requires adding new records into the CPT Tool Library configuration tables, namely DG_CPT_SYMBOLOGY, DG_CPT_SYMBOLOGY_SCALES_UNITS, DG_CPT_LOG_BLOCK and DG_CPT_FENCE_BLOCK.
The correlation log/fence reports can display up to 6 variations/interpretations of a correlation, and each variation must be configured in these tables.  Each variation is denoted by an index number, starting from 1 to 6 inclusive.  The naming convention that the log and fence blocks utilise is as below:
[Correlation Name] [Index Number]
Therefore, the names of the Undrained Shear Strength correlation are as below:
Undrained Shear Strength 1
Undrained Shear Strength 2
Undrained Shear Strength 3
Undrained Shear Strength 4
Undrained Shear Strength 5
Undrained Shear Strength 6
The field names also follow this naming convention, except that spaces are replaced with underscores.  Therefore, the CPT_DATA field names for Undrained Shear Strength are as below:
Undrained_Shear_Strength_1
Undrained_Shear_Strength_2
Undrained_Shear_Strength_3
Undrained_Shear_Strength_4
Undrained_Shear_Strength_5
Undrained_Shear_Strength_6
- Go to DATA DESIGN | Library Data, and select DG_CPT_SYMBOLOGY from the yellow drop down list.
Enter 6 new records in DG_CPT_SYMBOLOGY with the following values, replacing the # with the index number starting from 1 to 6, then click Save.
Column Name
Value
Parameter
Undrained Shear Strength #
gINT Field Name
<<CPT_DATA.Undrained_Shear_Strength_#>>
SQL Field Name
[CPT_DATA].[Undrained_Shear_Strength_#]
SQL Table Name
[CPT_DATA
Line Type
Solid
Line Thickness
0.2
Data Marker Height Log
0
Show on Report
True
Name
Undrained Shear Strength
Abbreviation
s<<SUB>>u<<SUB>>
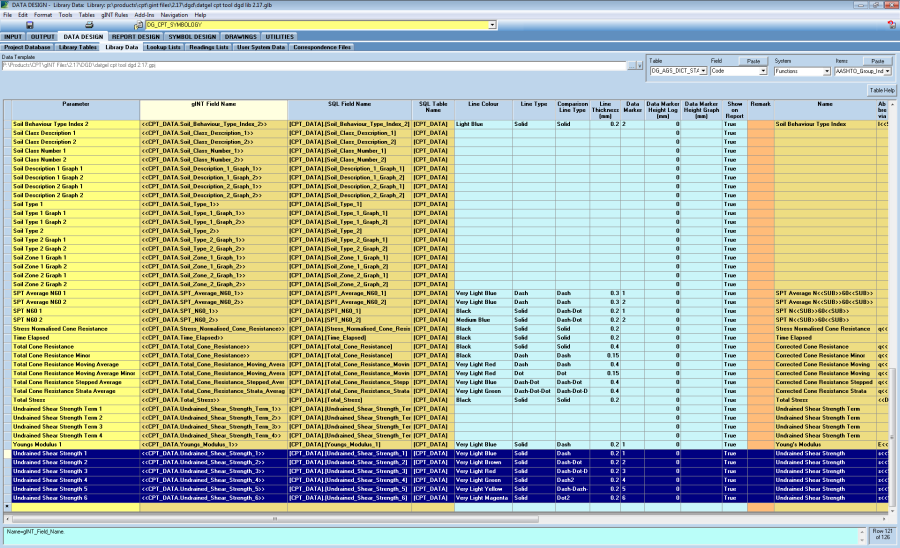
Set the following values for each parameter, then click Save.
Parameter Name
Line Colour
Comparison Line Type
Data Marker
Undrained Shear Strength 1
Very Light Blue
Dash
1
Undrained Shear Strength 2
Very Light Brown
Dash-Dot
2
Undrained Shear Strength 3
Very Light Red
Dash-Dot-Dot
3
Undrained Shear Strength 4
Very Light Green
Dash1
4
Undrained Shear Strength 5
Very Light Yellow
Dash-Dash-Dot
5
Undrained Shear Strength 6
Very Light Magenta
Dot2
6
Your screen should look similar to the following:
- Select DG_CPT_SYMBOLOGY_SCALES_UNITS from the yellow drop down list and enter two sets of 6 records following values, replacing the # with the index number starting from 1 to 6, then click Save.
1st Set:
Column Name
Value
Unit System
SI
Parameter
Undrained Shear Strength #
Unit
kPa
Minimum Scale
0
Maximum Scale
500
Number of Divisions
4
2nd Set:
Column Name
Value
Unit System
English
Parameter
Undrained Shear Strength #
Unit
tsf
Minimum Scale
0
Maximum Scale
4
Number of Divisions
4
3rd Set:
Column Name
Value
Unit System
SI_MPa
Parameter
Undrained Shear Strength #
Unit
kPa
Minimum Scale
0
Maximum Scale
40
Number of Divisions
4
4th Set:
Column Name
Value
Unit System
SI_kg/cm2
Parameter
Undrained Shear Strength #
Unit
kPa
Minimum Scale
0
Maximum Scale
40
Number of Divisions
4

Column Name
Value
Unit System
English
Parameter
Undrained Shear Strength #
Unit
tsf
Minimum Scale
0
Maximum Scale
4
Number of Divisions
4
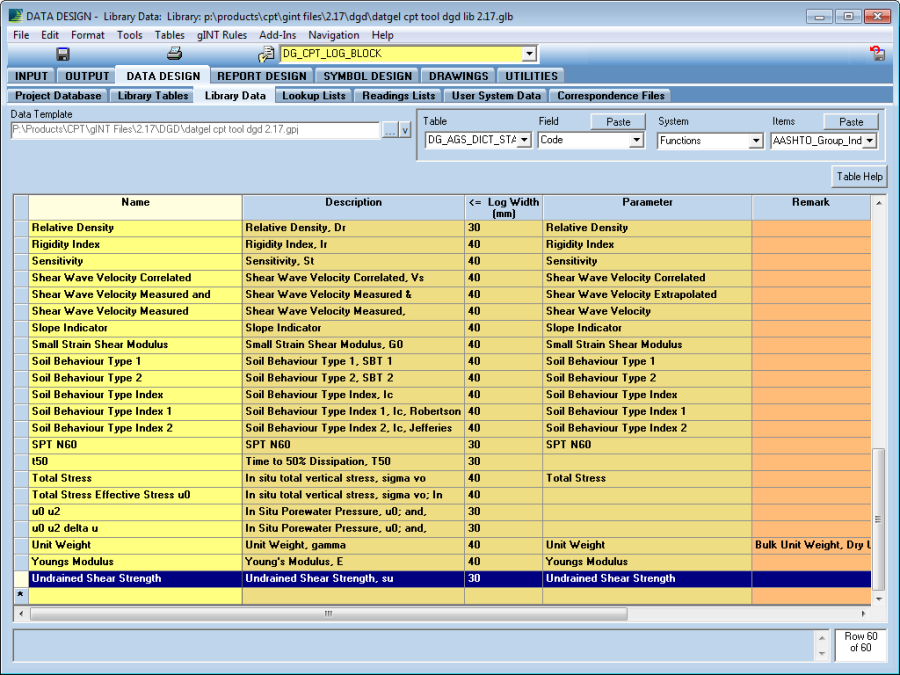
Select DG_CPT_LOG_BLOCK from the yellow drop down list and enter a new record with the following values, then click Save. You may right-click and drag the row header to change the position of the record appears on the table.
Column Name
Value
Name
Undrained Shear Strength
Description
Undrained Shear Strength, su
Log Width
30
Parameter
Undrained Shear Strength
Select DG_CPT_FENCE_BLOCK from the yellow drop down list and enter a new record with the following values, then click Save.
Column Name
Value
Name
Undrained Shear Strength
Description
Undrained Shear Strength, su
Width
10
Parameter
Undrained Shear Strength
Creating the Dynamic Log Block
To create the Dynamic Log Block, make a copy of an existing correlation Dynamic Log Block and modify it to work with the new correlation parameter. In this tutorial, you will be using the Friction Angle correlation parameter log block as the basis for our new log block.Creating the Dynamic Log Block
- Go to REPORT DESIGN | Logs then select Blocks > Edit Log Blocks. Select DG CPT FRICTION ANGLE from the yellow drop down list.
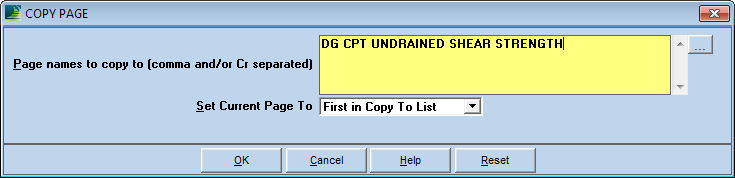
- Select File > Copy Page. Enter DG CPT UNDRAINED SHEAR STRENGTH in the Page names to copy to and click OK.
At this stage, your screen should look similar to this: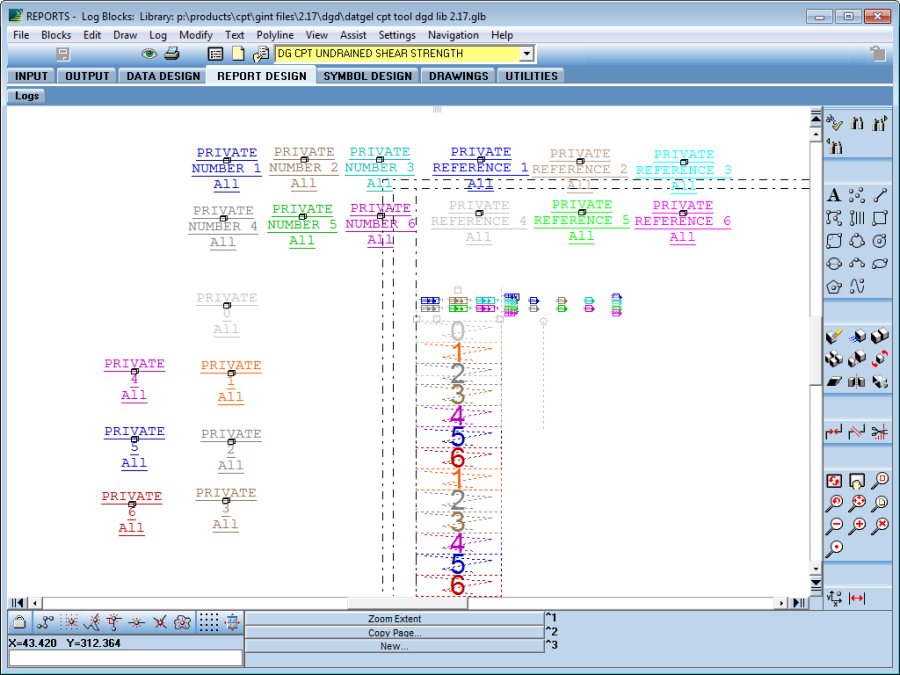
The references to the table fields and User System Data, and User Report Variables will be fixed at a later step.
A reference must now be added to the new block to the Dynamic Log reports. From the current screen (REPORT DESIGN | Logs > Log Blocks), select DG CPT DYNAMIC COLUMNS from the yellow drop down list. - Select Blocks > Insert Block and enter the following values, then click OK.
Main Tab:
Field Name
Value
Block Source
Int!dg cpt undrained shear strength
Page Range
All
Design Mode Colour
Medium Blue
Offset X
<<Let(Block = "Undrained Shear Strength")>>_
<<User System Data.DG CPT Dynamic Log Col Offset X>>Configuration Tab:
Field Name
Value
Design Mode Offset X
10
Output Condition
<<Let(Block = "Undrained Shear Strength")>>_
<<User System Data.DG CPT Dynamic Log Col Output Condition>> - Left click on a vacant space to place the Block reference, then click Save.
Add a new User Report Variable to the Dynamic Log reports: - Click on the Logs tab to return to the REPORT DESIGN | Logs screen. Select the log report CPT DYNAMIC A4P from the yellow drop down list, and select File > Page > Properties.
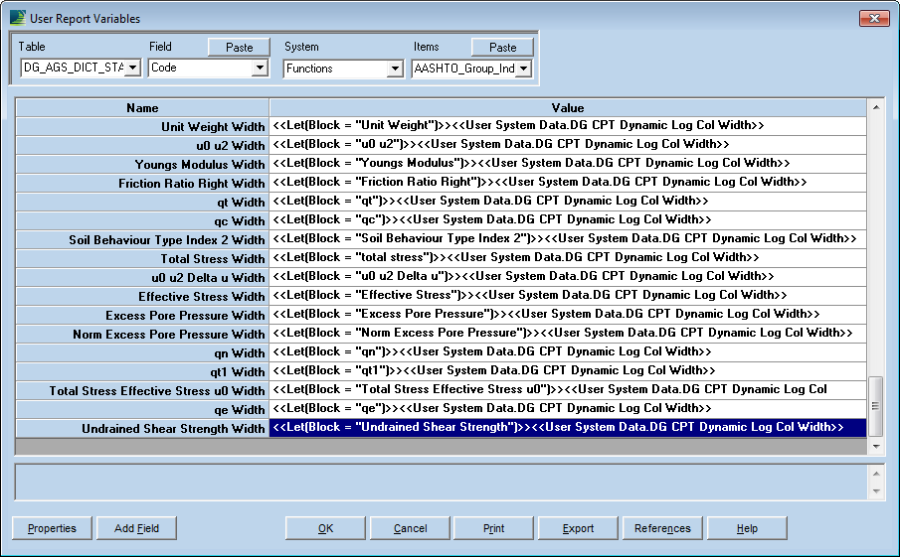
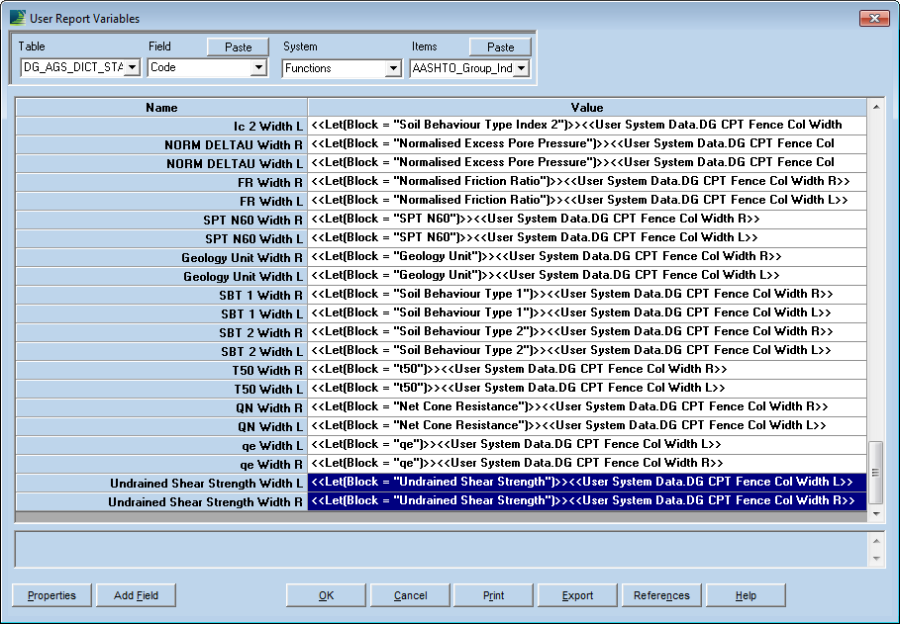
Click on the User Report Variables button, and click on the Add Field button on the bottom left. Enter the following values into the fields and click OK.
Field Name
Value
Name
Undrained Shear Strength Width
Type
Memo
- Enter <<Let(Block = "Undrained Shear Strength")>><<User System Data.DG CPT Dynamic Log Col Width>> for the Value in the newly created User Report Variable, and click OK.
- Click OK to close the Properties window and save the changes.
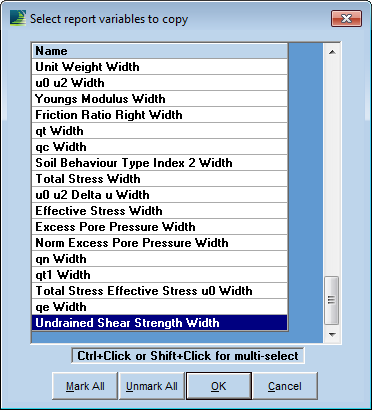
Copy the new User Report Variable to the other Dynamic Log reports: - With the CPT DYNAMIC A4P report currently open, select File > Page > Copy Report Variables, select qe Width and click OK.
- Click on the List of pages to copy to button to bring up the selection dialog. Select the Dynamic Log Reports in your library, then click OK. Note you may not have all the reports in your library as shown below.
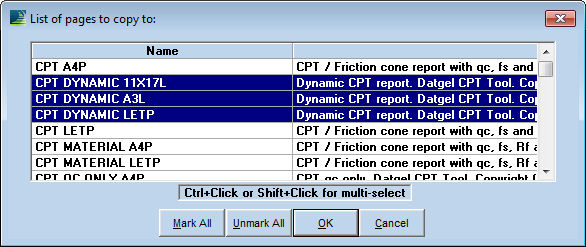
- Click OK to copy to User Report Variables to the selected Reports.
Creating the Fence Block
To create the Fence Block, make a copy of an existing correlation parameter fence block and modify it to work with the new correlation parameter. In this tutorial, you will be using the Friction Angle correlation parameter fence block as the basis for our new fence block.
Note that there are two blocks that need to be created, left and right. The fence blocks are suffixed by L and R to denote this.
- Go to REPORT DESIGN | Fences then select Blocks > Edit Fence Blocks. Select DG CPT FRICTION ANGLE L from the yellow drop down list.
- Select File > Copy Page. Enter DG CPT UNDRAINED SHEAR STRENGTH L in the Page names to copy to and click OK.
Create the right block: - From the current screen (REPORT DESIGN | Fences > Fence Blocks), select CPT FRICTION ANGLE R from the yellow drop down list.
- Select File > Copy Page. Enter DG CPT UNDRAINED SHEAR STRENGTH R in the Page names to copy to and click OK.
Add a reference to the new fence block to the Fence reports: - From the current screen (REPORT DESIGN | Fences > Fence Blocks), select DG CPT STICK from the yellow drop down list.
- Select Blocks > Insert Block and enter the following values for the left fence block, then click OK.
Main Tab:
Field Name
Value
Block Source
Int!dg cpt undrained shear strength l
Page Range
All
Design Mode Colour
Very Light Blue
Offset X
<<Let(Block = "Undrained Shear Strength")>>_
<<User System Data.DG CPT Fence Col Offset X L>>Configuration Tab:
Field Name
Value
Design Mode Offset X
-11.75
Output Condition
<<Let(Block = "Undrained Shear Strength")>>_
<<User System Data.DG CPT Fence Col Output Cond L>> - Left click on a vacant space to place the Block reference, then click Save.
- Repeat the above steps, and enter the following for the right fence block.
Main Tab:
Field Name
Value
Block Source
Int!dg cpt undrained shear strength r
Page Range
All
Design Mode Colour
Very Light Red
Offset X
<<Let(Block = "Undrained Shear Strength")>>_
<<User System Data.DG CPT Fence Col Offset X R>>Configuration Tab:
Field Name
Value
Design Mode Offset X
11.75
Output Condition
<<Let(Block = "Undrained Shear Strength")>>_
<<User System Data.DG CPT Fence Col Output Cond R>>Add a new User Report Variable to the CPT Fence reports:
- Click on the Fences tab to return to the REPORT DESIGN | Fences screen. Select the log report CPT FENCE A4P from the yellow drop down list, and select File > Page > Properties.
Click on the User Report Variables button, and click on the Add Field button on the bottom left. Enter the following values into the fields for the left fence block and click OK.
Field Name
Value
Name
Undrained Shear Strength Width L
Type
Memo
- Enter <<Let(Block = "Undrained Shear Strength")>><<User System Data.DG CPT Fence Col Width L>> for the Value in the newly created User Report Variable.
Click on the Add Field button again, and enter the following values into the fields for the right fence block, and click OK.
Field Name
Value
Name
Undrained Shear Strength Width R
Type
Memo
- Enter <<Let(Block = "Undrained Shear Strength")>><<User System Data.DG CPT Fence Col Width R>> for the Value in the newly created User Report Variable.
- Click OK to close the Properties window and save the changes.
Copy the new User Report Variable to the other CPT Fence reports: - With the CPT FENCE A4P report currently open, select File > Page > Copy Report Variables, select Undrained Shear Strength Width L and Undrained Shear Strength Width R then click OK.
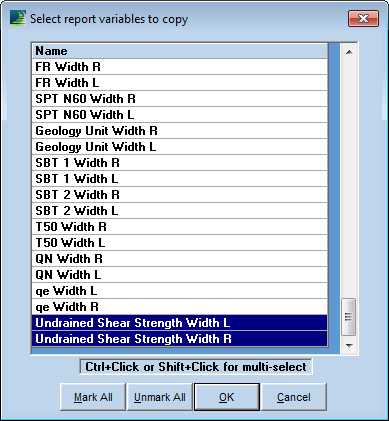
- Click on the List of pages to copy to button to bring up the selection dialog. Select the CPT Fence Reports in your library, then click OK.
Note you may not have all the reports in your library as shown below.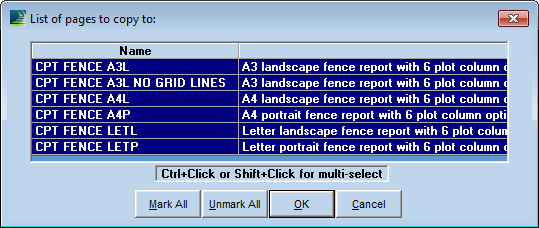
- Click OK to copy to User Report Variables to the selected Reports.
Replace Field Names in Log and Fence Blocks
All references to the original parameter (Friction Angle) need to be replaced by the new parameter (Undrained Shear Strength). The quickest and least error-prone way to do this is to use the Replace Field Names command.
Go to DATA DESIGN | Project Database, then select Tools > Replace Field Names. Click on the Field List button and enter the following values in the table grid. The <<…>> is optional.
Find | Replace |
|---|---|
<<CPT_DATA.Friction_Angle_1>> | <<CPT_DATA.Undrained_Shear_Strength_1>> |
<<CPT_DATA.Friction_Angle_2>> | <<CPT_DATA.Undrained_Shear_Strength_2>> |
<<CPT_DATA.Friction_Angle_3>> | <<CPT_DATA.Undrained_Shear_Strength_3>> |
<<CPT_DATA.Friction_Angle_4>> | <<CPT_DATA.Undrained_Shear_Strength_4>> |
<<CPT_DATA.Friction_Angle_5>> | <<CPT_DATA.Undrained_Shear_Strength_5>> |
<<CPT_DATA.Friction_Angle_6>> | <<CPT_DATA.Undrained_Shear_Strength_6>> |
<<Report Var.Friction Angle Width>> | <<Report Var.Undrained Shear Strength Width>> |
<<Report Var.Effective Friction Angle Width L>> | <<Report Var.Undrained Shear Strength Width L>> |
<<Report Var.Effective Friction Angle Width R>> | <<Report Var.Undrained Shear Strength Width R>> |
<<User System Data.DG CPT Param Friction Angle>> | <<User System Data.DG CPT Param Undrained Shear Strength>> |
- Click on the Reports to Scan button. Select the following items in the list then Click OK.
- LogBlk!DG CPT UNDRAINED SHEAR STRENGTH
- FenceBlk!DG CPT UNDRAINED SHEAR STRENGTH L
- FenceBlk!DG CPT UNDRAINED SHEAR STRENGTH R
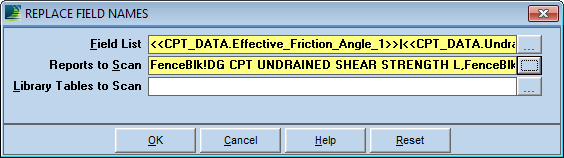
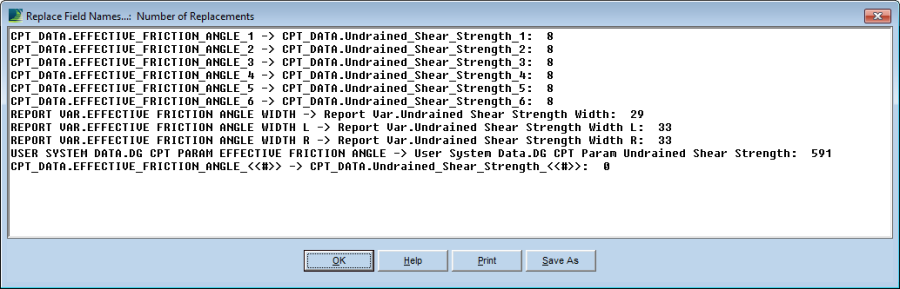
- Click OK to run the command. View the report to ensure that replacements were made and click OK.
At this point, you have completed creating the Dynamic Log Block and Fence Block for the Undrained Shear Strength correlation parameter. Ensure that you have data in Undrained_Shear_Strength_#, and test the output of the new correlation in your Dynamic Log and Fence reports.