Configuration Details
Introduction
To view the Configuration Details, click on the Details button. In this menu the user will be able to set up the configuration of the Datgel Security Tool Enterprise for each user and groups.
Configuration Details
This screen contains two panels, the Header Information (collapsed by default at top) and the configuration details itself. Clicking the Show Header Information would expand open the header information for viewing and editing. This panel shows the information related to the current Configuration (Name and Remark). A Guide is shown in each screen and contains instructions and information about the current screen. Clicking Hide Header Information would collapsed back this panel at top giving a larger view of configuration details.
The lower part of the screen contains the labels/sub-menus related to the Configuration setup. These sub-menus are explained in the following sections of the user guide.
Click Return to List to go to the Configuration screen.
Overview
This sub-menu contains the main information related to the Configuration such as the Data Template, the Related Database and Projects and the Security Objects.
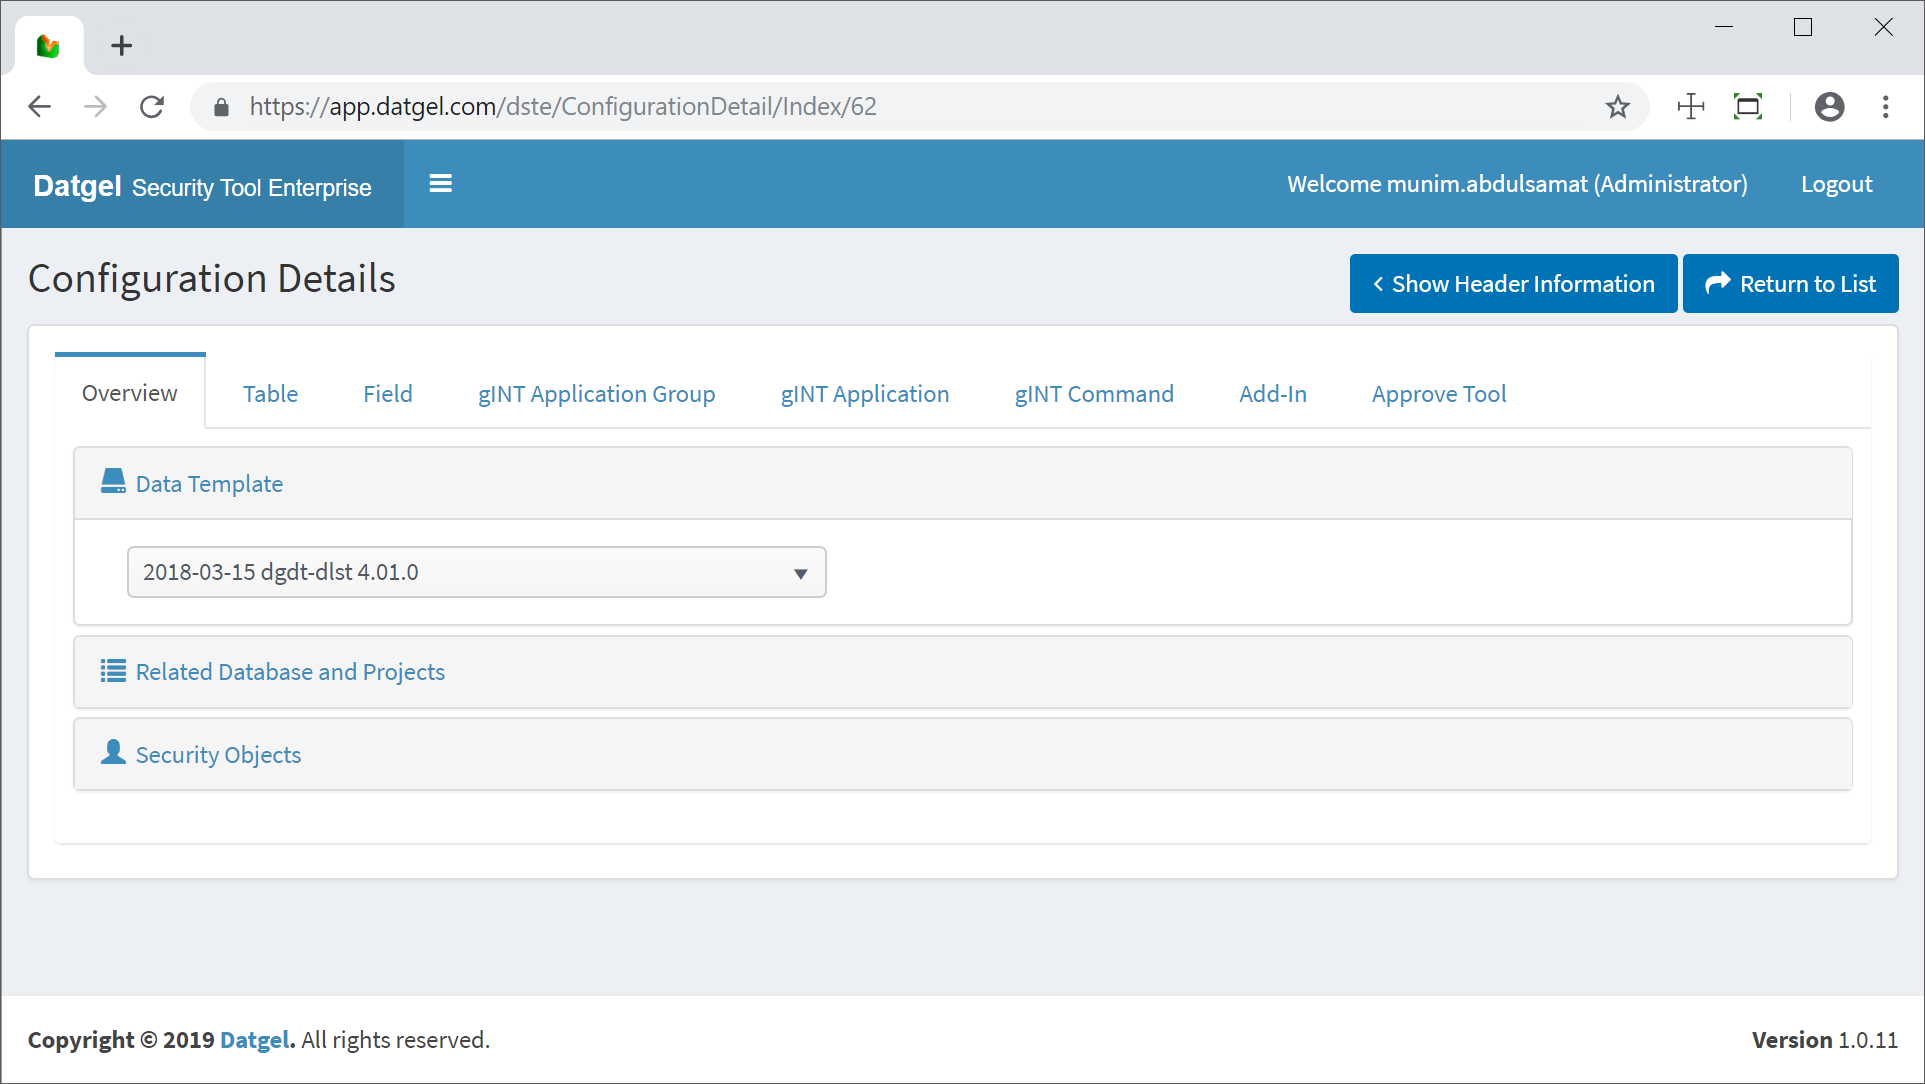
Data Template
A Data Template must be selected from the drop-down list to set up a Configuration. The Data Template is the SQL Server gINT database that will provide the tables and field names used by the Configuration. Often the selected data template is a database protected by this configuration.
When the user wants to change the existing Data Template, after selecting the required new Data Template a message will prompt with two options:
- Change & Validate if you want to change the Data Template and retain all existing values, which would retain some old records for things that don't exist in the new Data Template.
- Change & Purge to delete all settings related to tables and fields, and add new records from the new Data Template.
Change a Data Template Option message
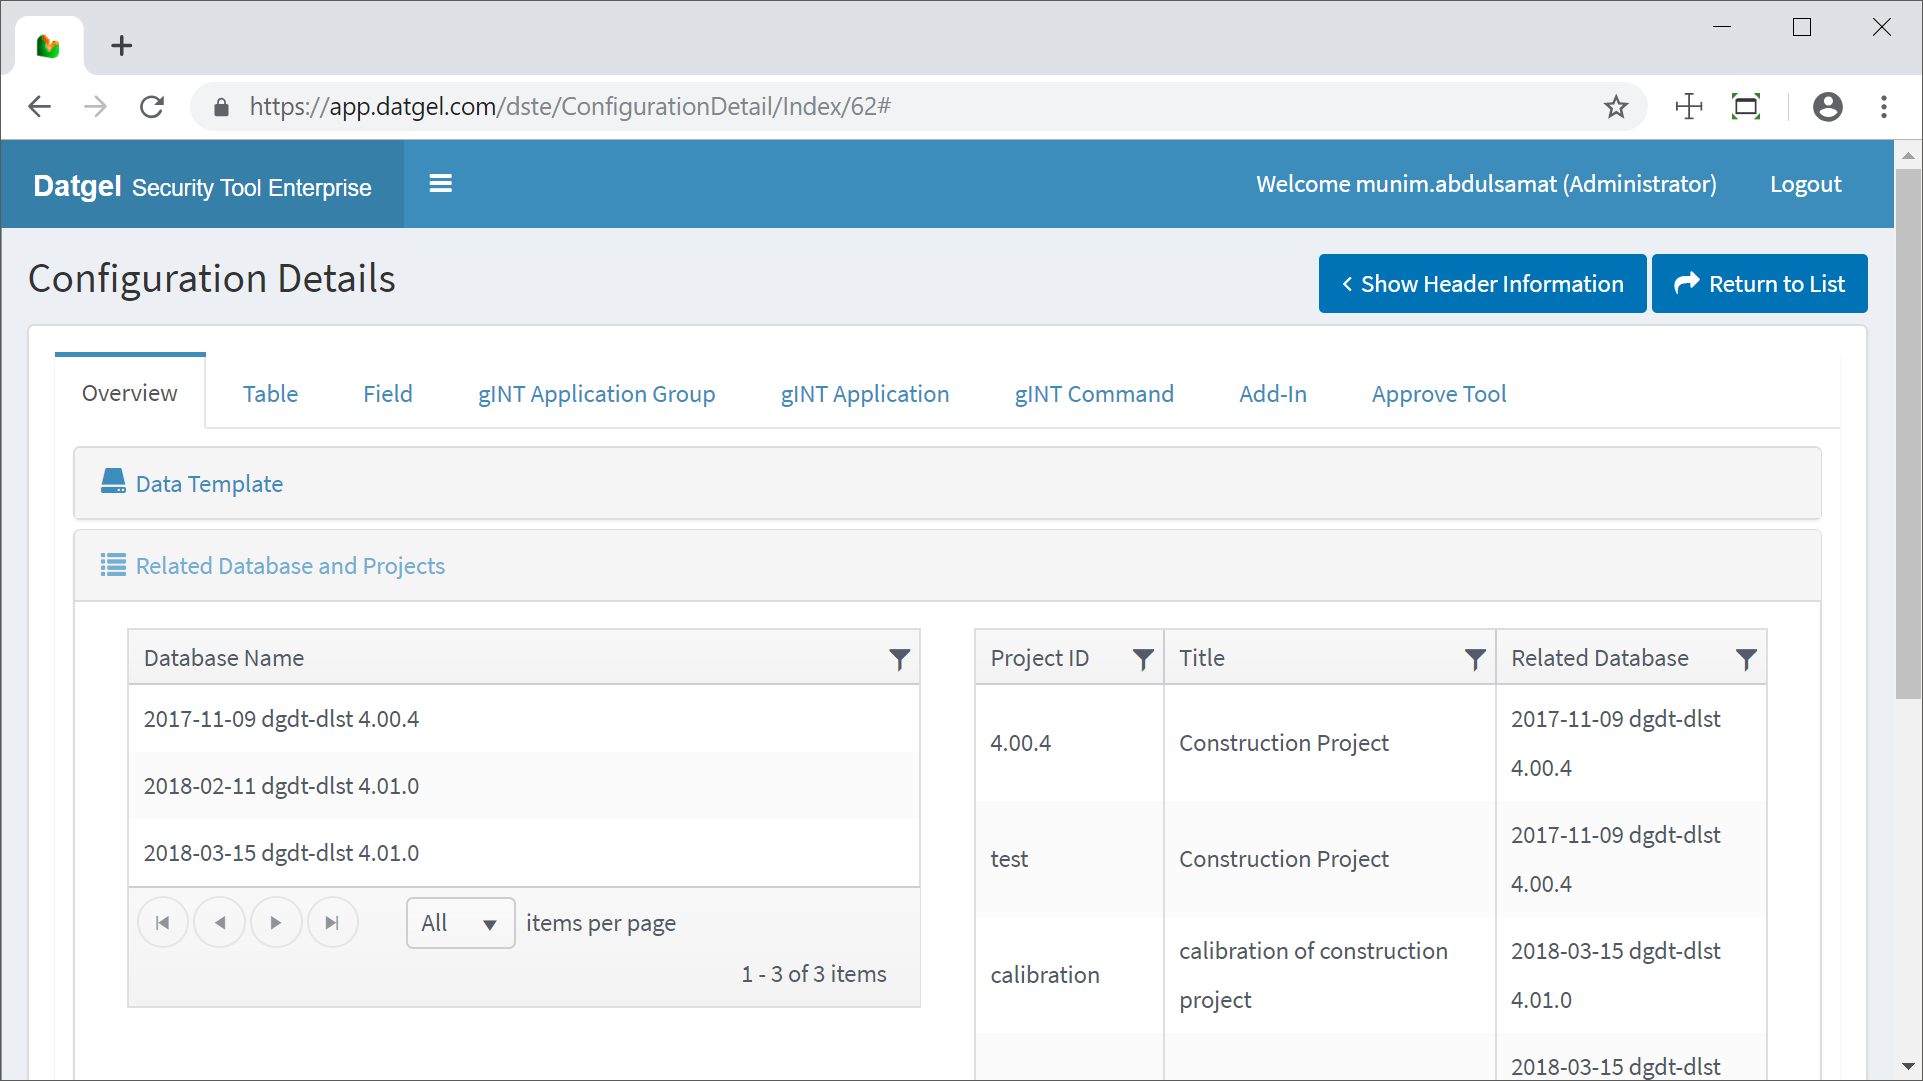
Related Database and Projects
The Related Database and Projects shows the Database and Projects assigned to the selected configuration. To see how to assign a configuration to a database, see Assign a Configuration to a Database or a gINT Project.
Configuration – Related Database and Projects
Security Objects
Add a Security Object
Click on + Add new record and select a Security Object Name from the drop-down list, select a Maximum Status from the drop-down list and introduce a description and click Update.
Configuration – Security Objects
Modify a Security Object
To modify either the name, the Maximum Status, the description or the Read Only, click on Edit button, do the required modifications and click Update. The modifications will be stored.
| Read Only | Description |
|---|---|
| Yes | Overrides current configuration and disallow changes to all tables and fields |
| No | Conform to table and field current configuration |
Delete a Security Object
To delete an existing Security Object check the box of the Security Object to be deleted and click on Delete. A message will prompt before the deletion, click Yes to proceed and the Security Object will be deleted.
Table
Overview
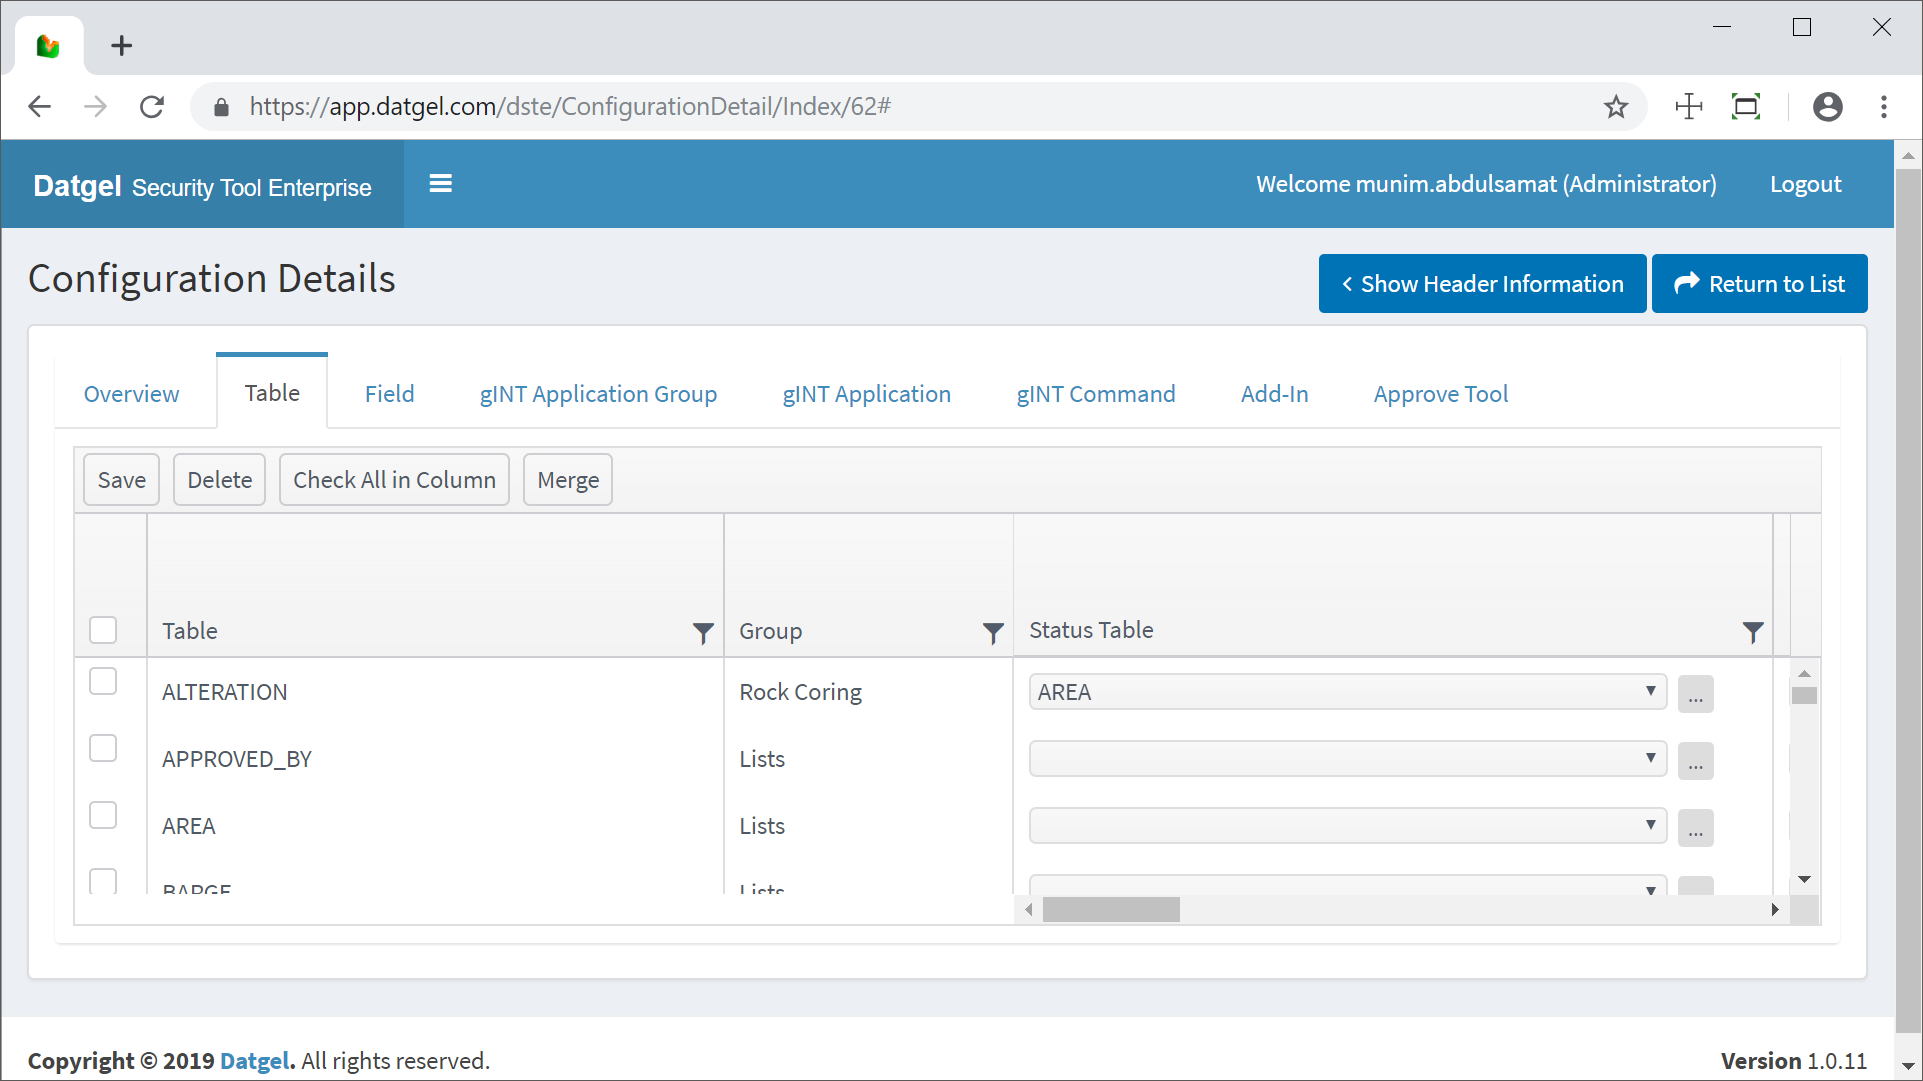
This list is automatically populated with all tables of the selected Data Template and is the screen that requires the most configuration effort.
Configuration – Table grid
Status Table and Status Field
If you want to control users editing data on a table based on the value set in a Status field, then you need to configure these cells. A normal situation is you want to control the editing of records based on a value set in a Status field on the current table or a parent table. The status field value must be less than or equal to the maximum security status set for the Security Object currently in use.
For example: Table = ALTERATION, Status Table = POINT, Status Field = Point_Status. Members of a Security Object may edit a keyset of data on this table if the maximum security status is higher than the Point_Status value for the current PointID.
Another option is to control data on a table based on status values in many child tables. Under this scenario, The DSTE assumes the Status field name is the same on all related tables, and you need to select the multiple child tables using the […] button.
Note you can copy and paste cells.
Show/hidden option
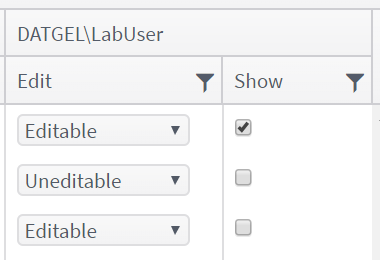
For each table you may assign if the table is visible or not (Show = checked for visible, Show = unchecked for hidden) for each Security Object.
Editable/Uneditable option
Each table in the database may be configured according to the project's and Security Object's needs.
Table permissions control
- Assign a Table as Uneditable and any changes will be disallowed for the table and security object.
- Assign a Table as Editable and any changes will be allowed for the table and security object.
- Assign a Table as Not Set and any changes will be controlled by the Status table/field if it was set for the table and security object.
Select/Deselect checkboxes
Click Select/Deselect All to check or uncheck all tables for all Security Objects. If there is more than one Security Object, to select or deselect all checkboxes for a particular security object column the user must highlight the required column and click on Select/Deselect Column button.
By clicking on the Merge button, data from other configuration may be merged.
Filters
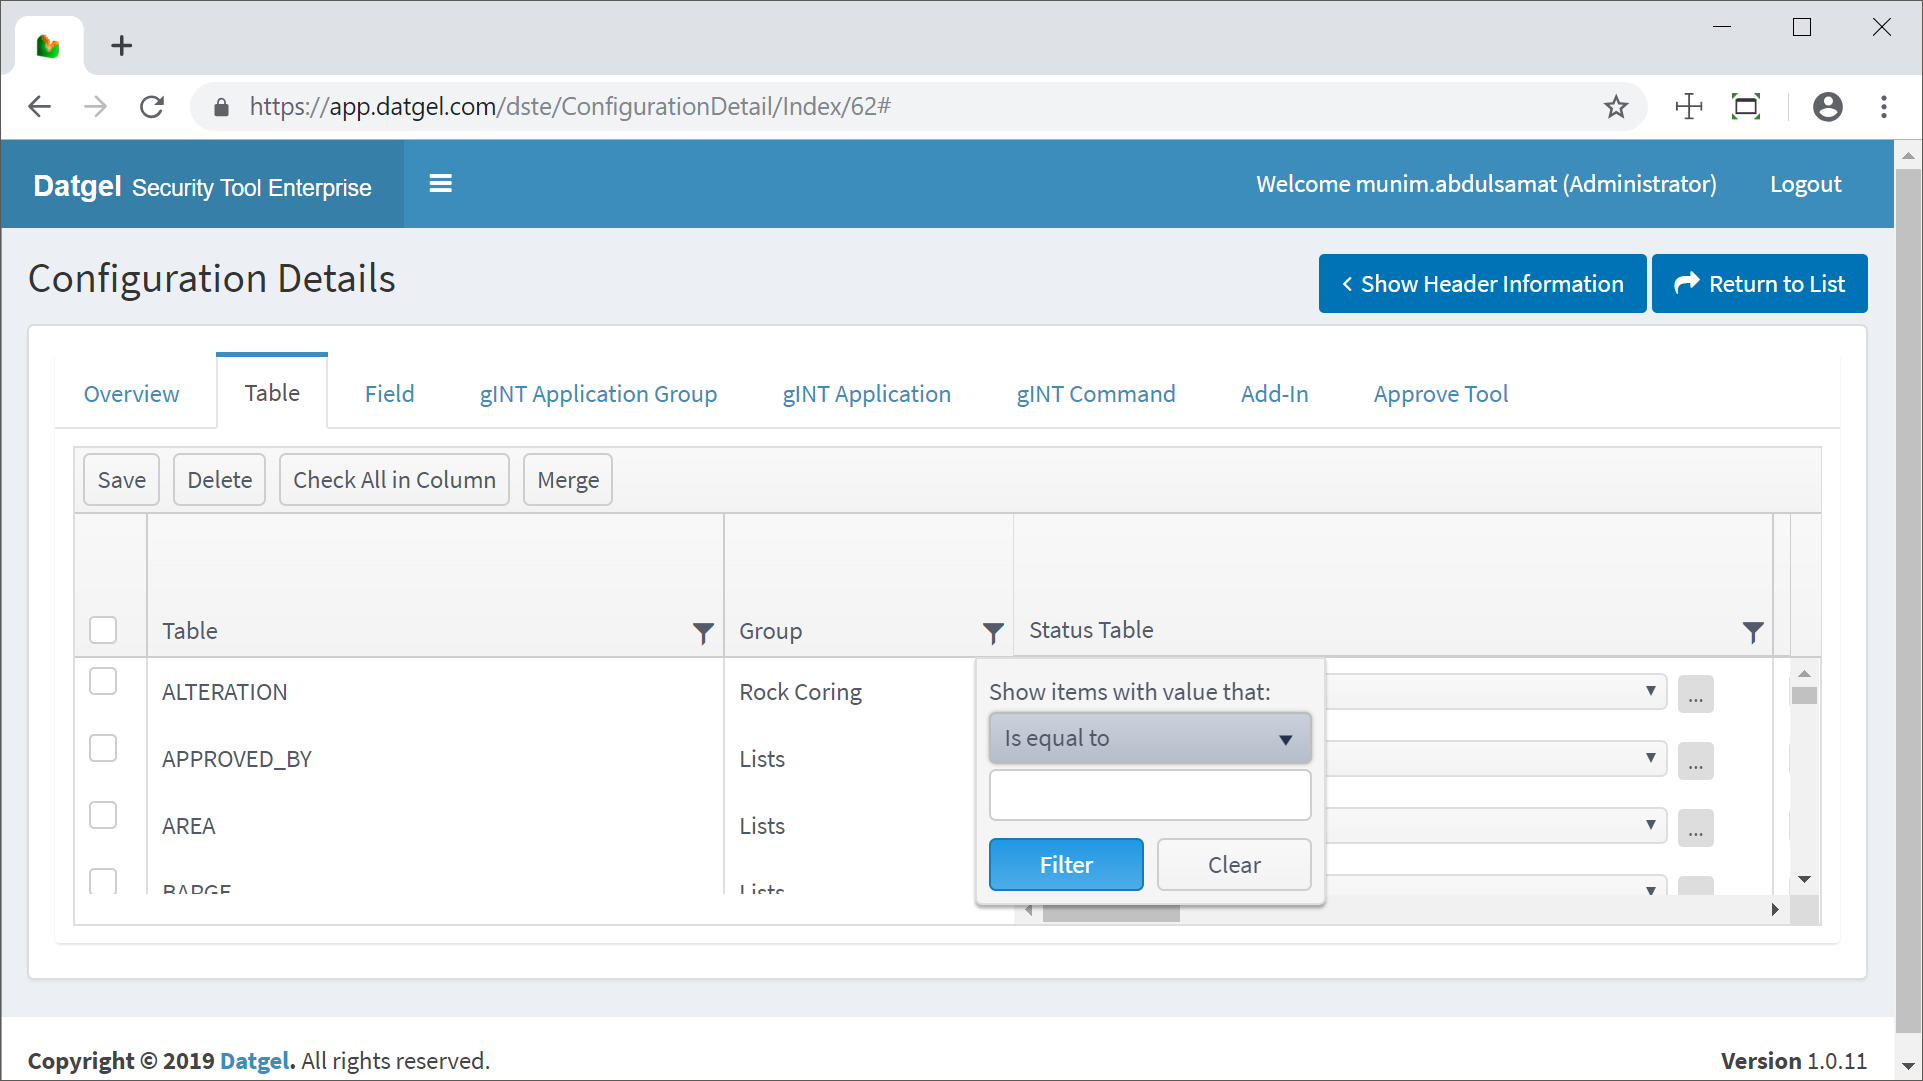
A filter can be applied in all columns. Click to show the filter options. Select the operator in the drop-down list and the 'word' to be filtered and click Filter.
To restore the filter click and Clear button.
Column Filter options
Linked Tables
This option applies where multiple gINT projects exist in a database, and some require all the same lists. The database concept makes easier to maintain the same list and map data in all databases.
To select Linked tables, go to table Grid and tick the checkbox for the required Linked tables in the Linked Table column.
Example: Create a new "Reference" project in the Database. Make sure it has all the list and calibration data you require, and lists tables. You can see which tables are linked by going to Configuration Details | Table, the Linked_Table checkbox in the Linked Table column defines which tables are linked. The selected tables can be modified according to the project needs.
Then set the field on the PROJECT table Linked_Project with the "Reference" GDMS_ID for each of the working projects. Don't enter anything in the Linked_Project field for the "Reference" project.
To update the linked data run the command Add-Ins > Datgel Security Tool Enterprise > Update Linked Tables. Do this in each of the working projects.
The Add-in deletes data in linked tables for the current project and copies data from "Reference" project in same SQL server database.
Field
The Security Configuration can be applied to specified fields. For each Security Object, we may define a list of fields that the Security Object can always edit and/or see.
Filters, Select/Deselect Column and Select/Deselect All buttons functions have the same properties as explained in sections Select/Deselect and Filters above.
Add a Field
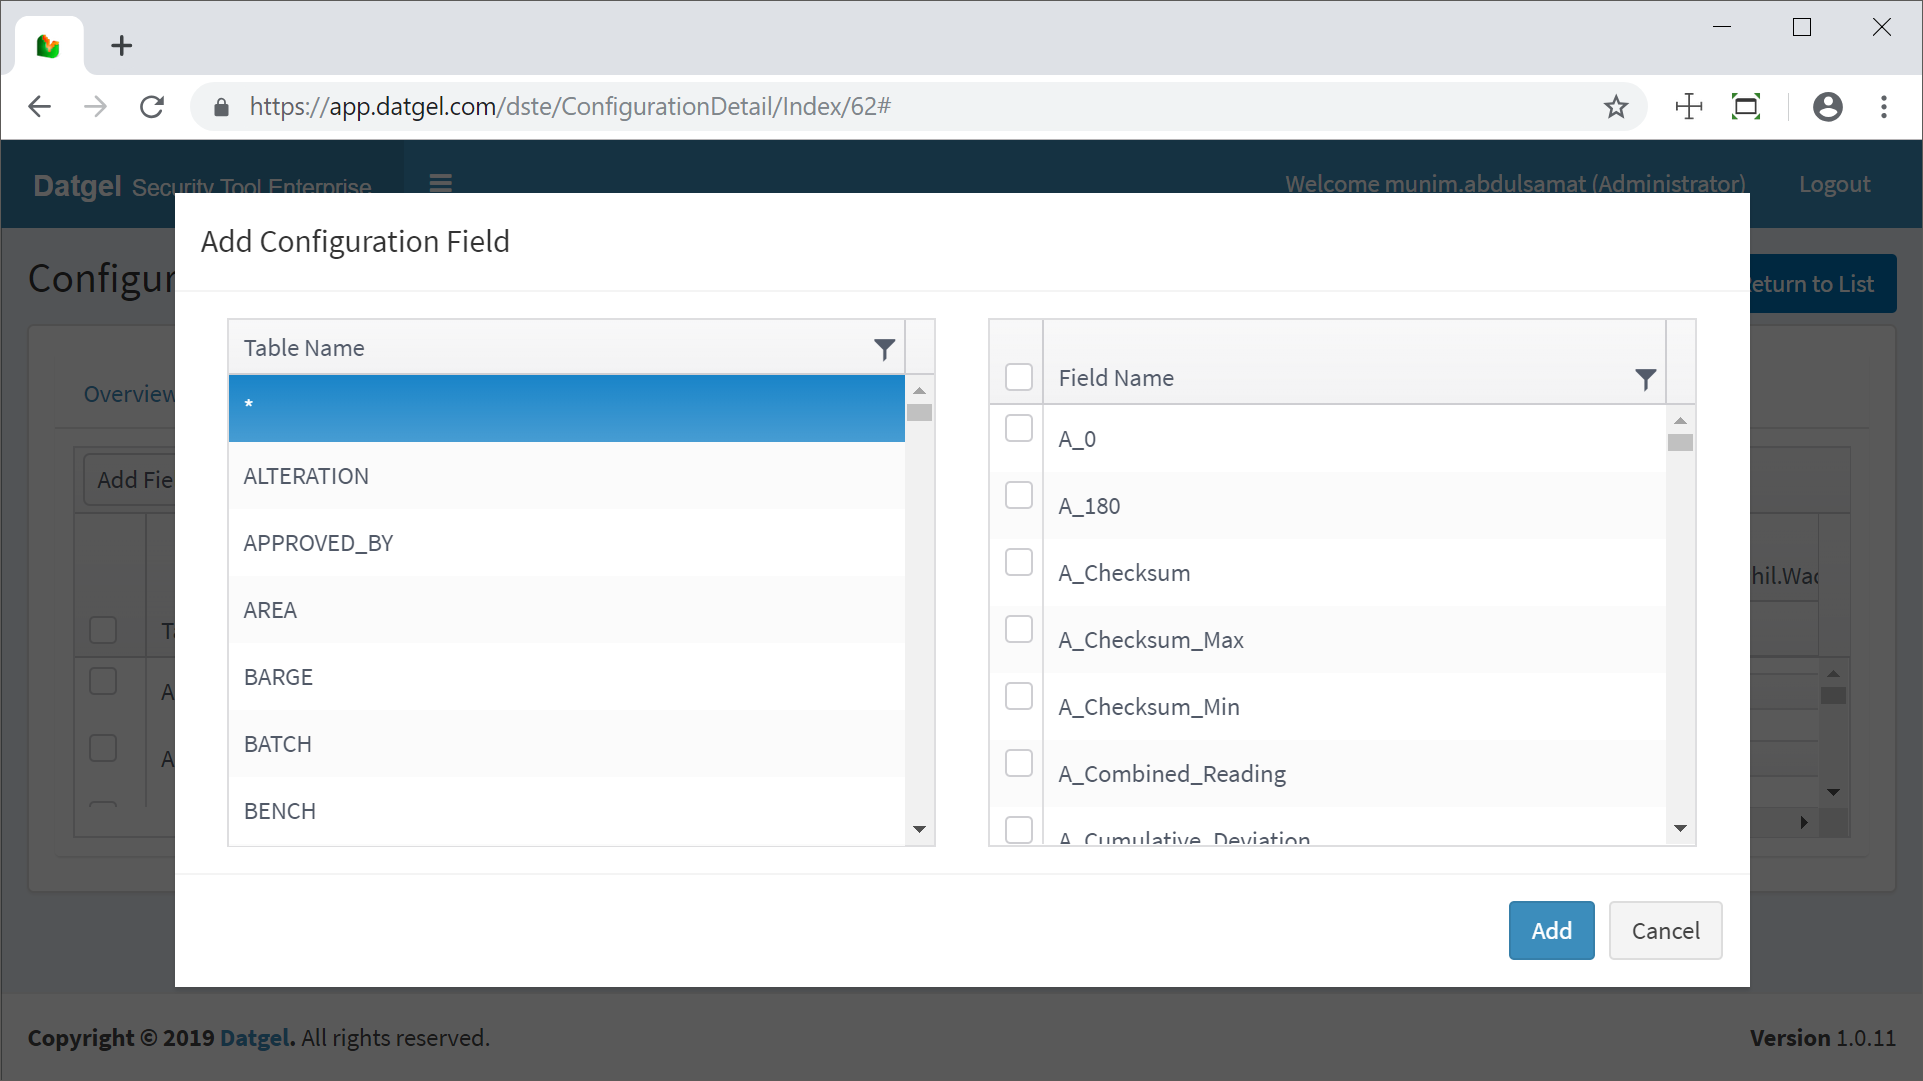
Click Add Fields and the Add Configuration Fields window will be opened. This window contains two grids, list of tables on left and corresponding fields on the right. Select from the left grid the required table to populate the corresponding table fields at right grid. Multiple fields can be chosen at once and click Add. The selected fields will be added to the Field list.
The left grid can be set to * as a wild character listing all available fields in every table.
By clicking on the Merge button, data from other configuration can be merged to current configuration.
Add new field
Configuration – Field
Show/hidden option
For each field you may assign if the table is visible or not (checked for visible, unchecked for hidden) for each Security Object.
Editable/Uneditable option
Editable/Uneditable property only applies when the Status Field and these fields are in the same table, e.g. if on the Table tab you have POINT table as Status Table with Point_Status as Status field, then only the fields defined in this tab which are in POINT table will be checked.
Edit property logic
The Edit column comprise of 3 options for user to choose that are Not set, Editable and Uneditable. The user may set a status to a field of a particular table (explicitly set) or to all tables (wild character) where this target field may exist. In the event where both a particular and wild table is configured for the same field, the Edit status which table is explicitly set would take precedence over the wild. If the derived Edit status of a field is Not set, the Edit status of corresponding table set under Configuration Table would then take precedence over the field's.
| Edit status | Behavior |
|---|---|
| Not set | Amendments against target field allowed given corresponding status field value does not exceed user maximum status defined |
| Editable | Amendments against target field allowed |
| Uneditable | Amendments against target field not allowed |
gINT Application Group
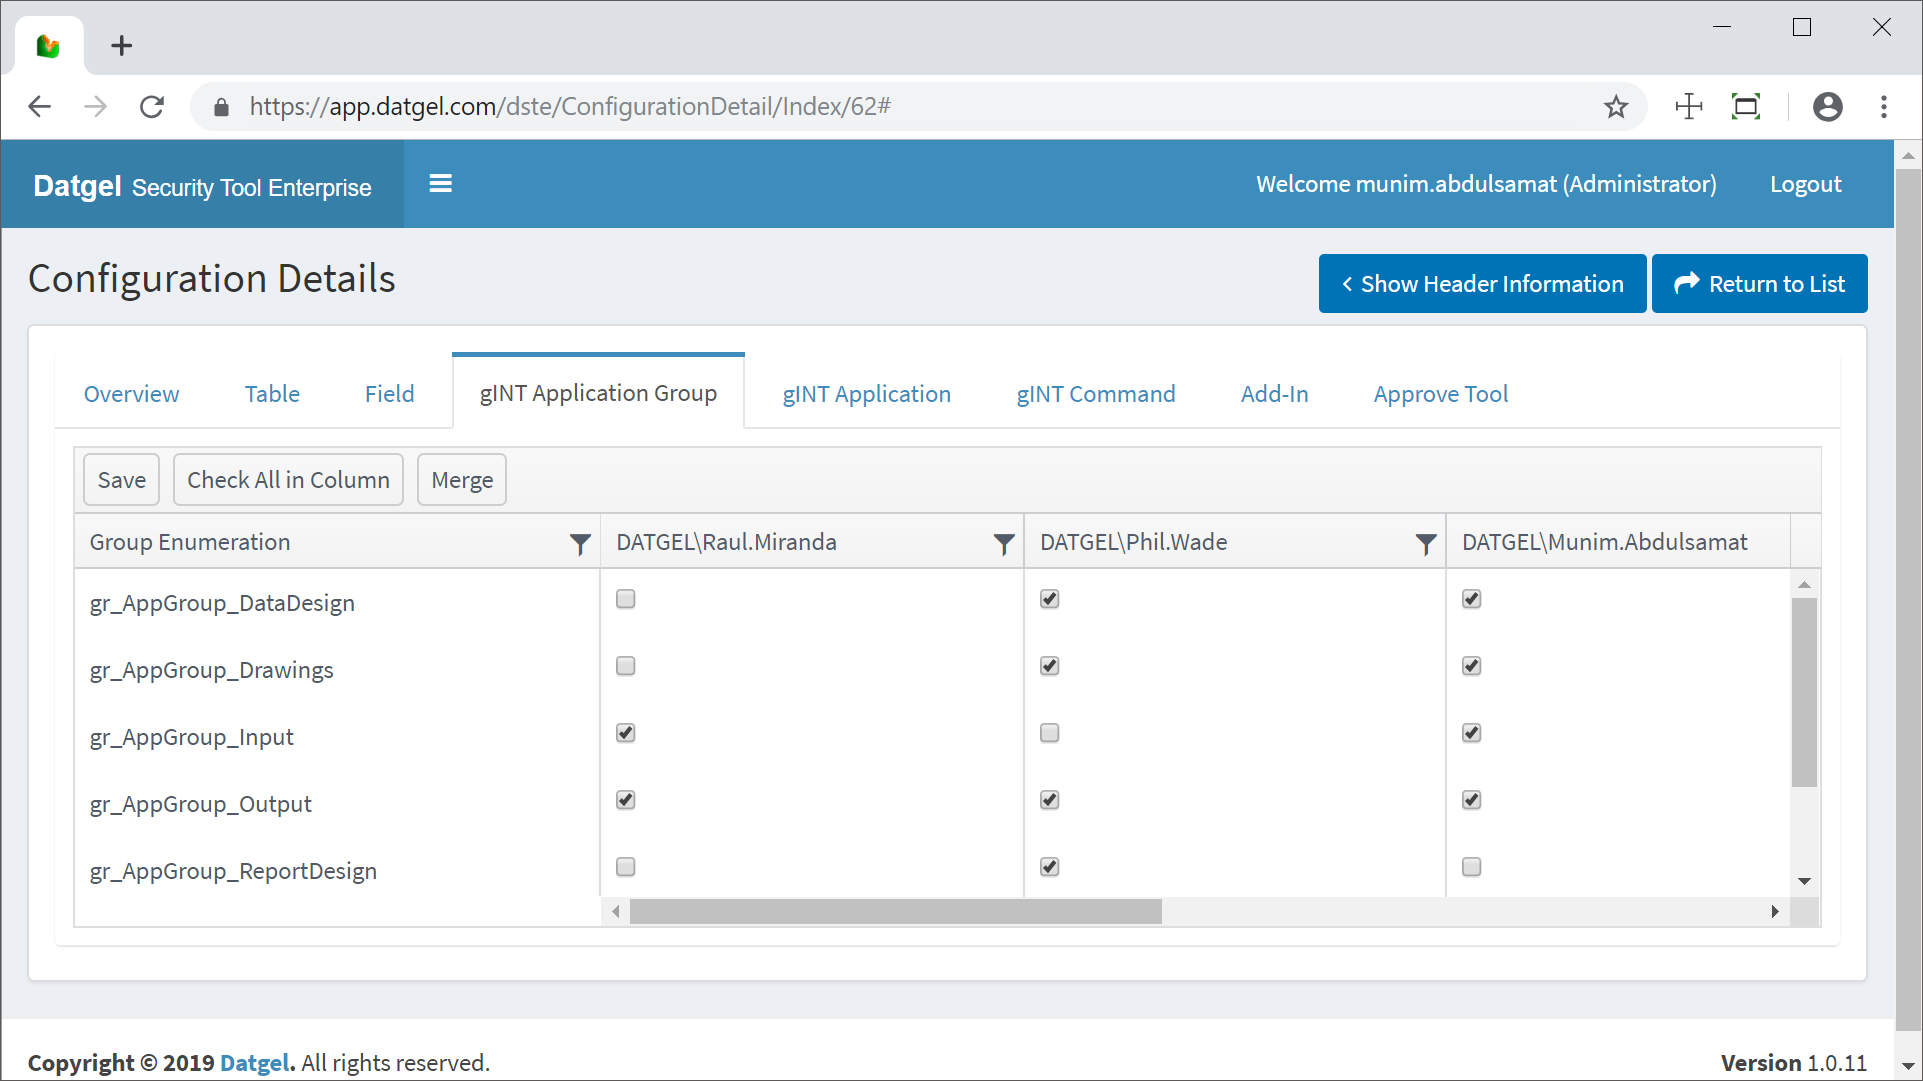
The application group list is populated with the data stored in Global Lists > gINT Application Group. For each Security Object, we may define a list of gINT Application Groups that the Security Object can use/see.
Application Group and Application show/hide apply on opening gINT, then the configuration applied will be the Instance level configuration (selected in Databases and Projects menu).
Configuration – Application Group
Check to display or uncheck to hide one or more Application Group for every Security Object.
By clicking on the Merge button, data from other configuration may be merged.
Filters, Select/Deselect Column and Select/Deselect All buttons functions have the same properties as explained in sections Select/Deselect and Filters above.
gINT Application
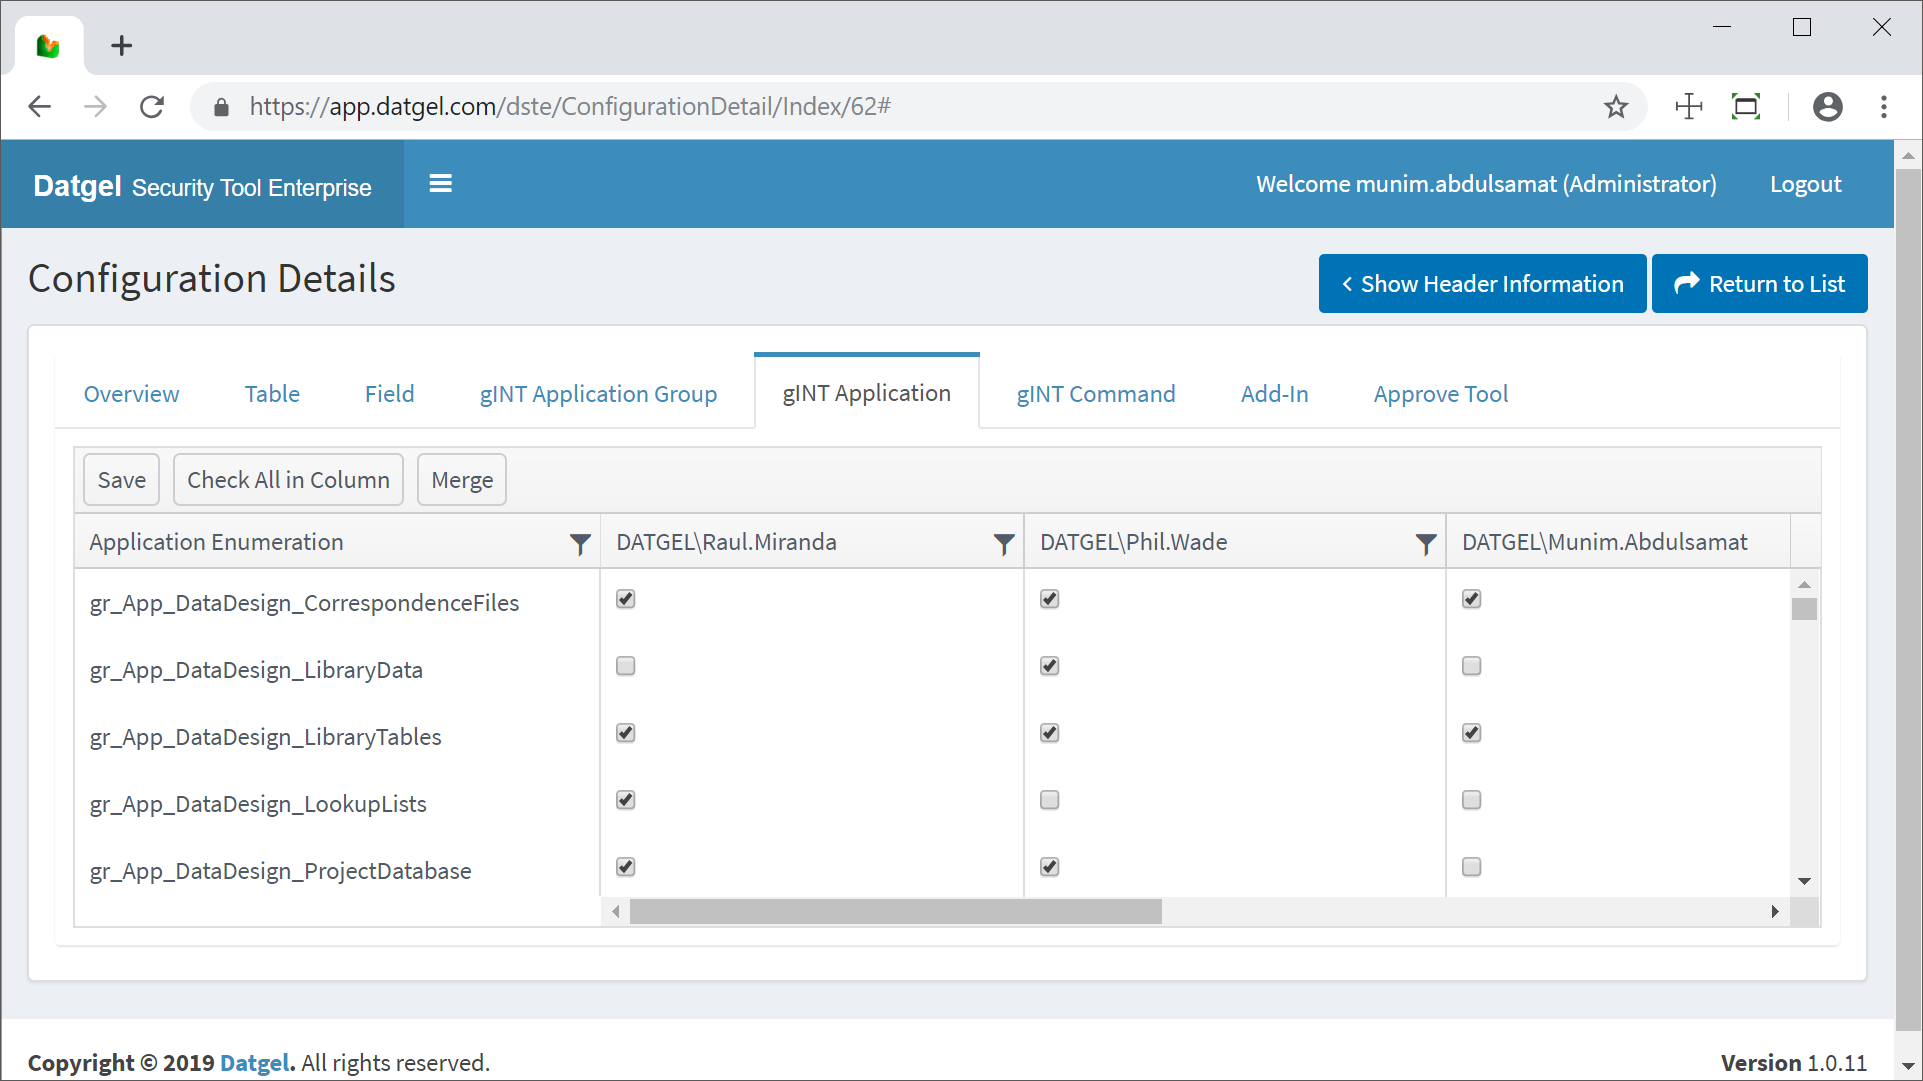
The application list is populated with the data stored in Global Lists > gINT Application. For each Security Object, we may define a list of gINT Applications that the Security Object can use.
Configuration – gINT Application
Check to display or uncheck to hide one or more gINT Applications for every Security Object.
By clicking on the Merge button, data from other configuration may be merged.
Filters, Select/Deselect Column and Select/Deselect All buttons functions have the same properties as explained in sections Select/Deselect and Filters above.
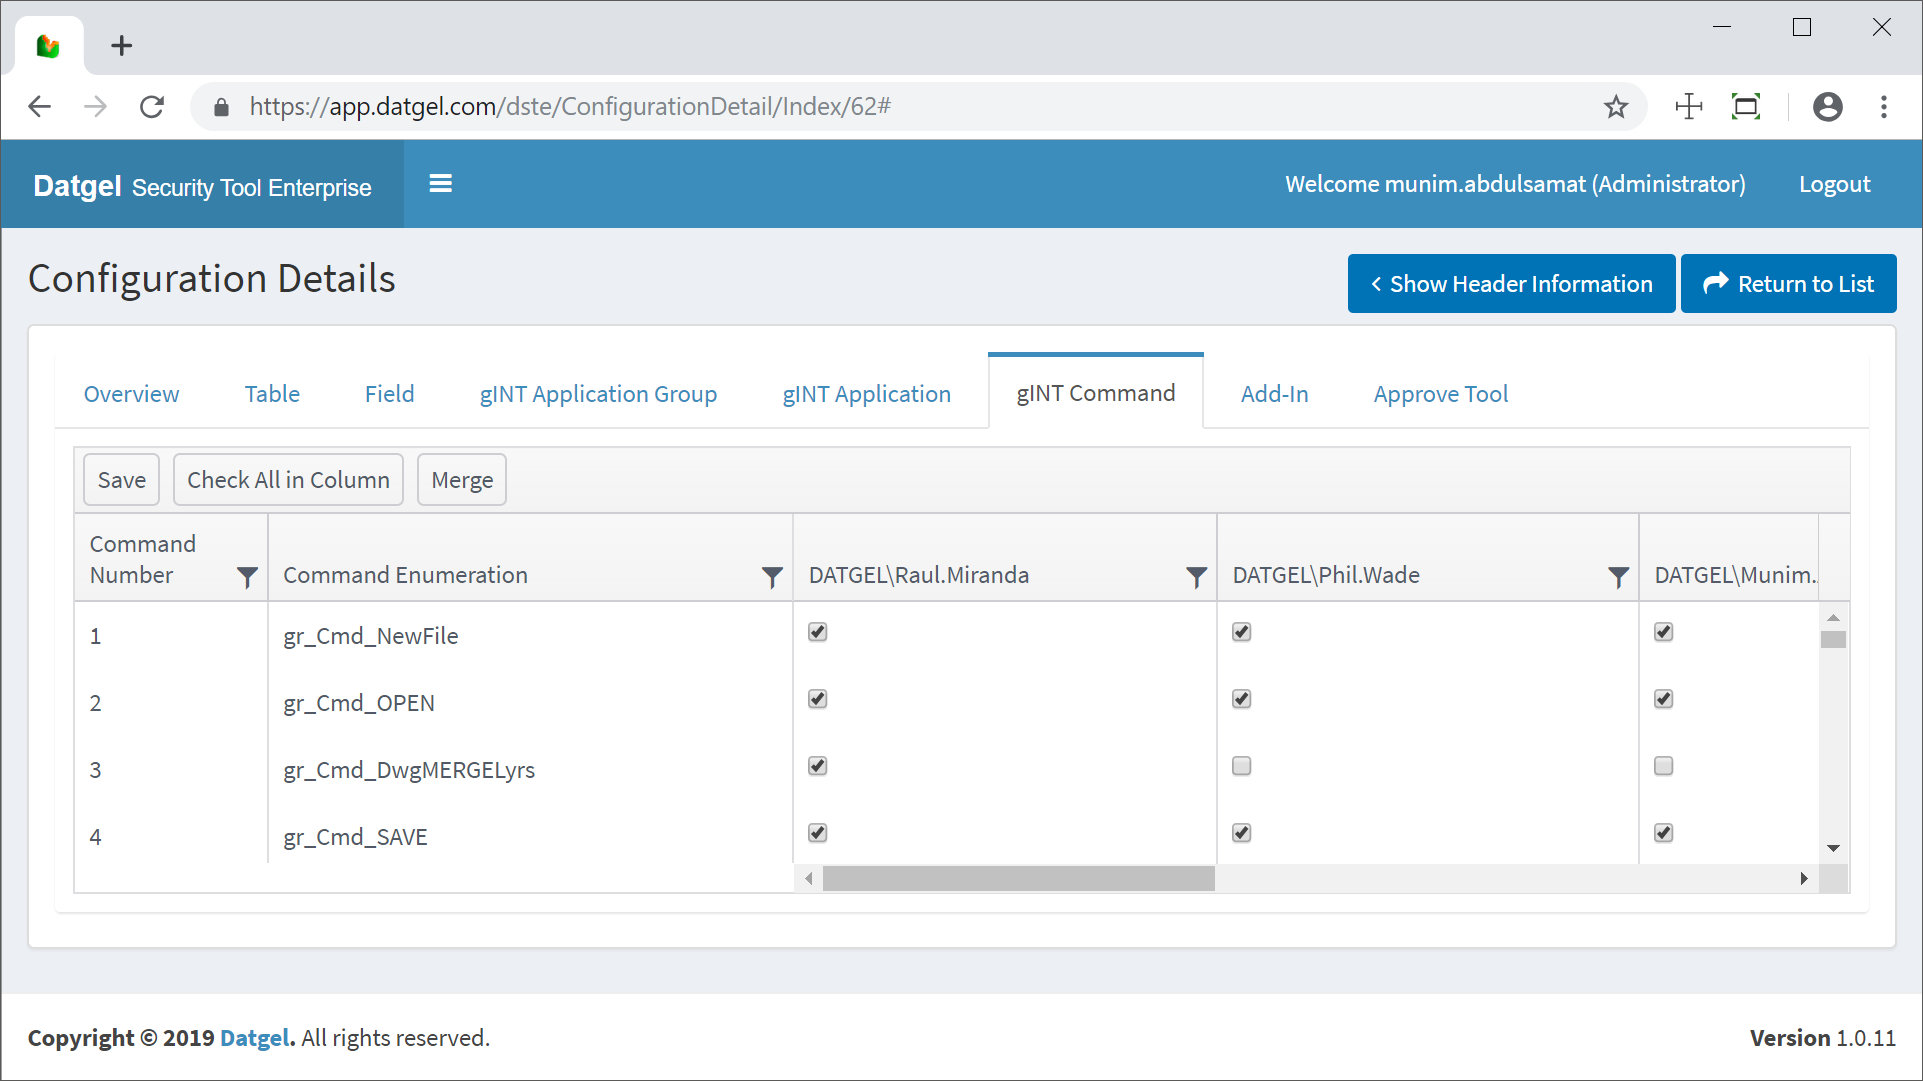
gINT Command
The Command list is populated with the data stored in Global Lists > gINT Command. For each Security Object, we may define a list of gINT Commands that the Security Object can use.
Configuration – gINT Commands
Check to allow or uncheck to disallow one or more commands for every Security Object.
By clicking on Merge button, data from other configuration may be merged.
Filters, Select/Deselect Column and Select/Deselect All buttons functions have the same properties as explained in sections Select/Deselect and Filters above.
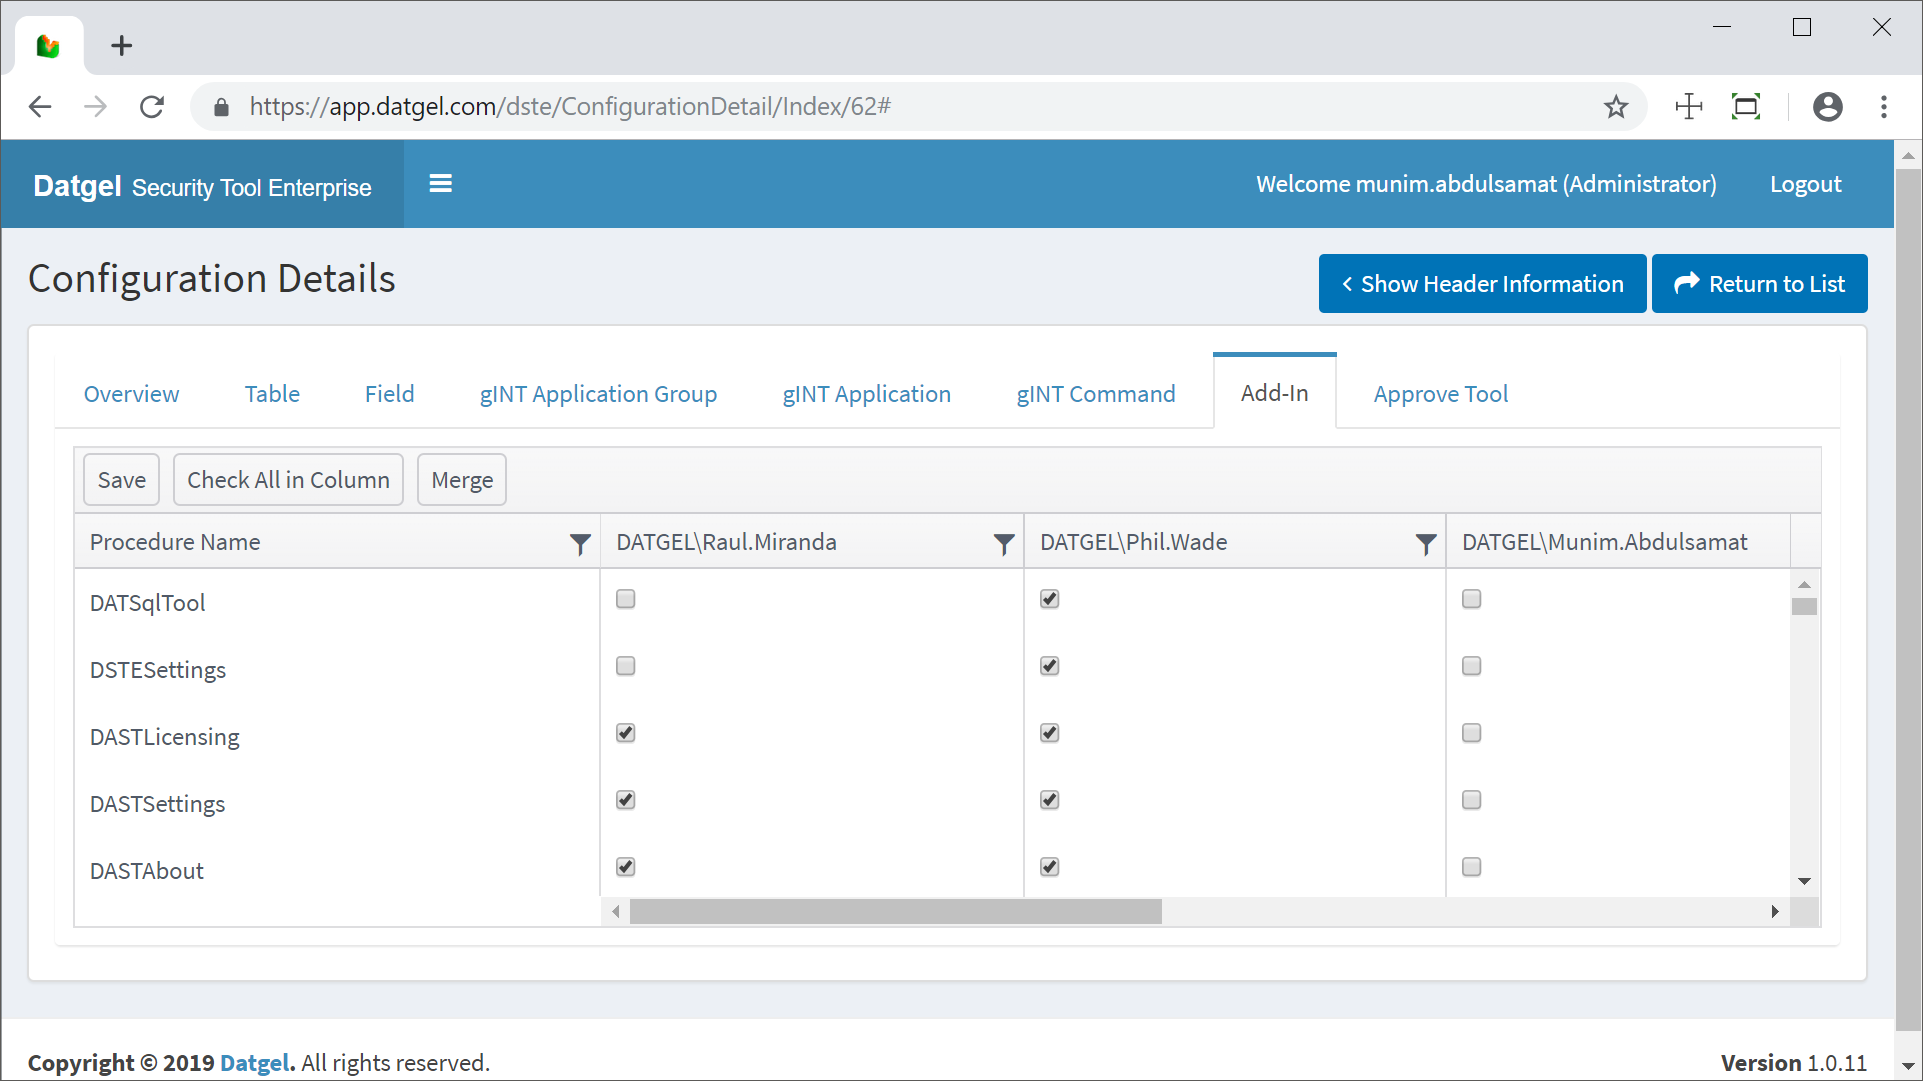
Add-In
The add-in list is populated with the data stored in Global Lists > Add-In. For each Security Object, we may define a list of add-ins that the Security Object can use.
Configuration – Add-in
Check to allow or uncheck to disallow one or more add-ins for every Security Object.
By clicking on the Merge button, data from other configuration may be merged.
Filters, Select/Deselect Column and Select/Deselect All buttons functions have the same properties as explained in sections Select/Deselect and Filters above.
By clicking on the Merge button, data from other configuration may be merged.
Approve Tool Configuration
The displayed fields in the Point table, the test tables list, monitoring readings tables list and the Approved By list can be configured here for the current configuration.
The Approved By list is defined by the values in the project table APPROVED_BY, which is generally located in the Lists group in INPUT.
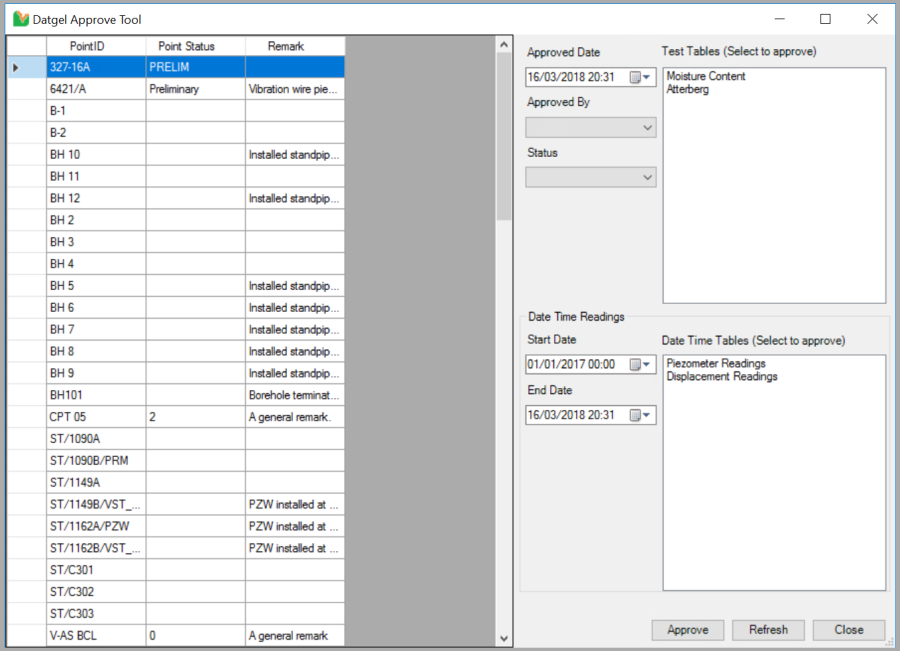
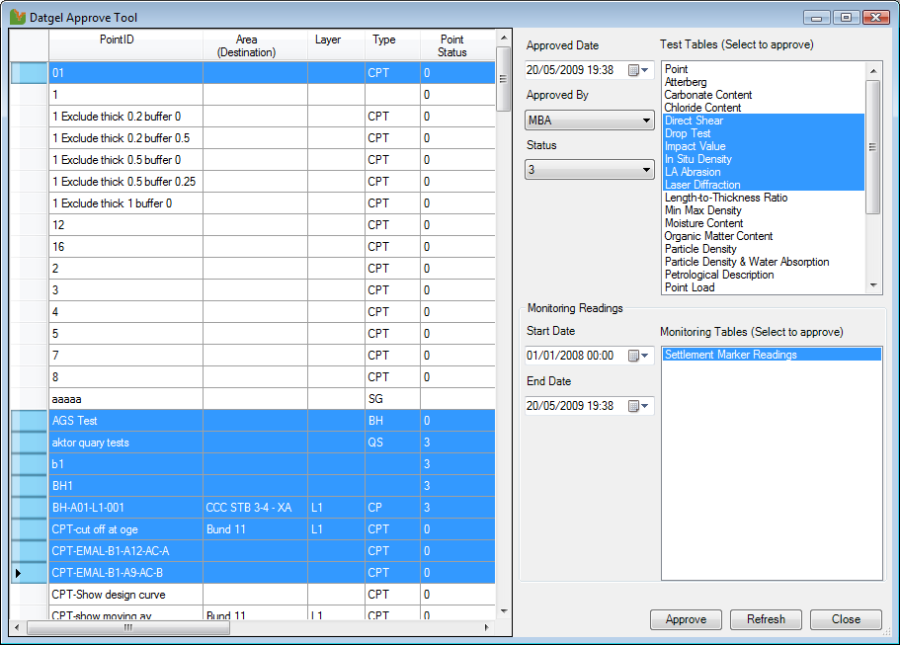
The Approve Tool is an add-in launched from the Add-Ins menu in gINT INPUT.
Approve Tool Add-in form
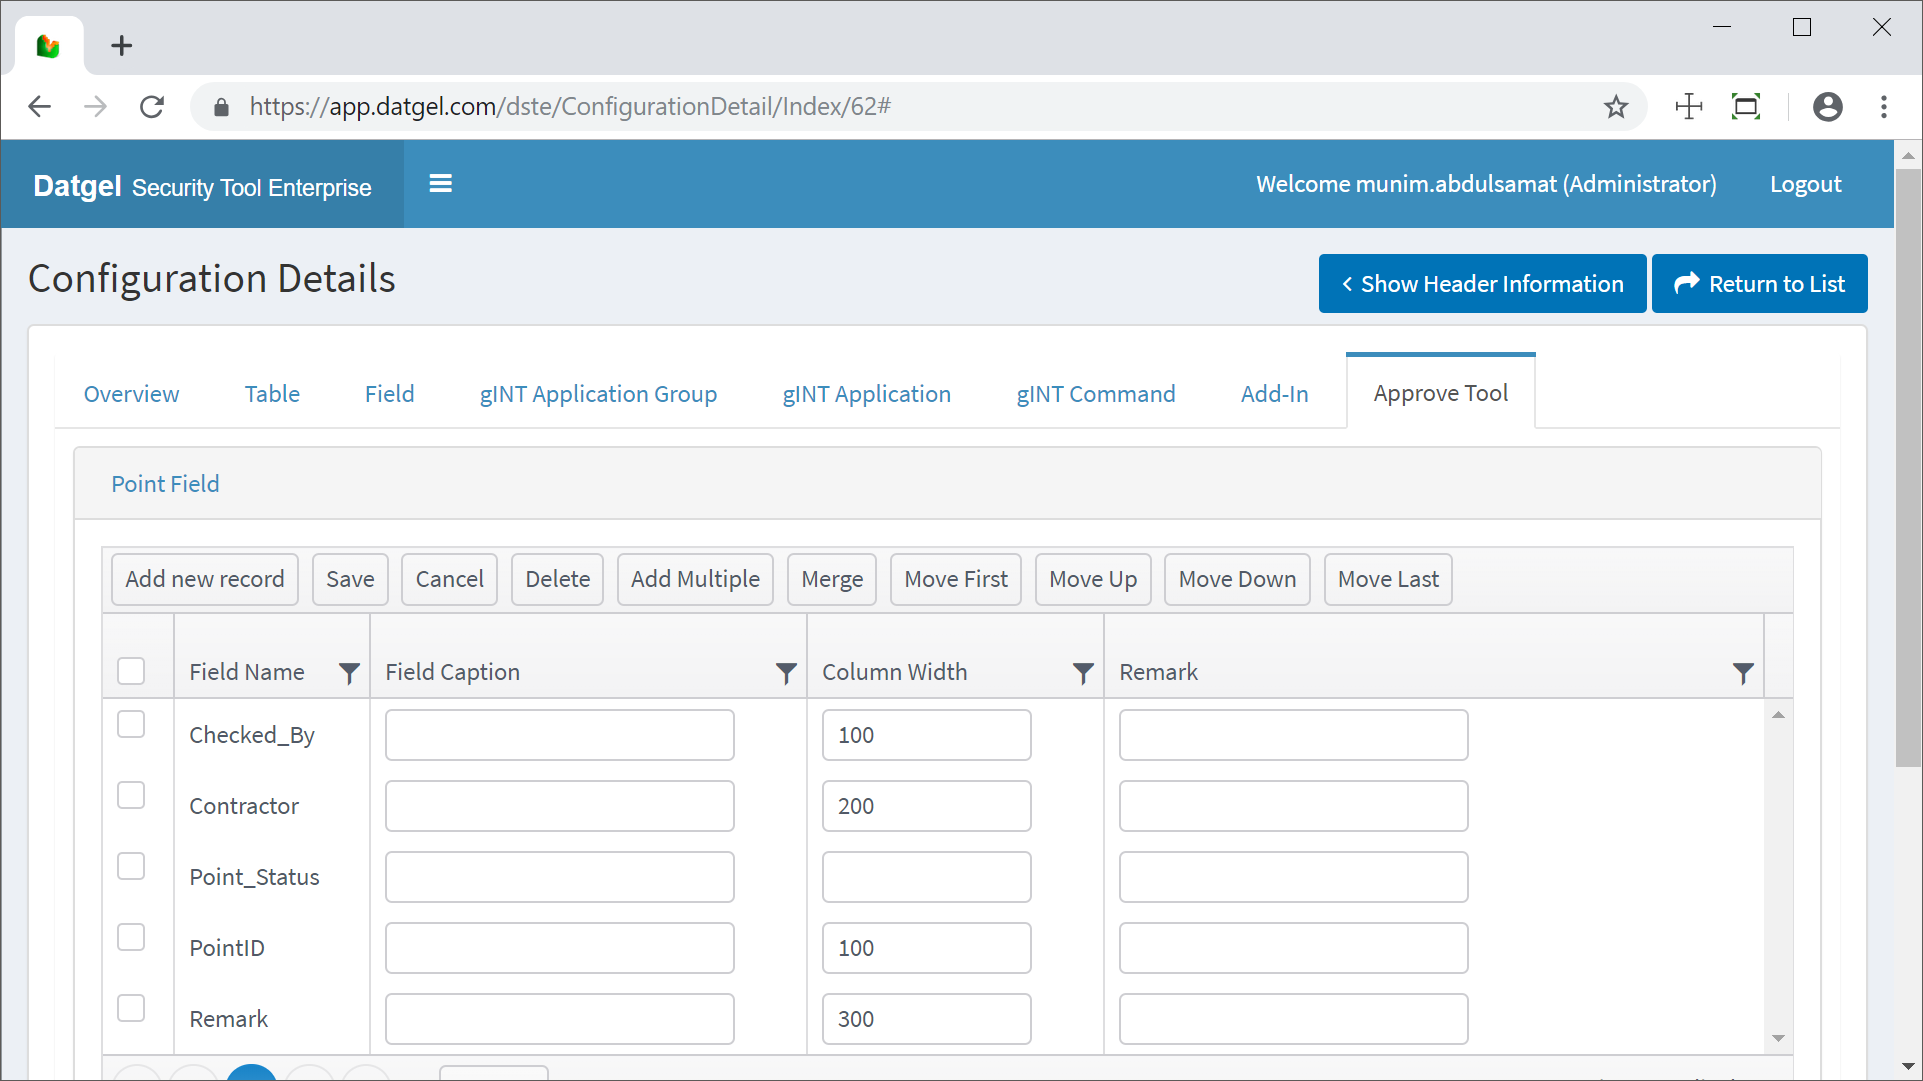
Approve Tool Point Field
The Add-in Approve Tool can be managed from this grid. The records in this grid will appear in the Add-in form's main grid, in the order listed.
- Field Name: The name of the field in the POINT table
- Field Caption: The display name of the field, the Approve Tool will display the caption if a value is entered, otherwise it will display the field name with _ replaced by a space.
- Column Width: Sets the column display width to the specified value. A number in the order of 75 works well.
- Remark: a remark for each field
Approve Tool Point Field Configuration in Web App
| Caption | Description |
|---|---|
| Add new record | Appends new row for new record input. |
| Save | Updates changes to database. |
| Cancel | Revert changes made. |
| Delete | Removes selected record row. |
| Add Multiple | Pops up new window to add multiple fields at once. |
| Merge | Copy Point Field data from other configuration. |
| Move First | Shift selected record row to top most. |
| Move Up | Shift selected record row one row upwards. |
| Move Down | Shift selected record row one row downwards |
| Move Last | Shift selected record row to bottom most. |
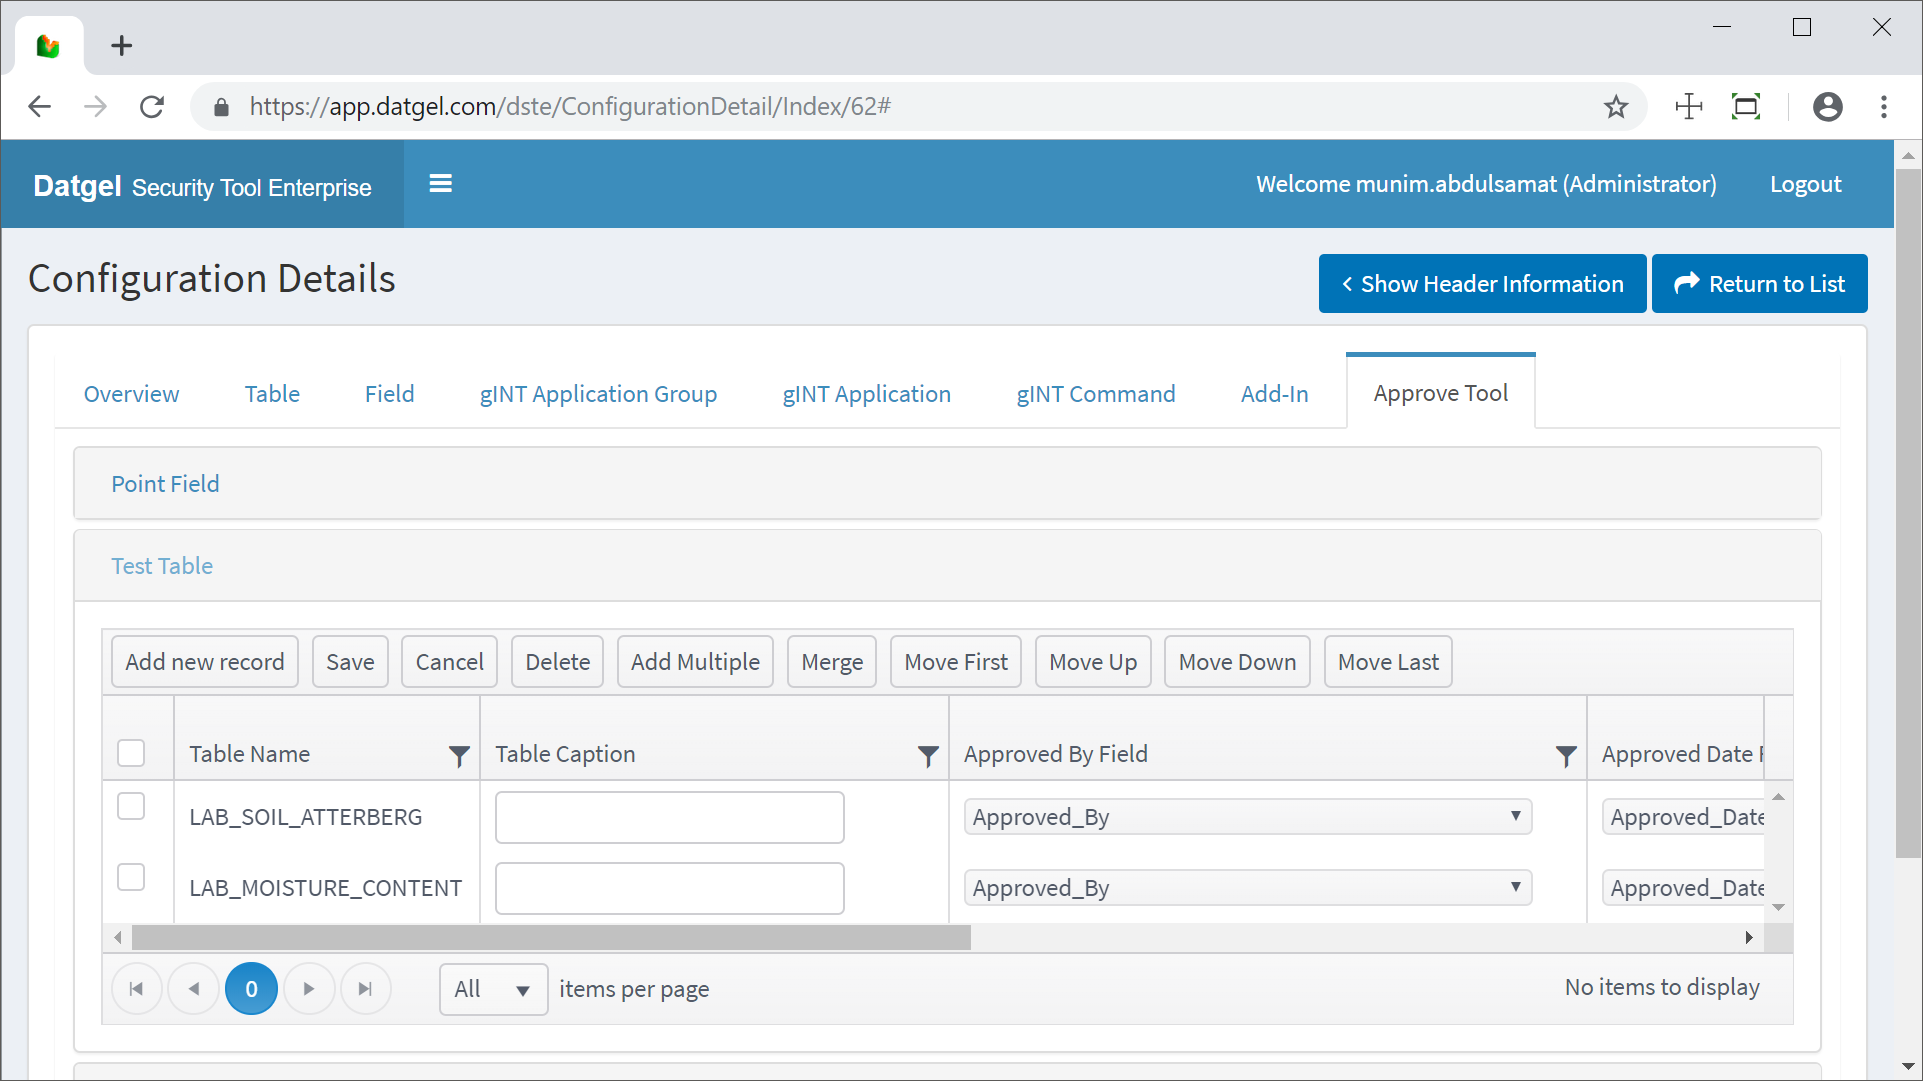
Approve Tool Test Tables
This stores the in situ and lab test tables that have a Status field, and also the POINT table is normally listed. The tables will appear on the Approve Tool form in the same order listed in the configuration grid.
- Table Name: The name of the depth-related or point level table.
- Table Caption: The display name of the table the Approve Tool will display if a value is entered, otherwise it will display the field name in Title Case with _ replaced by a space.
- Approved By Field Name: The name of the field which the Approved By value is to be written to.
- Approved Date Field Name: The name of the field which the Approved Date value is to be written to.
- Status Field Name: The name of the field which the Status value is to be written to.
Approve Tool Test table
| Caption | Description |
|---|---|
| Add new record | Appends new row for new record input. |
| Save | Updates changes to database. |
| Cancel | Revert changes made. |
| Delete | Removes selected record row. |
| Add Multiple | Pops up new window to add multiple tables at once. |
| Merge | Copy Test Table data from other configuration. |
| Move First | Shift selected record row to top most. |
| Move Up | Shift selected record row one row upwards. |
| Move Down | Shift selected record row one row downwards |
| Move Last | Shift selected record row to bottom most. |
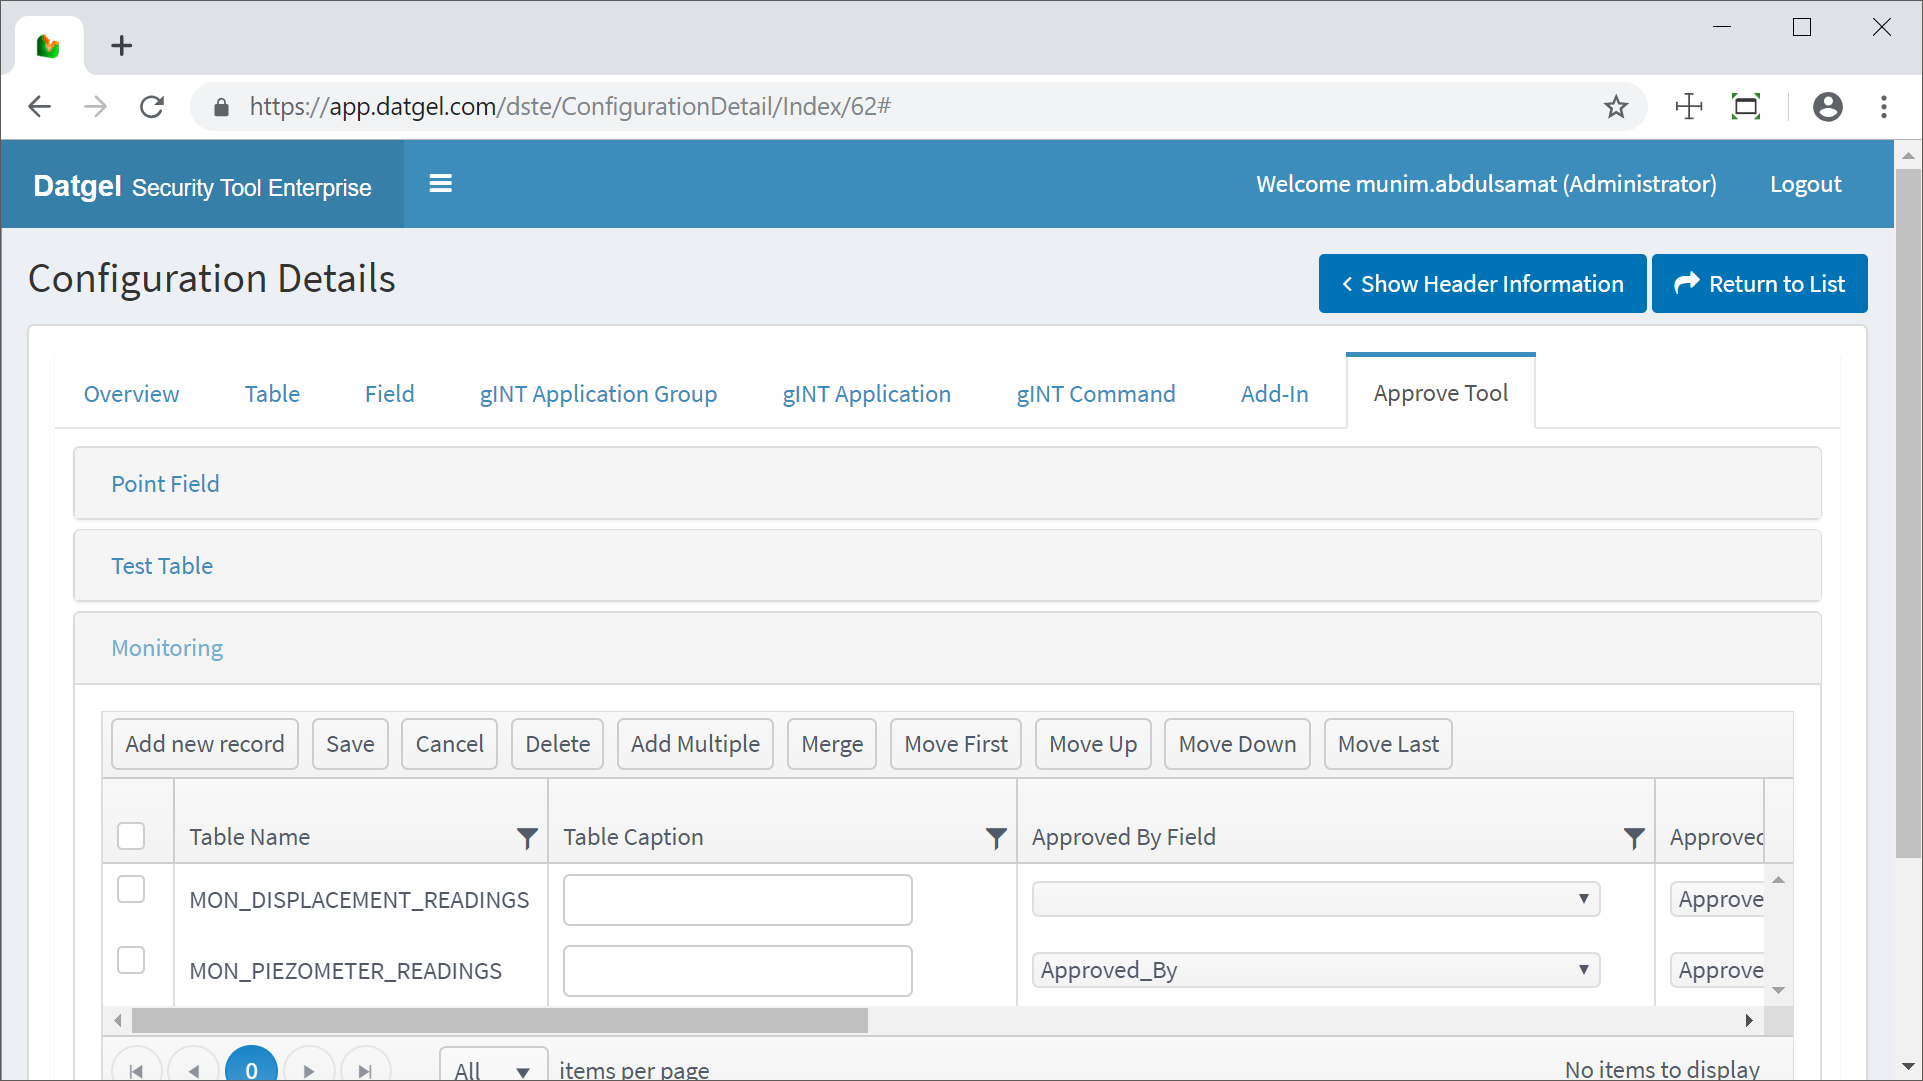
Approve Tool Monitoring tables
This section is for Date Time based data that needs to be approved. That is normally Monitoring data. The tables will appear on the Approve Tool form in the same order listed in the configuration grid.
- Table Name: The name of the date time-related table.
- Table Caption: The display name of the table the Approve Tool will display if a value is entered, otherwise it will display the field name in Title Case with _ replaced by a space.
- Approved By Field Name: The name of the field which the Approved By value is to be written to.
- Approved Date Field Name: The name of the field which the Approved Date value is to be written to.
- Date Field Name: The name of the field which contains the date time value which the Approve Tool should look up to determine if the record is in between the start and end dates.
- Status Field Name: The name of the field which the Status value is to be written to.
Approve Tool Monitoring table
| Caption | Description |
|---|---|
| Add new record | Appends new row for new record input. |
| Save | Updates changes to database. |
| Cancel | Revert changes made. |
| Delete | Removes selected record row. |
| Add Multiple | Pops up new window to add multiple tables at once. |
| Merge | Copy Monitoring data from other configuration. |
| Move First | Shift selected record row to top most. |
| Move Up | Shift selected record row one row upwards. |
| Move Down | Shift selected record row one row downwards |
| Move Last | Shift selected record row to bottom most. |
Configuration Validation
The Approve Tool Point Field must contain PointID in the Field Name. The Approve Tool will not open if the PointID value is not found in the Field Name field in this table. Non-existent field names in the Field Name field on this table will cause the Approve Tool to fail to load.
Invalid or Non-existent Table Names, Approved By Field Name, Approved Date Field Name, Date Field Name or Status Field Name in Approve Tool Configuration will cause the Approve Tool to fail to load.
Approve Tool
The Approve Tool sets Approved By and Approved Date fields in Point, Lab, In Situ and Monitoring tables as defined in the Web App configuration. The Approve Tool should only accessible and configurable by project managers or principal engineers that should have rights to approve data, and can be opened from the menu item Add-Ins > Datgel Security Tool > Approve Tool.
Usage
- Set the Status, Approved By, and Approved Date as required.
- Set the Test tables, such as Point, lab or in situ (depth related) tables you wish to approve by selecting the tables in the test tables list. You can select multiple tables by both clicking and dragging up or down on a table, or by pressing the Ctrl key and clicking on an unselected table. You can deselect by pressing the Ctrl key down while clicking on a selected table.
- Set the monitoring tables (date timetables) and reading date range you wish to approve by selecting the tables in the Monitoring Readings table list. You can select multiple tables by both clicking and dragging up or down on a table, or by pressing the Ctrl key and clicking on an unselected table. You can deselect by pressing the Ctrl key down while clicking on a selected table.
- Select the PointID rows you wish to approve by selecting the PointIDs in the PointIDs list. You can select multiple PointIDs by both clicking and dragging up or down on a table, or by pressing the Ctrl key and clicking on an unselected PointID. You can deselect by pressing the Ctrl key down while clicking on a selected PointID.
- Click Approve to set the approved by and approved date values.
Update Rules
Existing data in Approved By, Approved Date and Test Status on Test Tables will always be overwritten.
Approved By, Approved Date and Test Status fields for Monitoring readings will be updated if both the following are satisfied:
- The reading date satisfies the start and end date range
and
- The existing status is less than the new status
