Formula Tool
Introduction
The Formula Tool allows you to review and edit the preconfigured correlation formulas provided with the CPT Tool, and provides a way for you to define new correlation formulas.
A tutorial on defining a formula is presented in Tutorials.
To launch the Formula Tool Configuration form, select INPUT | Add-Ins > Datgel CPT Tool > Formula Tool Configuration.
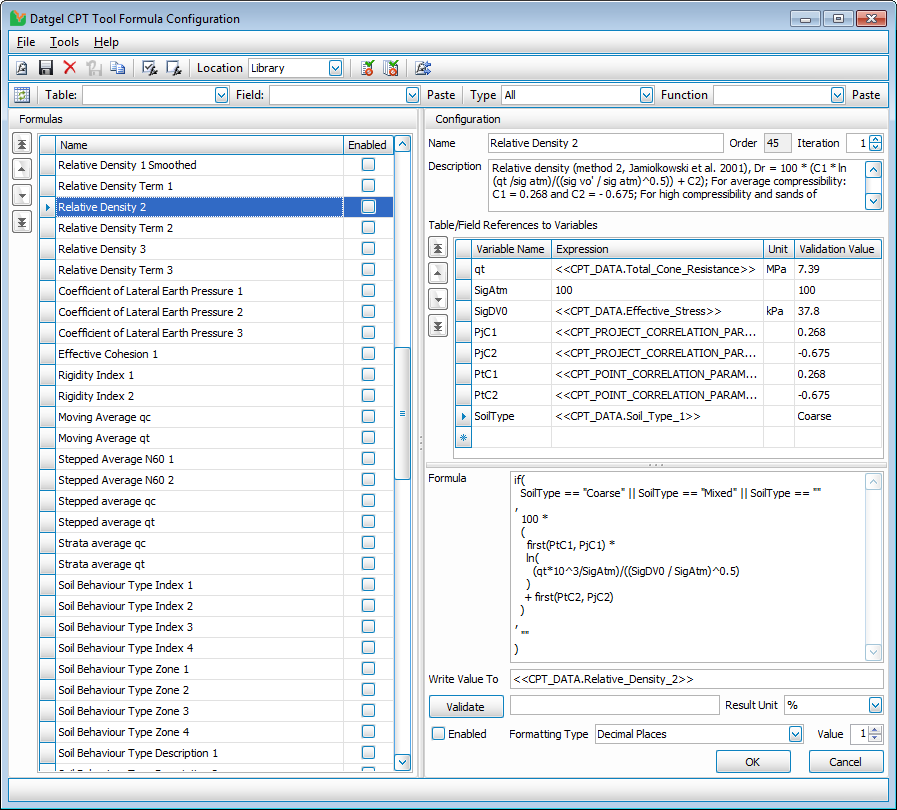
You should see a window similar to the following.
Formula Toolbar

Hovering the mouse cursor over each item will show a tooltip with a short description of the item.
Name | Icon/Image | Keyboard Shortcut | Description |
|---|---|---|---|
New Formula |
| Ctrl + N | Creates a new empty formula |
Save Formula |
| Ctrl + S | Saves all changes to the gINT Library or Project database, depending on the selected Location |
Delete Formula |
| Ctrl + D | Deletes the currently selected formula |
Undo Changes |
| Ctrl + U | Reverts any changes made to the current formula to the state it was last saved |
Copy Current Formula |
| Ctrl + Shift + C | Makes a copy of the currently selected formula, and adds it to the end of the Formula Grid. After copying, the copied formula will be selected, and you must enter a new unique name. |
Enable all Formulas |
| Checks the Enabled check box column for all formulas in the Formulas Grid | |
Disable all Formulas |
| Unchecks the Enabled check box column for all formulas in the Formulas Grid | |
Location |
| Location the Formula Configurations are stored. Select Library to load the Configuration stored in the current gINT Library, and Project to load the Configuration stored in the current gINT Project. | |
Generate Validation Report for Current Formula |
| Generates a report containing full details of the currently selected formula, evaluated validation result and any errors or missing Table Field references in the current formula. | |
Generate Validation Report for All Formulas |
| Generates a report containing full details of the all formulas showing in the formula grid, evaluated validation result and any errors or missing Table Field references for each formula. | |
Merge/Copy Formulas |
| Shows the Merge/Copy Formulas Form. See the Merge/Copy Formulas section below for full details. |
Data Tool Toolbar

Hovering the mouse cursor over each item will show a tooltip with a short description of the item.
Name | Icon/Image | Keyboard Shortcut | Description |
|---|---|---|---|
Refresh Data Tool |
| Ctrl + R | Clears, re-reads and reloads the Table and Field drop down list items from the current gINT Project and Library. Use this to update the drop down list if you have added a new table or field after the Formula Configuration Form has been opened. |
Table Field Data Tool |
| Pastes the selected table and field as formatted text into the last focused configuration field. Refer to the Table Field Data Tool section of the manual for detailed information | |
Function Data Tool |
| Pastes the selected function text into the last focused configuration field. |
Table Field Data Tool

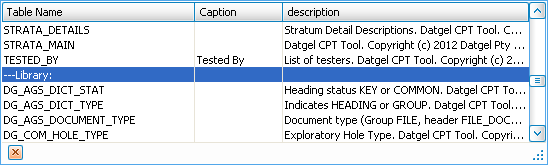
The Table Field Data Tool pastes the selected table and field as formatted text into the last focused configuration field. The drop down list contains all tables and fields in the current gINT Project and Library database. When a Table is selected, the Field list will automatically filter to show only the fields for the selected table.
The Table and Field drop down lists consist of three columns:
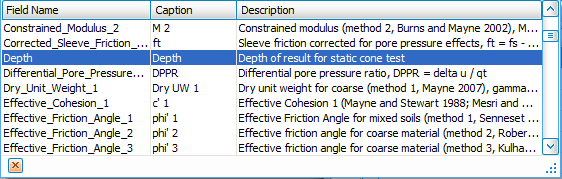
- Table Name/Field Name – database name of the Table or Field
- Caption – The caption text as configured in the Caption field in the gINT Table or Field Properties
- Description – The description text as configured in the Description field in the gINT Table or Field Properties
The drop down list can be sorted by a column by clicking on the column header. The columns can be resized by clicking and dragging the edges of the column header left or right. The drop down list window can be resized by clicking and dragging the bottom right corner of the window.
The drop down list lists the Project tables first, then the Library. A delimiter row as seen below divides the Project Tables from the Library Tables.
The Paste ![]() button will insert the selected table field into a formatted, table field reference text into the last focused configuration text field or grid cell. The Paste button can insert text into the following Configuration fields:
button will insert the selected table field into a formatted, table field reference text into the last focused configuration text field or grid cell. The Paste button can insert text into the following Configuration fields:
- Description
- Any cell in the Variables Grid
- Formula
- Write Value To
The table field reference format is as below:
<<Table Name.Field Name>>
Table field references in the Formula field are required to be surrounded by quotation marks. The Table Field Data Tool will automatically add the quotation marks if pasting in the Formula field. The table field reference format for the Formula field is as below:
"<<Table Name.Field Name>>"
The pasted text will be inserted at the current position of the cursor in the fields. Any highlighted text will be replaced by the inserted text. Selecting an entire cell in the Variables grid will replace the contents of that cell with the inserted text.
Function Data Tool

The Table Field Data Tool pastes the selected function text into the last focused configuration field. The Function drop down list contains all functions, constants and operators that are available in the Formula Tool, it the correct syntax. Each function is categorised as a type, and selecting a type in the Type drop down list will filter the function drop down list by that type.
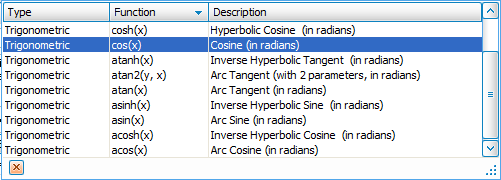
The Function drop down list consists of three columns:
- Type – type of function, can be filtered by a particular type by selecting a type in the Type drop down list
- Function – the function, constant or operator in the correct syntax as required by the Formula Tool. The typical syntax composition of a function consists of the function name, followed by an open bracket, followed by a comma separated list of function parameters, followed by a closed bracket.
FunctionName(Parameter 1, Parameter 2 [,...])
The function name is case sensitive. All function parameters are required, unless noted otherwise. If a function accepts an arbitrary number of parameters, it is denoted by ... . - Description – A short description about the function
The Paste ![]() button will insert the selected function into last focused configuration text field or grid cell. The Paste button can insert text into the following Configuration fields:
button will insert the selected function into last focused configuration text field or grid cell. The Paste button can insert text into the following Configuration fields:
- Description
- Any cell in the Variables Grid
- Formula
- Write Value To
Refer to Formula Tool and Data Correction Tool Functions for detailed information about the functions.
Formulas Group
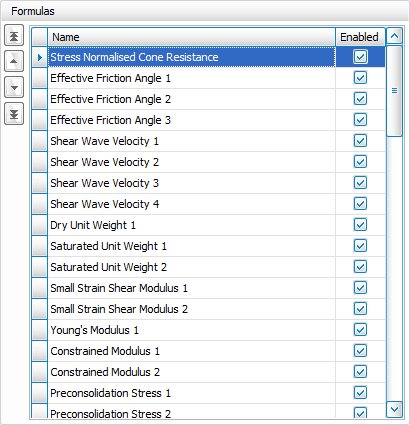
The Formulas Group contains a list of formulas stored in the currently selected location. Each row in the Grid represents one formula, and is listed in the order they are to be evaluated from first to last.
Selecting a formula by either by clicking on a row, or pressing the up or down keys in the Grid will display the configuration associated with the selected formula in the Configuration Group. The Name column values cannot be changed in this grid. It must be done in the Configuration Group after the formula has been selected.
The Order of the formula can be changed in the Formulas Group with the up down buttons on the top left. Descriptions of the bottom are listed below from top to bottom:
- Move to Top – Moves the currently selected formula to the top of the grid
- Move Up – Moves the currently selected formula up by one row
- Move Down – Moves the currently selected formula down by one row
- Move to Bottom – moves the currently selected formula to the bottom of the grid
The formulas can be enabled or disabled by clicking on the corresponding check box in the Enabled column. When the formula grid is active, pressing the Spacebar key will also toggle the enabled check box for the currently selected rows. You can select multiple rows by left clicking and dragging down on the row header, or by holding the ctrl key while left clicking on the row headers.
Configuration Group
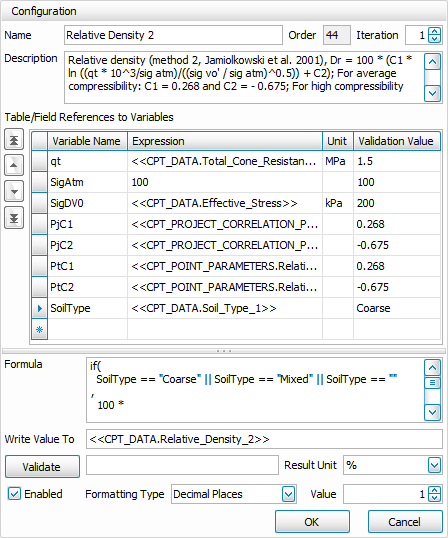
The Configuration Group contains all the configurable options for the formula that is currently selected in the Formulas Grid.
- Name – Name of the formula. The formula name must be unique for the configuration location. This means that you may have two formulas with the same name with one in current Library and one in the current Project.
You will not be able to select another formula, or save the formula until a unique name is entered.
Order – A numeric value of the order the formula will be evaluated. If the result of the current formula is required to evaluate another formula, then the current formula should be placed at a higher order to than the other formula. - The order cannot be changed in the Configuration Group. Move the selected formula up or down using the up down buttons left of the Formulas Grid. The numeric Order value will update itself when the order has changed.
- Iteration - The round of iteration in which the current formula will be evaluated. Default value is 1. Functions which calculate the average of a correlation that is evaluated by the Formula Tool need to be run at a later iteration to the correlation.
- -1 or less, before derived parameters.
- 0, midway through derived parameter, designed for Bulk Unit Weight calculation
- 1 or more, after derived parameters
- Description – Description of the formula. It is not used or required in the formula calculation, and hence it is an optional field.
- Table/Field References to Variables – Declare the variables that are used in the formula expression in this grid. The rows in this grid can be changed with the up down buttons on the left of this grid. Column definitions are listed below:
Variable Name – Name of the variable. The variable name can consist of alphanumeric characters [a-z, A-Z, 1-9], but must have at least one alphabetic character, and is case sensitive. It cannot contain the following:
Symbols, such as `, $, #
White spaces or carriage return
In addition, a duplicate variable names for a particular formula is not permitted, and a variable name cannot be exactly the same as a function name.
- Expression – Table Field reference to where the variable value is to be retrieved from, or a text or numeric value. The following is a list of rules and specifications regarding the Expression:
- Table Field references must be in the format of <<Table.Field>>
- If the referenced field is from the CPT_DATA table, then it will take the value from the field of the current row the CPT Tool is calculating.
- If the referenced field is from any other table, it will retrieve the first result from a query to that table, filtered by the PointID and ItemKey values of the current CPT calculation, where appropriate.
- To use the variable as a constant, enter a numeric value, or text that is not in the format of <<Table.Field>>
- Unit – Unit the value is required to be in to be used in the formula expression. The Formula Tool will convert the variable from its source unit to the unit defined in this column before the value is used in the formula. The source unit can only be retrieved if the value in the Expression is a table/field reference, and is taken from the Unit field property of the named field.If no unit is specified, then the variable value is used as-is. If a unit is specified, but a conversion factor cannot be determined, then the value is null.
- Validation Value – Value used to evaluate the formula when the Validate button is clicked, and in the Validation Reports. The Validation Value has no effect on the actual CPT calculation, and is solely used in the Formula Configuration Form.
- Expression – Table Field reference to where the variable value is to be retrieved from, or a text or numeric value. The following is a list of rules and specifications regarding the Expression:
- Formula – The formula expression. Refer to Formula Tool and Data Correction Tool Functions for a full list of available functions. Variables declared in the Variables Grid above can be referenced in the formula expression. String constants must be surrounded with quotation marks "" in order to differentiate it from a variable reference. Spaces and carriage returns may be used liberally to improve readability.
Table field references in the formula expression must be surrounded by quotation marks, i.e. "<<Table.Field>>". The Table Field Data Tool will automatically add the quotation marks when pasted in the formula expression field.
- Write Value To – The Table Field reference to where the result of the formula evaluation is to be written to. The value in this field must be in the <<Table.Field>> format, and must be from the CPT_DATA table or a one-to-one child of the table.
- Validate – Click this button to evaluate the current formula expression, with the Validation Value set as the Variables. If the evaluation was successful, the result will be written to the adjacent text field. The Formatting Type and Value will be applied to the result, if defined. Use Validate to spot check your formula expression for syntax errors, and to verify the formula returns an expected result.
- Result Unit – Unit of the result of the equation. The evaluated result of the formula is converted from the Result Unit to the unit of the Write Value To field, if the two units are different. If Result Unit is empty, the value is not converted and is written to the Write Value To Field as-is. The lookup list of values in this field is sourced from the Field_Units library table.
- Enabled – Check or uncheck to enable or disable the formula respectively from evaluating in the CPT calculation
- Formatting Type and Value – Formats the result to either decimal or significant figures, to the nearest specified value. The formatting only applies to formula expressions that return a numeric value.
- OK – Saves the current state of the formulas in the Formula Configuration form to the selected location, and closes the form.
- Cancel – Discards any changes made in the Formula Configuration form and closes the form. The formulas will remain at the exact same state as before the Formula Configuration form was opened. You will be prompted to save if changes are detected.
Merge/Copy Formulas
The Merge/Copy Formulas Form facilitates the merging/copying of CPT Tool formulas between gINT Projects and Libraries.
The Form will automatically handle the differences between the configuration tables in Project and Library, and also the differences between the current version and older versions of the formula configuration tables.
The Form will allow you to choose which formula to merge, indicating whether the formula exists in the target gINT Project/Library.
The Merge/Copy Formulas Form is accessible from the Formula Configuration Form. Open the form, then go to Tools > Merge/Copy Formulas, or click on the Toolbar Icon ![]() .
.
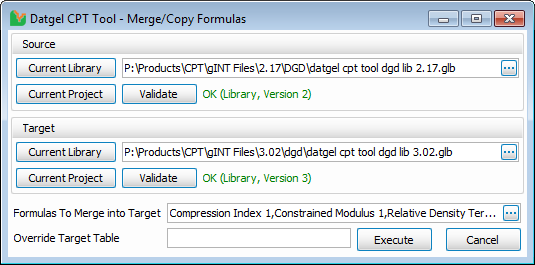
Source and Target Group

Select the source and target of the Formula Tool Formulas in these groups. The selected files must be a gINT Project (.gpj) or a gINT Library (.glb) file, and must contain a valid CPT Tool Formula Configuration Table.
There are four ways to select a file:
- Browse Button – Brings up a file selection dialog and allows you to navigate and select a gINT file
- Current Library – Selects the currently open gINT Library file
- Current Project – Selects the currently open gINT Project file
- Text Box – You may type in or copy/paste in the file path in the text box
By default, the Target file will be set to the current Formula Configuration source of the Formula Tool Configuration Form.
Validation
The source and target files must be validated before you can select Formulas to merge, or execute the Merge/Copy. If you have used the Browse Button, Current Library or Current Project buttons to select the file, the Form will automatically validate the file for you. If you have entered the file path manually, you must click on the Validate button to validate the selected file.
The results of the validation can be seen next to the Validate button as a green or red coloured text.
The possible values are listed below:
Validation Result | Description | |
OK (Library, Version 2) | Valid CPT Tool gINT Library (*.glb) version 2.17 and older, CPT Tool DLL version 2.2.0 and older | |
OK (Library, Version 3) | Valid CPT Tool gINT Library (*.glb) version 2.18 and newer, CPT Tool DLL version 2.2.1 and newer | |
OK (Project, Version 2) | Valid CPT Tool gINT Project (*.gpj) version 2.17 and older, CPT Tool DLL version 2.2.0 and older | |
OK (Project, Version 3) | Valid CPT Tool gINT Project (*.gpj) version 2.18 and newer, CPT Tool DLL version 2.2.1 and newer | |
Error | Not a valid CPT Tool file |
The Target Table field is missing from Version 2 CPT Tool gINT Files. Therefore, the Table from the Write Value To field is extracted from the value and used as the Table. You may override this by entering a table name in the Override Target Table text field.
From CPT Tool gINT files 2.15 and older, the Result Unit field is missing. If you are merging formulas from these version of gINT Files, you must review the formulas after merging to ensure the Result Unit has been set.
If the validation result is an error, mouse over the text to see a tooltip popup detailing the reason why the file could not be validated. 
Override Target Table
Override Target Table allows you to manually set the target table, overriding the Table in the source. This is useful if for example, you were merging formulas into DGD CPT Tool from the AGS RTA CPT Tool files, the table names would be STCT in AGS RTA, and CPT_DATA in DGD.
Enter the exact table name into this field, for example, CPT_DATA.
If a value for Override Target Table is entered, the Formula Selection Form will use this value (and the Formula Name) to determine if a Formula exists in the Target file.
Selecting Formulas to Merge
Once the Source and Target files have been set and validated, click on the Browse Button on the Formulas to Merge into Target text field to bring up the Formula Selection Form.

The Formula Selection Form will not open under the following conditions, and you will be prompted with the reason.
- Source and Target files have not been validated, or validation has failed for either of the files
- Source and Target files are the same
- Target file is version 2 – The Merge/Copy Formulas Form does not support merging formulas into older versions of the CPT Tool.
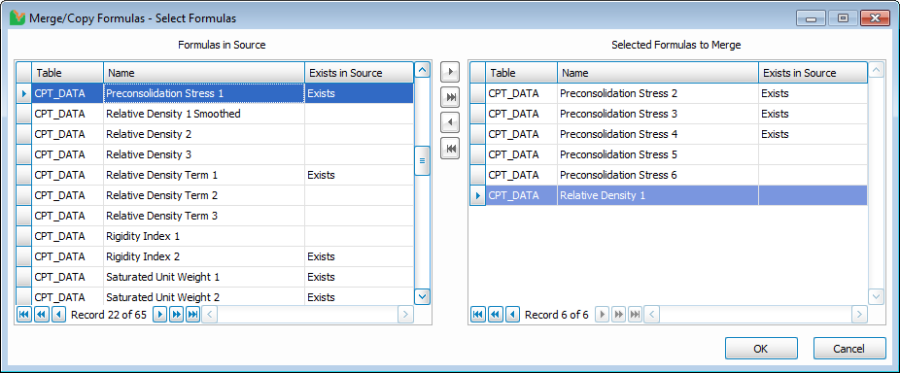
The left grid will list out all the available formulas found in the Source file. The Exists in Source column will specify if the Formula exists in the Target file, for the given Table and Name. If a value has been entered in the Override Target Table, it will use that value to determine the existing Formulas.
To select the formulas to merge, use a combination left click, click-drag, ctrl + left click and shift + click to select the formulas from the left grid, and use the arrow buttons in the centre of the form to move formulas into the right grid.
Click the OK button to return to the Merge/Copy Formulas Form. The selected formulas will be listed in the text box, and this is an indication that Formulas have been selected for merging.

You may click on the Browse Button to review and adjust your Formula selection. If you perform any of the following actions, the selected Formulas will be cleared, and you will need to reselect your Formulas to merge:
- Enter a different Source or Target file, by clicking on the Current Library, Current Project or Browse Buttons, or modifying the file path manually in the text field
- Modifying the Override Target Table value
Execution of Merge/Copy Formulas
When you have selected Formulas to merge, click on the Execute button to merge in the formulas into the Target file. If a Formula has been marked as Exists, the existing Formula in the Target is overwritten. If not, then a new Formula record will be created in the Target.