Data Import
Overview
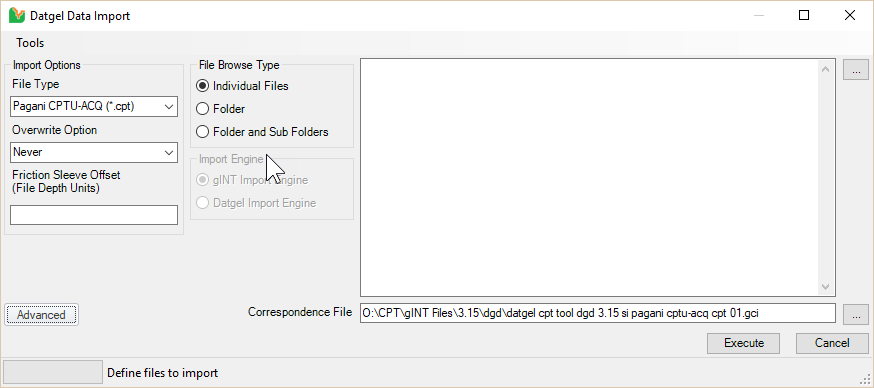
The Data Import Tool allows you to import data from various file formats into gINT. The function is located in INPUT Add-Ins > Datgel CPT Tool > Data Import.
On load the default setting will populate the form. In addition, the previous correspondence file used for each file type be loaded as default.
Tools Menu
- Load Defaults: Loads all selections, field values and the initial directory that has been previously saved as default.
- Save Defaults: Saves defaults for File Browse Type, Friction Sleeve Offset, and Overwrite Option.
- Set Initial Directory: Sets the initial browse directory so that every time you browse, it will start at the set directory.
- About: Displays the version information of the Data Import Tool.
File Browse Types
- Individual Files: Select one or more files in a single folder manually.
- Folder: Select a folder and all relevant files in that folder are selected automatically.
- Folder and Sub-Folders: Select a folder and all relevant files in that folder and its sub-folders are selected automatically.
Files paths may be manually entered or deleted from the large text box.
File Types
- A.P. van den Berg Gorilla! (.) – CPT and Dissipation
- Access database files (*.gpj; *.mdb)
- AGS (*.ags)
- ConeTec (*.cor) – The Datgel Import Tool .net code reads the cor file, and applies the unit conversion factors defined in the last line of the cor file so that the data in the temp csv file is in units of depth (m), q_c (bar), f_s (bar) and u (m head). The temp csv file is imported into gINT using the gci file. The gci needs to convert the units of depth (m), q_c (bar), f_s (bar) and u (m head) to the units used in the given project.
- Datem Neptune (*.cdf; *tcf) – Offsets for Sleeve and Thermal Conductivity must be applied. In CPT Data Import form, enter using syntax <Sleeve>|<Thermal Conductivity> e.g. 0.079|0.545, in the Friction Sleeve Offset textbox.
- Delimited Depth q_c f_s u (.) – simple file with no header, and data delimited by tab, ",", ";", or ":". The u data is not required, and the columns must be in the order Depth q_c f_s u. The file name (without the extension) will be used as the PointID.
- Douglas Partners (.)
- Fugro (*.a00; *.asc)
- GEF 1.1.0 (*.gef) – CPT and Dissipation. The friction shift is applied by the Import Tool for 1.0.0 version files only.
See: http://www.geffiles.org/ - Geo-Explorer (*.csv)
- Geo-Explorer v2 (*.001;*.101;*.D01;*.L01) – select all files for a test
- Geomil PlotCPT (*.T)
- gINT CSV (*.csv; *.txt) – regular gINT compliant csv file.
- gINT Excel (*.xls) – regular gINT compliant excel file.
- Gregg Drilling (*.cor)
- Hogentogler (*.cpd)
- Hogentogler (.cpt; .dis)
- Hogentogler (*.txt)
- Pagani (*.cpt)
- Pagani (*.dat)
- Pagani CPTU-ACQ (*.cpt)
- Pagani TGSA08 (*.csv)
- ProbeDrill (*.txt; *.dis) – you must import *.txt and *.dis files together. The *.dis file and *.txt file for the one location MUST have the same file name
- Swedish Geotechnical Format (SGF), used by Geotech AB and Envi A.B. (*.cpt; *.dpt; *.ini)
See: http://www.sgf.net/home/page.asp?sid=862&mid=2&PageId=21095 - Vertek (*.ecp)
Overwrite Option
These are the standard gINT overwrite options.
Correspondence File
gINT correspondence files need to be developed or altered to meet the needs of each companies gINT project database for each data source file type. Example files have been provided that meet the needs of Datgel's standard project files.
Datgel Import Engine
The Datgel Import Engine doesn't use gINT to import data, it only works with SQL Server, and is considerably faster than the gINT import engine. It is selected by default when using SQL Server, and you may switch to the gINT import engine if needed. The initial release supports a limited number of functions used in gci expressions, and doesn't support nested functions. gci files for some file types do use other functions and important data is not imported. Due to data loss, you may need to use the gINT Import Engine, or edit the gci to use supported functions.
The supported functions are:
- UserName
- Now
- Calc
- ListBuildSepTrim
- FirstData
- MinVal
- MaxVal
Advanced Options
Click on the Advanced button to show the Advanced Options panel. To hide the Advanced Options panel once it is open, click on the Simplified button.

There are two features in the Advanced Options panel, Create Temp Import File and User Import Parameters.
Create Temp Import File
During the import process the initial data files are read and transferred to a temporary file in gINT compatible CSV format. If this box is checked, the Data Import Tool will bring up a new window showing the contents of this temporary file, and will not continue with the import. This can be saved as a CSV, and used as the source when designing an import correspondence file.
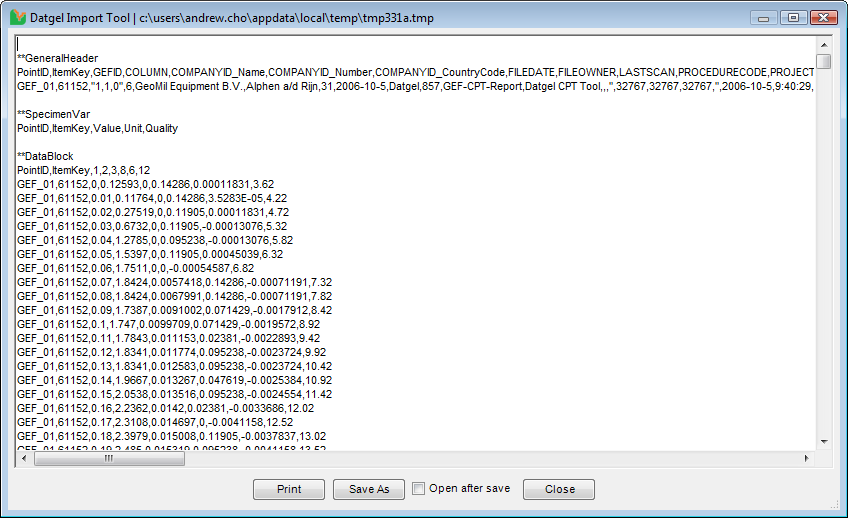
In this interface, click Save As to save the text as a file, or Print to print the text on a printer. You must save the text as a file before you can modify the text. This file can be imported into gINT with the Data Import Tool with gINT CSV selected as the File Type.
User Import Parameters
The User Import Parameters feature allows you to insert custom fields into the tables in the temporary import file, thus allowing you to reference the custom field in the correspondence file, and import the parameter value into gINT.
This enables you to import values that are not in the data file without needing to modify the data file itself.
The User Import parameters configuration is stored in a library table called DG_IMPORT_TOOL_USER_IMPORT_PARAMETERS. This table must exist in the current library to use the User Import Parameters, if it does not exist then the grid will be disabled.
To save the User Import Parameters to the configuration table, go to Tools > Save User Import Parameters to Library.
The User Import Parameters currently only works for Swedish Geotechnical Format (SGF) (*.cpt; *.dpt; *.ini) files.
The Parameters will be created as fields in all tables in the temporary import file, and will be prefixed with UIV, followed by a space. Each row of the table will have the specified value in the column. This will apply for all files selected for import.
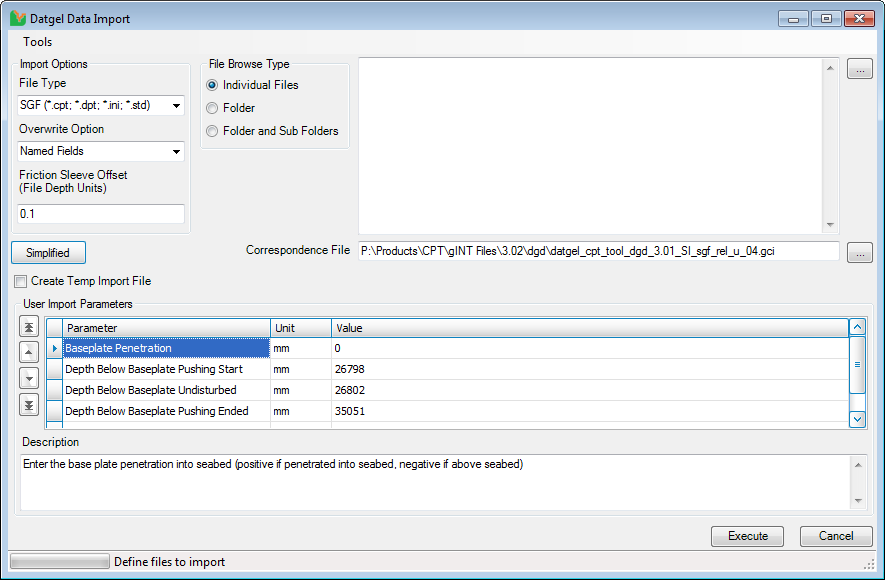
Description of the columns are as below:
- Parameter – The name of the parameter. The parameters will be created as fields in all tables in the temporary import file, and will be prefixed with UIV, followed by a space. E.g. UIV Baselate Penetration.
- Unit – The unit of the parameter. This field is metadata and is optional. It does not affect the User Import Parameter in any way.
- Value – The Value of the parameter. Each row of the table will have the specified value in the corresponding parameter column.
- Description – Description of the Parameter. This field is metadata and is optional. It does not affect the User Import Parameter in any way.
Importing Multiple Strokes/Tests into one PointID
The Depths in all strokes within the one PointID must have the same zero depth reference, hence if multiple strokes are done down a borehole, then when importing the Depth field must be populated with pre-drill Depth plus the push depth. This can be achieved in the correspondence file if the predrill depth in recorded in the source data file. Gorilla files are a common offshore data file format. Some files have the start depth of each test recorded in fields titled Reference Level or Depth Borehole.
Gorilla File Example with relevant depth information
[TEST]
<GORILLA! header>
job number=BH-CPTU-S8-BL
client=Oil Company
job description=8 LOCATION
.
.
.
operator=ZZ/HH
reference level=3.0
reference point=M.S.L
pre drilled=0.0
GORILLA!-remark 1=
.
.
.
GORILLA! serie #=
<user header>
NORM=12345
START DEPTH=
Seabed ref level=
Seabed ref point=
Depth borehole=3.0
Vanedepth=

[SCALING FACTORS\]
.
.
.
[DATA]
*D:0.02#1:0.01#2:0.000#4:4#0:28!
*D:0.04#1:0.01#2:0.000#4:4#0:29!
*D:0.06#1:0.03#2:0.000#4:3#0:30!
*D:0.08#1:0.04#2:0.001#4:4#0:31!
*D:0.10#1:0.05#2:0.001#4:4#0:32!
Step by step import process
- Launch the import form by clicking on Add-Ins > Datgel CPT Tool > Data Import.
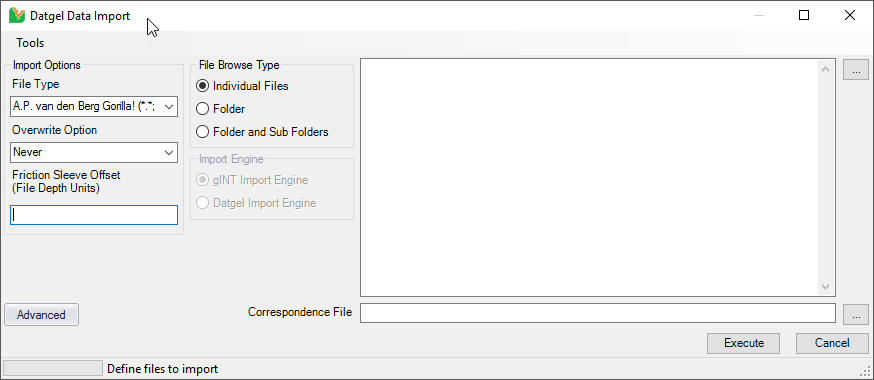
- Select the file type A.P. can den Berg Gorilla!
- Set the required Overwrite Option, normally Never.
- Check File Browser Type Individual Files
- Click on the [...] button in upper right of form and browse to your file location. Select the files you wish to import.
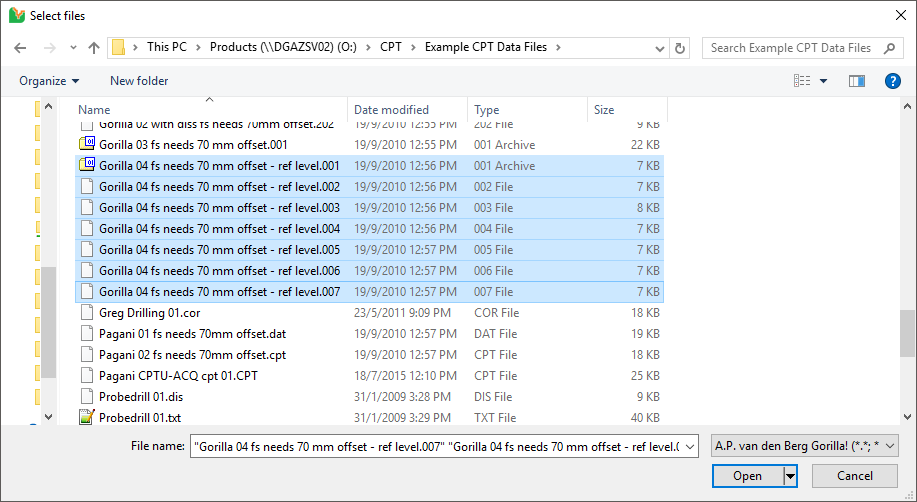
Click Open. - File paths are now in the box.
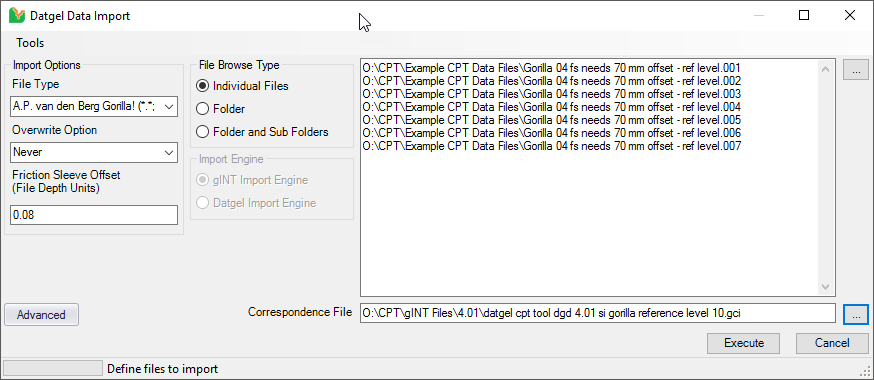
- Select the Correspondence file: datgel cpt tool dgd #.## si gorilla reference level ##.gci.
- Set the Sleeve Friction Offset to 0.08, for this example data.
- Click Execute, and the import will start. Once it has finished, a window with the import log will open. You can save it for check the process and errors if required.

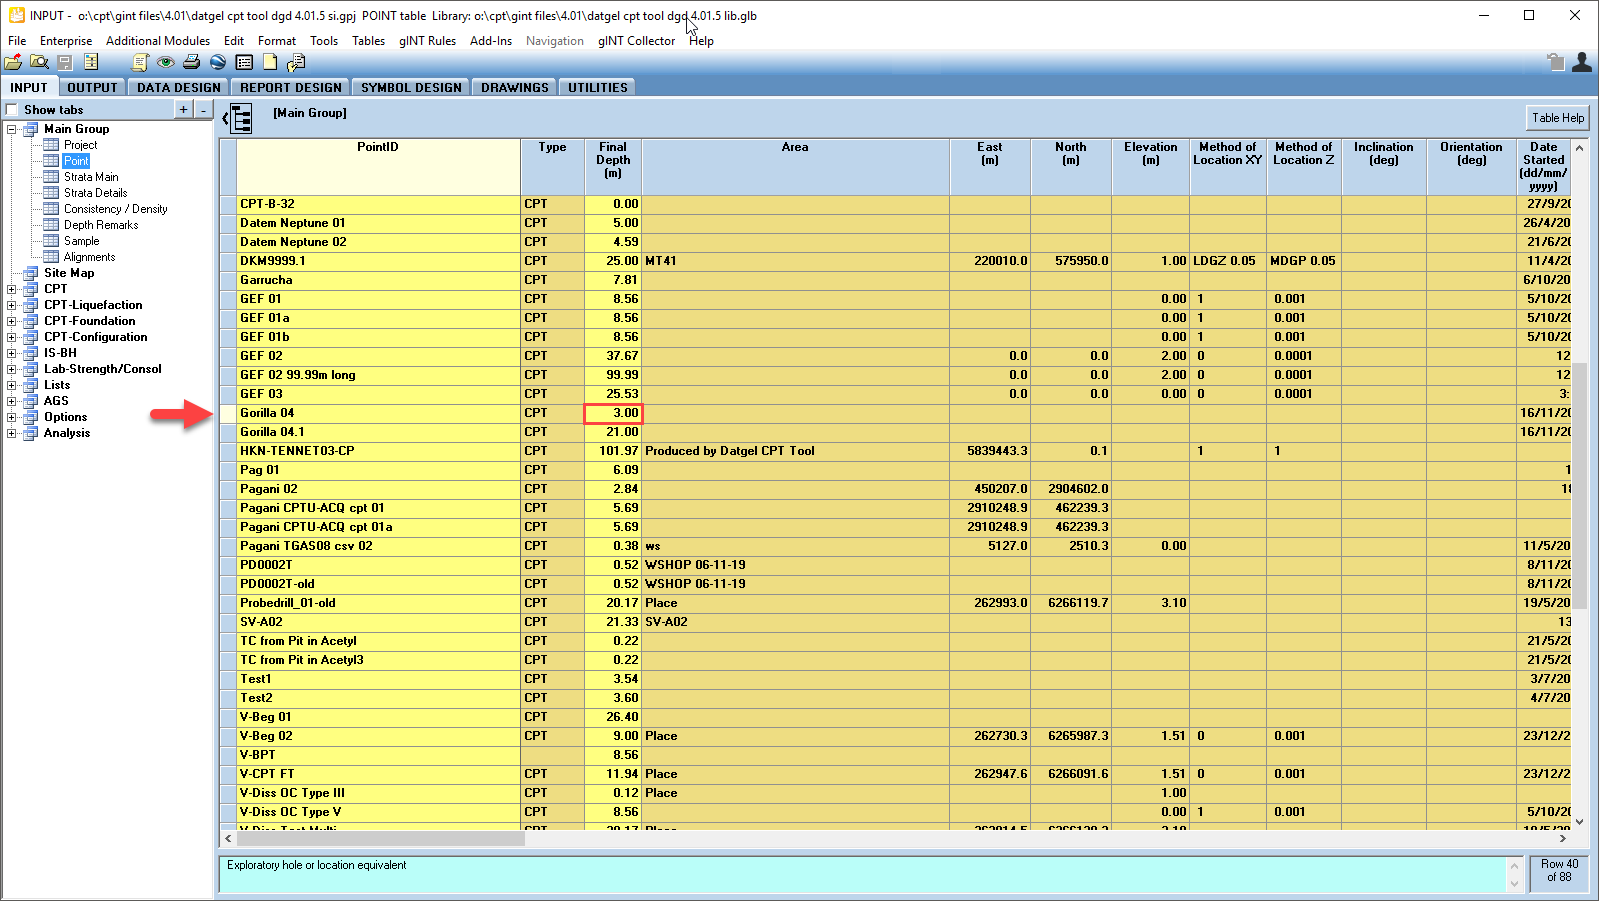
- View the data:
- Point table
- CPT Data table
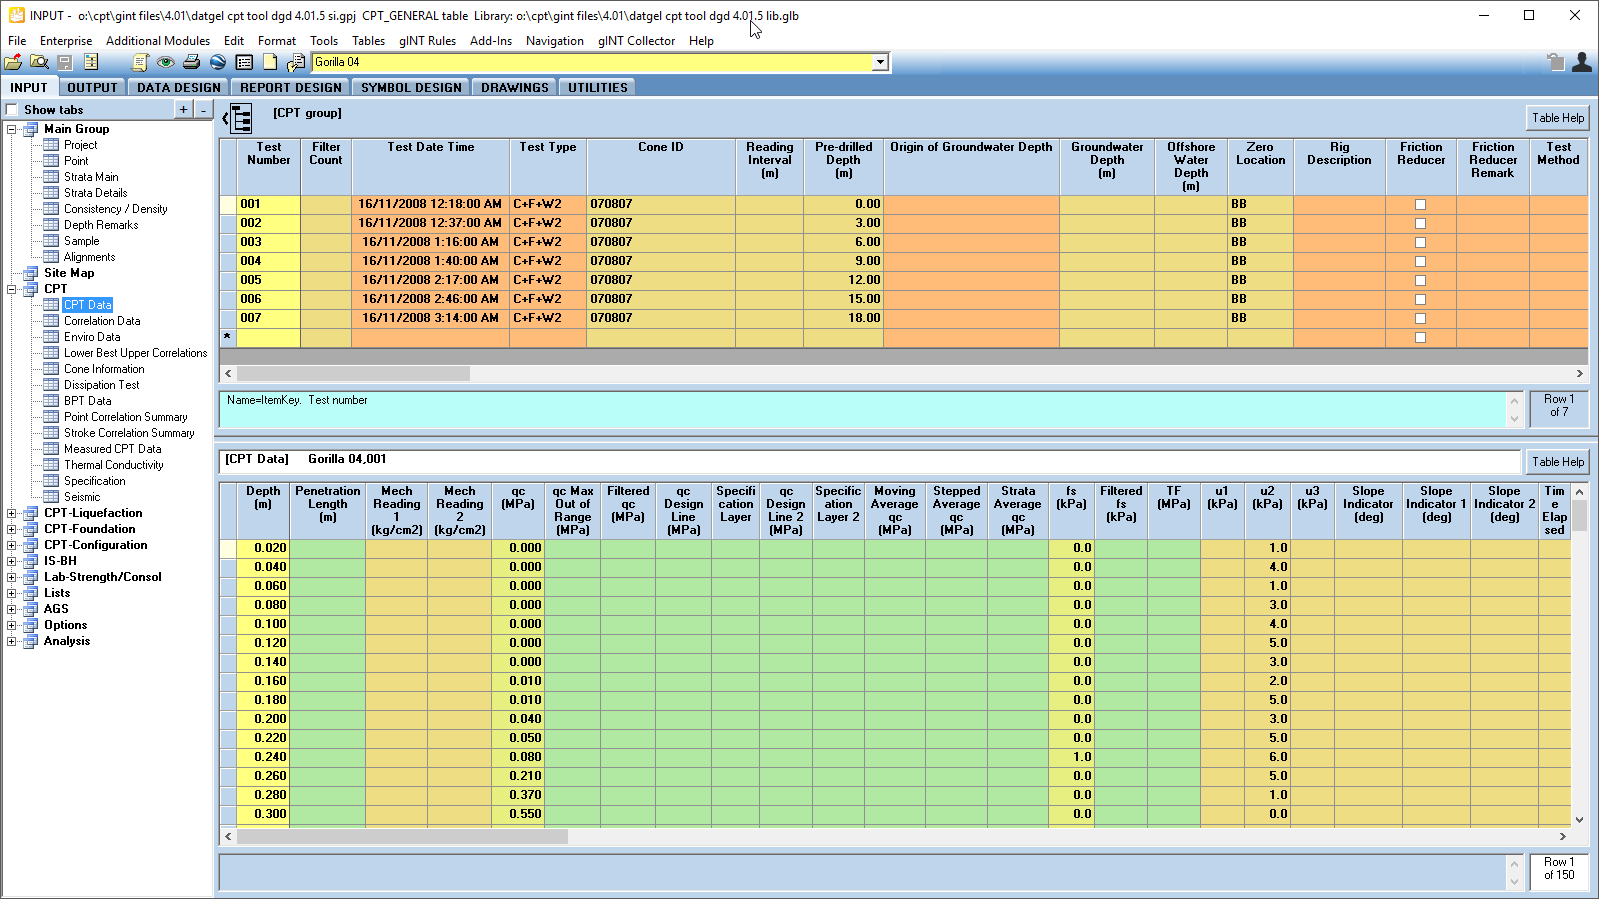
The upper half screen shows the strokes
The lower half screen contains the data of the selected stroke.
- Point table
- Go to CPT-Configuration | Project Parameters, and check Suppress Automatic Calculation
- Go to CPT | CPT Data, and set the offshore water depth for each stroke to 50 for this data
- Note the Cone ID for all stroked is 070807, go to CPT | Cone Information, and review the Cone Area Ratio for this cone is set to 0.800
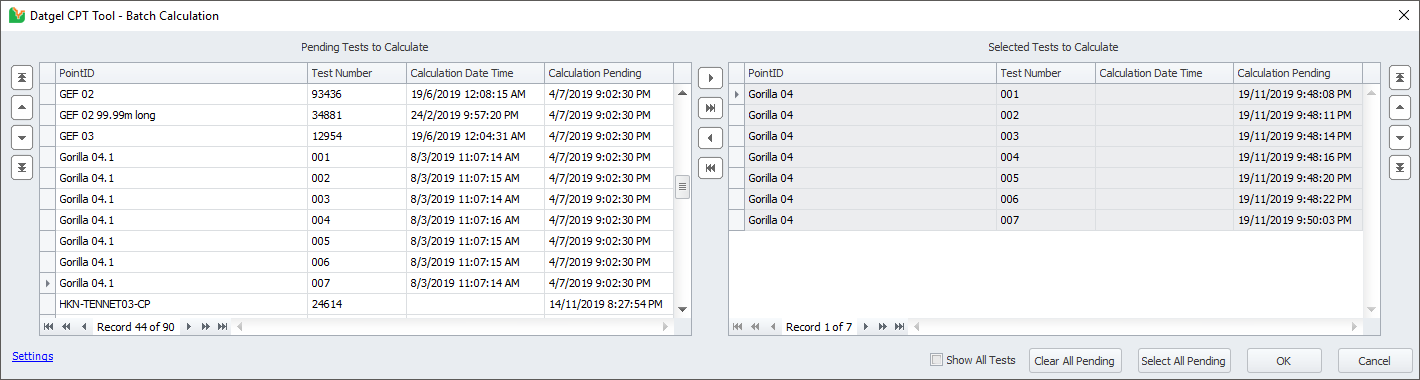
- Now calculate the data by selecting Add-Ins > Datgel CPT Tool > Batch Calculation, then select all strokes for PointID Gorilla 04 on left side, and push the to right. Then click OK.
- The calculation will also automatically set the Hole Depth to the deepest CPT Data Depth
- Review the calculated values on CPT Data by scrolling horizontally. Also view Correlation Data, CPT-Liquefaction | Liquefaction Data, and CPT-Foundation | Foundation Data.
Importing only the File Name from the Full File Path
If the full file path of the source file is being imported, but you only want to import the file name, you can modify the gINT correspondence file (.gci) to extract the file name from the full file path to import into gINT.
Open the gINT correspondence file in a text editor, and then search for the field name where the file path is being directed to (for example, File_Reference). Replace the existing expression with the following:
<<GetListItem<<Original Expression>>,"\",<<ListCount(<<Original Expression>>)>>,"\")>>)>>
Where: <<Original Expression>> is the original expression that retrieves the full file path for that particular field.