Excel Export Tool
Overview
The Excel Export Tool facilitates the export of data from gINT to an excel file based on a formatted excel template. Configuration for what data is exported and where it is placed is stored in an XML file.
Using the Tool
The Tool is accessible by selecting Add-Ins > Datgel Administrator Tools > Excel Export Tool.
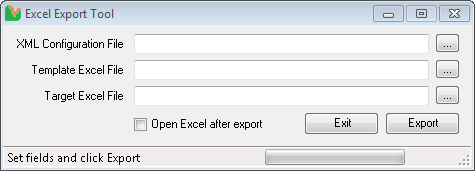
An explanation of the fields and buttons are listed below:
XML Configuration File: The file name and path to the XML configuration file which contains the configuration information related to writing to the Excel file and extracting the data from the gINT database. Browse to the XML file by clicking on the button on the left of this field, or by typing the full file path in the field. The XML file ExcelExport.xml will have been provided to you. It is recommended that you place this file on your server and that all users browse to this file, so that in the event the XML file is updated the XML file on the server can be updated so that all users will be using the updated file.
Template Excel File: The file name and path to the Excel workbook you wish to use as the template for the exported Excel file. The first worksheet in the template Excel workbook will be used as the template, and will be copied into each new worksheet created in the exported Excel file. Browse to the Excel file by clicking on the button on the left of this field, or by typing the full file path in the field. As with the XML Configuration File, it is recommended that this file is stored on the server and all users browse to this file.
Target Excel File: The file name and path to the Excel workbook where the data will be extracted to. If you define an existing Excel file, the file will be overwritten. Browse to the Excel file by clicking on the button on the left of this field, or by typing the full file path in the field.
Open Excel after export: If checked, Excel will be launched at the end of the export process and the target Excel file will be opened. Useful if you wish to review the exported data.
Export: Starts the export process. If the data exceeds the number of rows in the template worksheet, then a new copy of the template worksheet will be added in the workbook and the data will continue to write to this worksheet and so on. The status text and status bar will inform you of the progress.
Excel File Formats
The Excel file formats available for use with the Excel Export Tool depends on which version of Microsoft Excel is installed. The Excel Export Tool has been designed for use with Microsoft Excel 2003 (Version 11), and Microsoft Excel 2007 (Version 12). The Excel Export Tool will determine which version of Excel is installed and the browse button on the Template Excel file and Target Excel File fields will automatically filter the file formats. The available file formats for each Excel version are listed below:
Microsoft Excel 2003 (Version 11)
- Template Excel File
- Excel 97-2003 Workbook (*.xls)
- Excel 97-2003 Template (*.xlt)
- Target Excel File
- Excel 97-2003 Workbook (*.xls)
Microsoft Excel 2007 (Version 12)
- Template Excel File
- Excel 97-2003 Workbook (*.xls)
- Excel 97-2003 Template (*.xlt)
- Excel 2007 Workbook (*.xlsx, *.xlsm)
- Excel 2007 Template (*.xltx, *.xltm)
- Target Excel File
- Excel 97-2003 Workbook (*.xls)
- Excel 2007 Workbook (*.xlsx)
- Excel 2007 Macro Enabled Workbook (*.xlsm)
XML File
The XML file is laid out as defined below.
<?xml version="1.0" encoding="utf-8"?>
<ExcelExport>
  <SettingType Name="SQL query">
    <Setting>
      <Value>
      ...SQL select statement goes here...
      </Value>
    </Setting>
  </SettingType>
  <SettingType Name="Column Positions">
    <Setting>
      <SourceColumnName>...Column Name 1...</SourceColumnName>
      <SourceColumnNumber>0</SourceColumnNumber>
      <TargetColumnNumber>0</TargetColumnNumber>
    </Setting>
    <Setting>
      <SourceColumnName>...Column Name 2...</SourceColumnName>
      <SourceColumnNumber>1</SourceColumnNumber>
      <TargetColumnNumber>2</TargetColumnNumber>
    </Setting>
    <Setting>
      <SourceColumnName>...Column Name n...</SourceColumnName>
      <SourceColumnNumber>3</SourceColumnNumber>
      <TargetColumnNumber>3</TargetColumnNumber>
    </Setting>
  </SettingType>
  <SettingType Name="Row Positions">
    <Setting>
      <FirstRow>13</FirstRow>
      <LastRow>27</LastRow>
    </Setting>
  </SettingType>
Use the following codes in the SQL Statement in place of indicated characters.
- & &
- < <
- > >
Library name and path ~LibFileSpec~
