Material Mass Classification Tool
Overview
The Datgel Material Mass Classification Tool is designed to streamline the classification of material based on a user defined classification system with up to three parameters. The tables and field names from the user's database are used to configure the tool and the interpretation is then written back to the database.
Project Tables
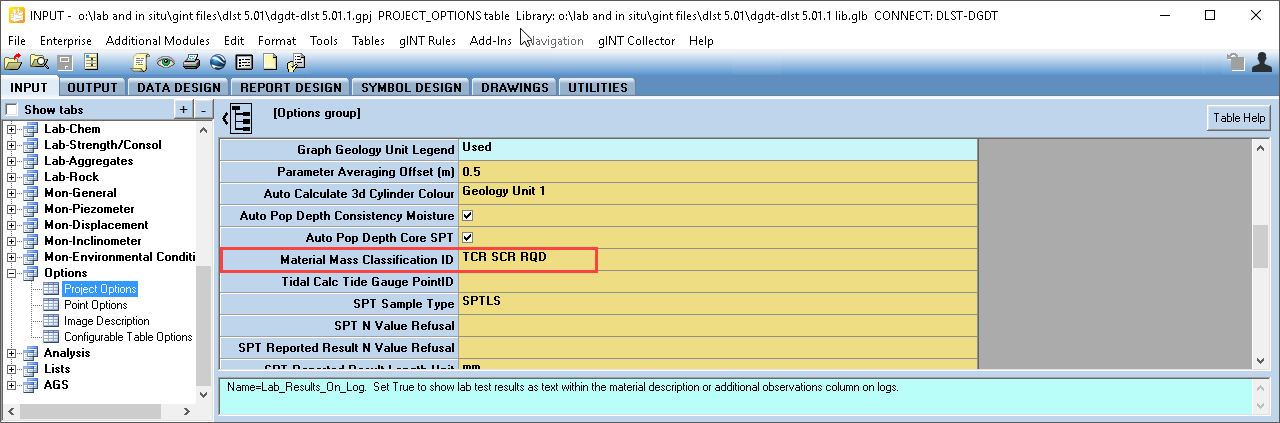
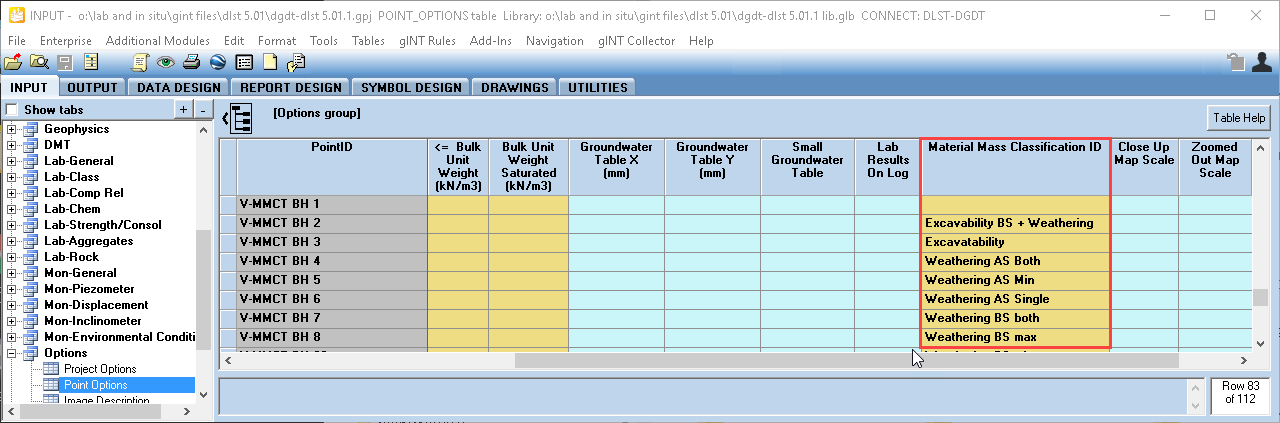
Project Options
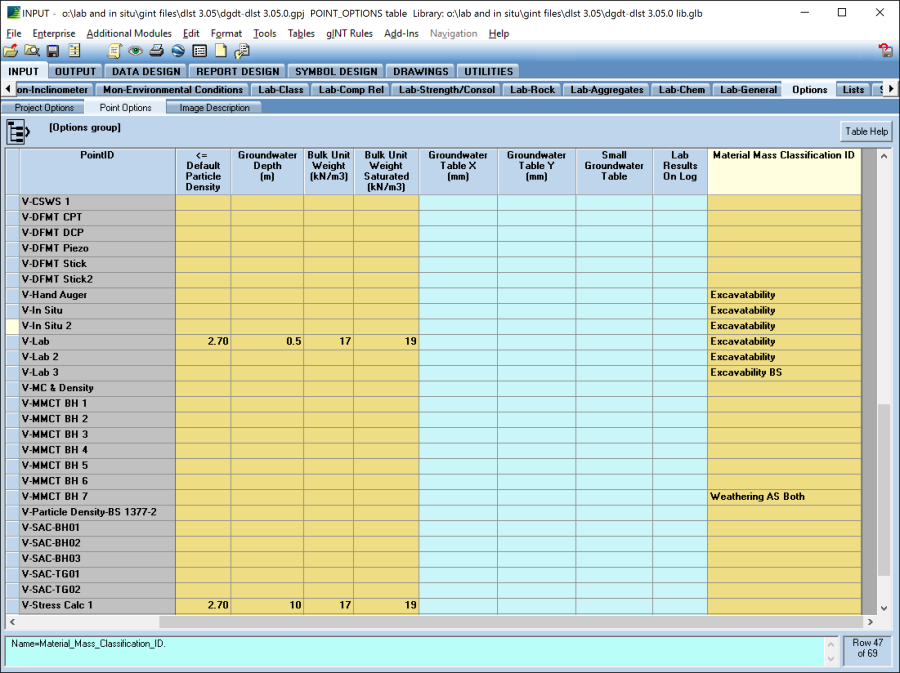
The Material_Classification_ID field in Project_Options table and in Point_Options table is used to set the Classification schemes to be used. The material classification schemes are stored in the Analysis Group Tab in the Material_Mass_Classification table. The user can configure a particular scheme based on a maximum of three parameters. Once defined, a classification can then be assigned in the Material_Classification_ID for all the project in Project_Options table or for each PointID in the Point_Options table.
Material Mass Classification
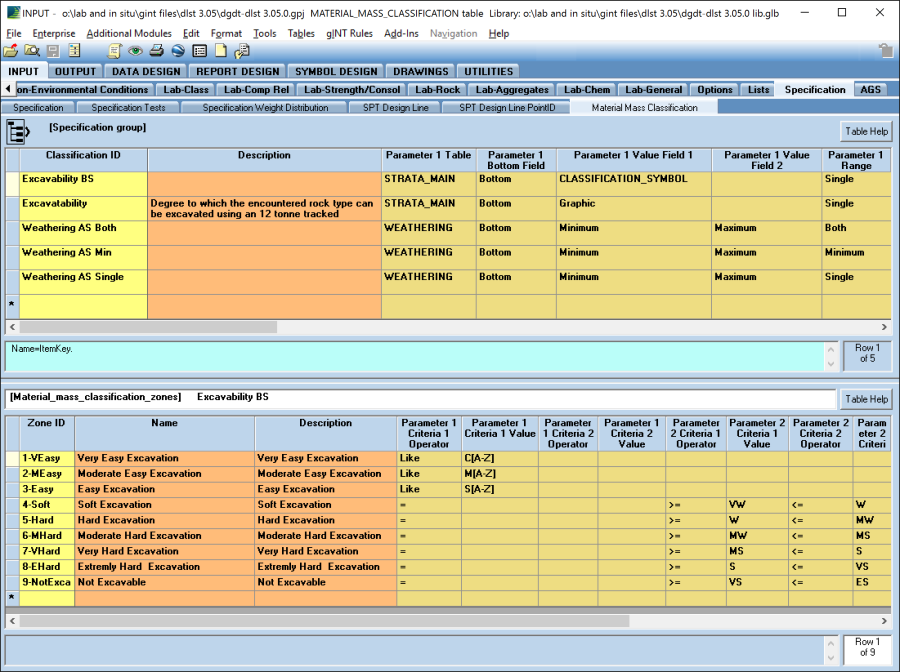
The Material_Mass_Classification (upper) table is used to define the each of the Classifications and the table and field names associated with each parameter. Each classification has a unique name that is then use on the Project_Options or Point_Options tables.
The Material_Mass_Classification_Zones (lower) table stores the individual values for each parameter that is used by the Datgel Material Mass Classification Tool to determine the material classification zone for each PointID.
Defining a Material Mass Classification
MATERIAL_MASS_CLASSIFICATION Table
In the Analysis Group, in the Material_Mass_Classification (upper) table, define a Classification_ID and a Description for the material classification on the Material_Mass_Classification_Zones table (below). Next you must define each of the parameter types that you will want to evaluate your data against.
Table – Definition of MATERIAL_MASS_CLASSIFICATION Parameters
Field Name | Explanation |
Parameter # Table | Enter the project database table name (not the caption name) storing the parameter information |
Parameter # Bottom Field | If the table has a bottom depth field, enter the database field name |
Parameter # Value Field 1 | Enter the database field name that contains the minimum criteria data. If there is only one criteria, then define the database field name as the minimum |
Parameter # Value Field 2 | Enter the database field name that contains the maximum criteria data. If no maximum exists then leave this field blank |
Parameter # Range Option | Select the most appropriate option for the range from the look up list (see Table – Parameter Range Options) |
Parameter # Lookup Order | If the database minimum and maximum fields used in the definition are looked up from a library table and that library table has a field to define the order of the data, then you can specify the name of the library table field here |
If your parameter is a term like rock strength, e.g. EL or VH, then the lookup must be a library or project table, and must have an Order field. The order field would normally be an integer or double type, and be populated for each row of the lookup table.
Table – Parameter Range Options
Range Option | Description of Range Option |
Single | Only Value Field 1 is defined and will be used (default) |
Minimum | Use Value Field 1, if Value Field 1 is empty then use Value Field 2 |
Maximum | Use Value Field 2, if Value Field 2 is empty then use Value Field 1 |
Average | Average of Value Field 1 and Value Field 2 (or one if the other is empty) |
Both | Test both Value Field 1 and Value Field 2 fit in zone |
Any | Test if any Value Field fits in zone |
Following is an example of a Classification_ID that has been defined with 3 parameters:
Table – Example of MATERIAL_MASS_CLASSIFICATION Parameters
Field Name | Example Entity provided | Explanation |
Parameter 1 Table | STRATA_MAIN | The criteria data for Parameter 1 is stored in the STRATA_MAIN table |
Parameter 1 Bottom Field | Bottom | This is the bottom depth field for Parameter 1 |
Parameter 1 Value Field 1 | Graphic | The primary graphic is being used as the minimum (and only) assessment criteria for Parameter 1 |
Parameter 1 Value Field 2 | This has been left blank as there is only one criteria being assessed for Parameter 1 | |
Parameter 1 Range Option | Single | Only one criteria is being used so the range option is defined as single |
Parameter 1 Lookup Order | This has been left blank as there is no order | |
Parameter 2 Table | ROCK_STRENGTH | The criteria data for Parameter 2 is stored in the ROCK_STRENGTH table |
Parameter 2 Bottom Field | Bottom | This is the bottom depth field for Parameter 2 |
Parameter 2 Value Field 1 | Minimum | The minimum rock strength is being used as the minimum assessment criteria for Parameter 2 |
Parameter 2 Value Field 2 | Maximum | The maximum rock strength is being used as the maximum assessment criteria for Parameter2 |
Parameter 2 Range Option | Both | Both the minimum and maximum values are used to check that the data in the Parameter 2 fields fall within the minimum and maximum defined values |
Parameter 2 Lookup Order | Order_AS | The library table that stores the abbreviation code used to describe the minimum and maximum rock strengths also contains a field called ORDER which is used to sort the minimum and maximum values |
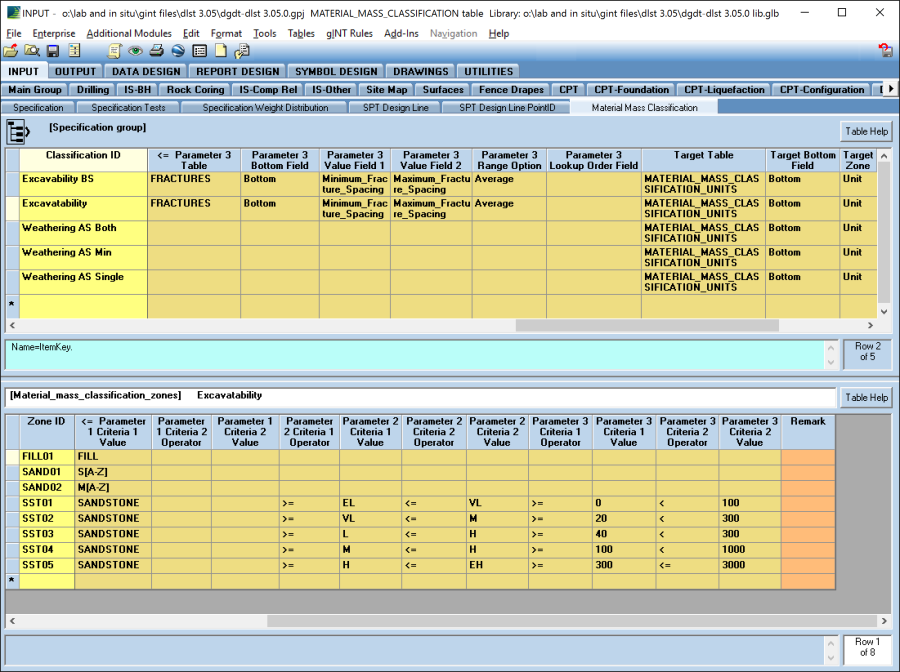
Parameter 3 Table | FRACTURES | The criteria data for Parameter 3 is stored in the FRACTURES table |
Parameter 3 Bottom Field | Bottom | This is the bottom depth field for Parameter 3 |
Parameter 3 Value Field 1 | Minimum_Fracture_Spacing | The minimum fracture spacing is being used as the minimum assessment criteria for Parameter 3 |
Parameter 3 Value Field 2 | Maximum_Fracture_Spacing | The maximum fracture spacing is being used as the maximum assessment criteria for Parameter 3 |
Parameter 3 Range Option | Average | The average value from the minimum and maximum Parameter 3 fields is required for this assessment |
Parameter 3 Lookup Order | This has been left blank as there is no order |
Once you have defined the required Parameters, you must then also define the target where the material classification will be written to.
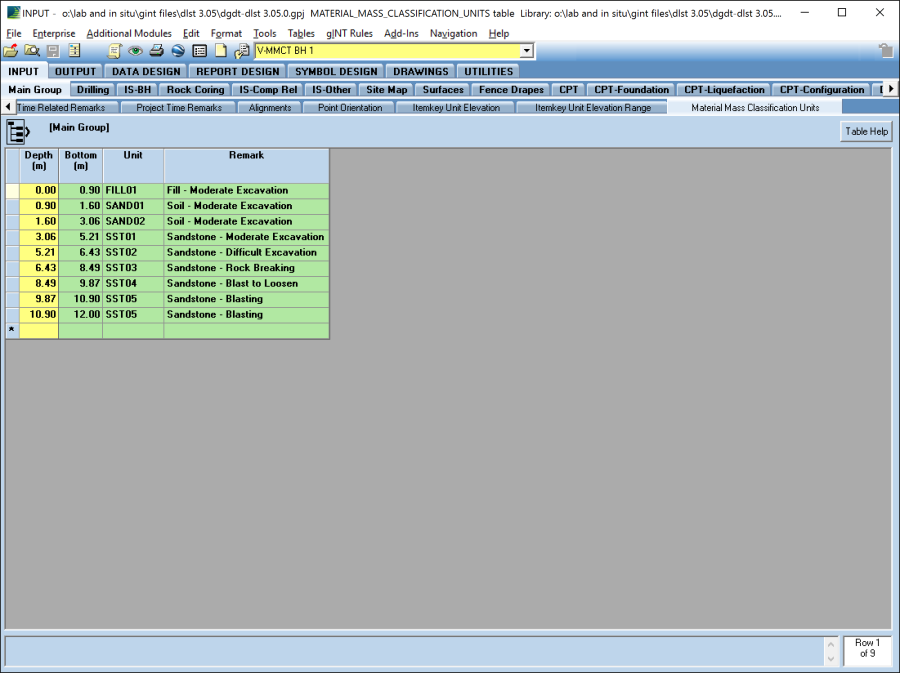
In the following example, the material classification is defined to be written to the Material_Mass_Classification_Units table.
Table – Example of MATERIAL_MASS_CLASSIFICATION_UNITS Target Table Specification
Field Name | Example Entity provided | Explanation |
Target Table | MATERIAL_MASS_CLASSIFICATION_UNITS | Enter the database table name (not the caption name) where you want to write the material classification to |
Target Bottom Field | Bottom | If the table that you want to write the material classification to has a bottom depth field, enter the database field name |
Target Zone ID Field | Unit | Database field that stored the Zone ID. |
Target Name Field | Remark | Enter the database field name that you want to write the material classification to |
Target Description Field | Database field that stored the long description. In the example the Description is not of interest, and hence this is left empty. |
MATERIAL_MASS_CLASSIFICATION_ZONES Table
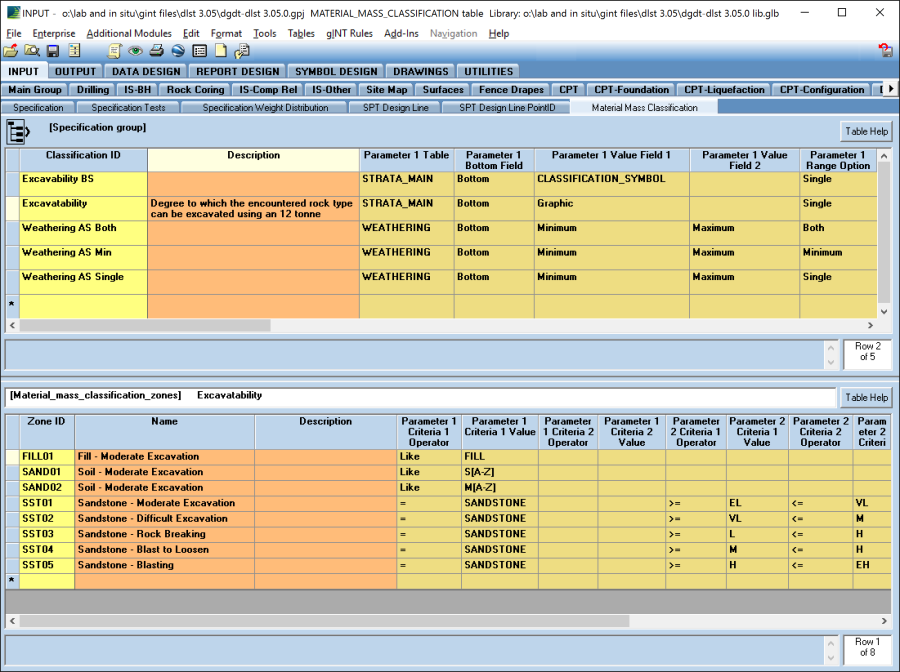
In the Material_Mass_Classification_Zones (below) table, define a Zone_ID and a Name for the material classification on the Material_Mass_Classification (upper) table. Next you must define each of the parameter values that you will want to evaluate your zones against.
Table – Definition of MATERIAL_MASS_CLASSIFICATION_ZONES Parameters
Field Name | Explanation |
Parameter # Criteria 1 Operator | Pick the minimum sign that is associated with the parameter value (see Table – Parameter Operators) |
Parameter # Criteria 1 Value | Enter the minimum value associated with the parameter |
Parameter # Criteria 2 Operator | Pick the maximum sign that is associated with the parameter value (see Table – Parameter Operators). If no maximum exists then leave this field blank |
Parameter # Criteria 2 Value | Enter the maximum value associated with the parameter. If no maximum exists then leave this field blank |
Table – Parameter Operators
Range Option | Description of Range Option |
< | Less than |
<= | Less than or equal to |
<> | Not equal to |
= | Equal to |
<> | Not Equal to |
> | Greater than |
Like | Like comparison |
=1 | One value must be equal to |
=1+ | One or more value must be equal to |
Comparisons are NOT case sensitive; stings are converted to upper case and then compared.
The Like and Not Like comparisons accept the same syntax as the gINT Software Like (function) defined in the gINT on Line Help.
Following is an example of 1 Classification Zone that has been defined with 3 parameters:
Table – Example of MATERIAL_MASS_CLASSIFICATION_ZONES Parameters
Field Name | Example Entity provided | Explanation |
Zone ID | SST01 | |
Name | Sandstone Moderate Excavation | |
Description | ||
Parameter 1 Criteria 1 Operator | = | The value in the Graph field in the database must be equal to SANDSTONE |
Parameter 1 Criteria 1 Value | SANDSTONE | |
Parameter 1 Criteria 2 Operator | These have been left blank as there is only one criteria being assessed for Parameter 1 | |
Parameter 1 Criteria 2 Value | ||
Parameter 2 Criteria 1 Operator | >= | The value in the Minimum field in the Rock Strength table must be greater than or equal to EL |
Parameter 2 Criteria 1 Value | EL | |
Parameter 2 Criteria 2 Operator | <= | The value in the Maximum field in the Rock Strength table must be less than or equal to VL |
Parameter 2 Criteria 2 Value | VL | |
Parameter Criteria 1 Operator | >= | The value in the Minimum Fracture Spacing field in the Fractures table must be greater than or equal to 0 |
Parameter 3 Criteria 1 Value | 0 | |
Parameter Criteria 2 Operator | < | The value in the Maximum Fracture Spacing field in the Fractures table must be less than 300 |
Parameter 3 Criteria 2 Value | 100 |
To complete the classification, each Zone that is required must be specified, as indicated in the following example:
Run the calculation
- In INPUT and go to the Project_Options table or Point_Options table.
- In the Material_Classification_ID field, select the Material Mass Classification that you have previously defined in the Material_Mass_Classification and Material_Mass_Classification_Zones (below) tables.
- Select Add-Ins > DGD Tool > Material Mass Classification Tool
- To determine the material classification for a selected PointID, choose the Material Classification Tool – Current PointID.
- To determine the material classification for all PointIDs, choose the Material Classification Tool – All PointIDs.
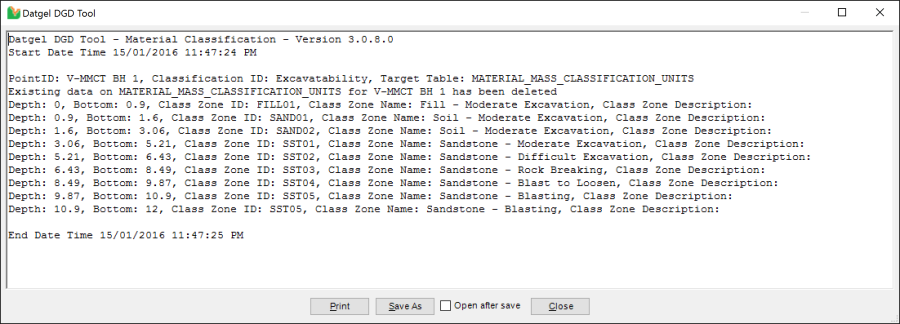
The Tool will then run and write the material classification to the target table as defined for that classification scheme. On completion, the Tool will also provide you with a full report (see example below).
Any existing data in the Target table for the applicable PointIDs will be DELETED.
The first zone that satisfies the criteria will be used. Zones are ordered by Zone ID, but this is a string hence it is ordered 1, 10, 2, 3... If this is a problem, then name Zone IDs with padded zeros, e.g. 01 Sand, 02 Sand clayey, etc.