Installation and Licensing
Overview
If you are trialing the CPT Tool, then please first work through the following sections: DLL Program Installation, Which Database Structure? – DGD SI, DGD EN or AGS RTA, and Getting Started.
There are five parts to the installation process:
- Datgel Toolbox installation
- Licensing
- Merge gINT library objects
- Merging project tables and fields
- Configure settings in library and project/data template
Datgel CPT Tool Download
Download the CPT Tool package and Datgel Toolbox Installer from datgel.com.
- Full version: https://www.datgel.com/customer/downloadableproducts
- Trial version: https://www.datgel.com/trial-software
Install Datgel Toolbox
Before Installation
A few basic preparations can help ensure an effortless installation.
- Make sure that the computer where you plan to install the program meets the minimum hardware and software requirements.
- Connect your PC to Internet before installation (the process may need a working Internet connection).
- The Datgel Toolbox program requires that the Microsoft .NET 4.8 framework is installed on the PC prior to the installation of the Tool. If your PC does not have this, then it will be automatically downloaded and installed during the Tool installation process.
- Log into the PC with Administrator privileges before starting installation.
- It is recommended that you exit out of other applications that maybe running on your PC.
- Close gINT before you start installation.
Installation
- Run the installer, typically named Datgel.Toolbox.20##.#.#_YYYY-MM-DDTHHmmss.exe.
- When you come to the Components screen, be sure to select this product, or you can simply install all Components.
- The gINT*.exe.config files for gINT versions V8i and 10..# are edited by Datgel software during installation.
Datgel Licensing
Virtual Memory Configuration
This setting is recommended so that Windows can achieve optimal memory use and speed for batch calculation.
- Start Menu, right click on Computer > Properties > Advanced System Settings > Advanced tab > Performance section > Settings… button > Advanced Tab > Virtual memory section > Change… button
- Uncheck Automatically manage paging file size for all drives
- Select Custom size radio button.
- Set Initial size to the same as your installed RAM (e.g. if 8GB RAM, then enter 8192MB)
- Set Max size to double your installed RAM (e.g. if 8GB RAM, then enter 16384MB)
Which Database Structure? – SI or USC
At this point you must decide which CPT Tool database structure to use. The options are:
- SI stands for Datgel Database with SI/metric units.
- USC stands for Datgel Database with United States Customary units aka English/Imperial units.
- The user can run the unit conversion against DGD SI to create a database with SI_MPa or SI_kgcm2.
Merge gINT Library Objects
If you're in one of the following situations then proceed to Section Validate or Activate the License.
- In the trial version of the CPT Tool, the library will be locked and you cannot merge any gINT Library Objects into your Library file, or make changes to this Library file. In this case, you have to use the locked library as-is.
- Steps Merge gINT Library Objects, Merge gINT Project File Tables and Fields and Initial Configuration have been done by Datgel's developers or done previously by you or a colleague.
If you don't have existing gINT files, then you may wish to just use the example CPT Tool gINT Files provided on the .zip folder.
If you have purchased the CPT Tool, then you have full access to the library objects, and you may proceed with the following steps to merge the gINT Library components into your Library file.
- Make a backup copy of your existing library file. By default, this is located at:
C:\Users\Public\Documents\Bentley\gINTCL\libraries\ - Start gINT and open the library and project file you wish to use the Datgel CPT Tool with.
- If your library has existing library tables with the same name as those in the CPT Tool files, you need to consider if to delete those library tables. For example if you are using the DGD Tool, don't delete the tables not related to CPTs e.g. don't delete tables that start with DG_LOG*. To do this, go to DATA DESIGN | Library Tables > File > List…, select the rows to delete, and press the Delete key. Critical CPT Tool tables include all tables starting with DG_CPT*, DG_COM_UNIT_CONVERSION, DG_LOG_SOIL_STRENGTH, and DG_IMPORT_USER_IMPORT_PARAMETERS.
- If you have an older version of the CPT Tool in your gINT files, it is simpler to delete the library objects prior to merging the new version. This is done by navigating to each library application, e.g. Log Blocks, displaying the List of objects, and deleting those starting with DG CPT, and library tables DG_COM_UNIT_CONVERSION, DG_LOG_SOIL_STRENGTH, and DG_IMPORT_USER_IMPORT_PARAMETER.
- Select UTILITIES | Lib Merge/Copy.
- Browse the Source Library File for datgel cpt tool dgd lib #.## <Unit>.glb
- Select of what to merge is complex, we will suggest two common scenarios
- Scenario 1: You are not using the DGD Tool
- Check the Query On Overwrite box, then move all source tables, except Material Composite Symbols and Tiles, to the yellow box on the right side by clicking the >> button. Critical CPT Tool library tables include all tables starting with DG_CPT*, and library tables DG_COM_UNIT_CONVERSION, DG_LOG_SOIL_STRENGTH, and DG_IMPORT_USER_IMPORT_PARAMETERS.
- Click Execute. The process may take several minutes.
This merges the CPT Tool Add-In menu item, gINT Rules modules, user system data and other library tables relevant for the use of the CPT Tool.
- Scenario 2: You are using the DGD Tool
- First merge: Check Select All and Query on Overwrite, and select the tables on right in screen shots
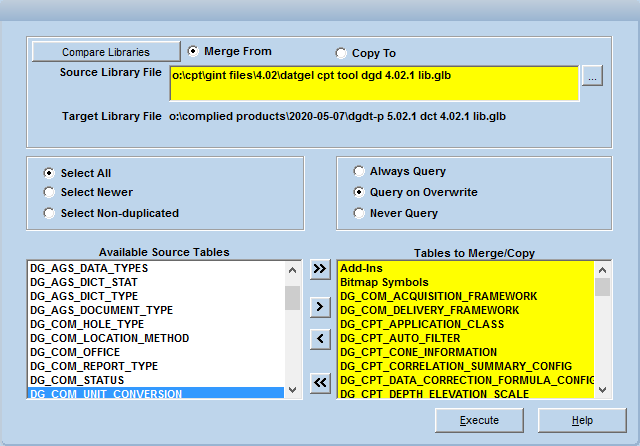
All DG_CPT* tables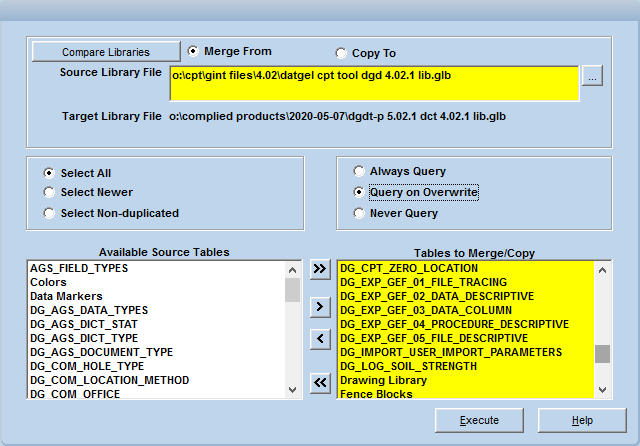

Click Execute. and select items that relate to CPT Tool. - Second Merge: Check Select Non-duplicate and Always Query, and select the tables on right in screen shots.
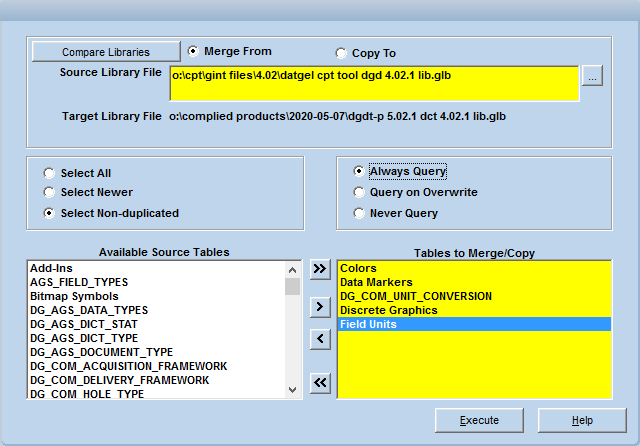
Click Execute, normally you would merge all items
- First merge: Check Select All and Query on Overwrite, and select the tables on right in screen shots
- Scenario 1: You are not using the DGD Tool
Depending on which page sizes you tend to use, you may find it convenient to not merge the Letter (LET) and 11x17 or the A4 and A3 reports. It is easier to merge all reports, and later delete the pages sizes you don't want using the Datgel SQL Tool against the Library, and using these SQL scripts:
- delete from [GIDPAGE] where [GIDPAGE].[Name] like '%LETP%' or [GIDPAGE].[Name] like '%LETL%' or [GIDPAGE].[Name] like '%11x17%'
- delete from [GIDPAGE] where [GIDPAGE].[Name] like '%A4%' or [GIDPAGE].[Name] like '%A3%
Merge gINT Project File Tables and Fields
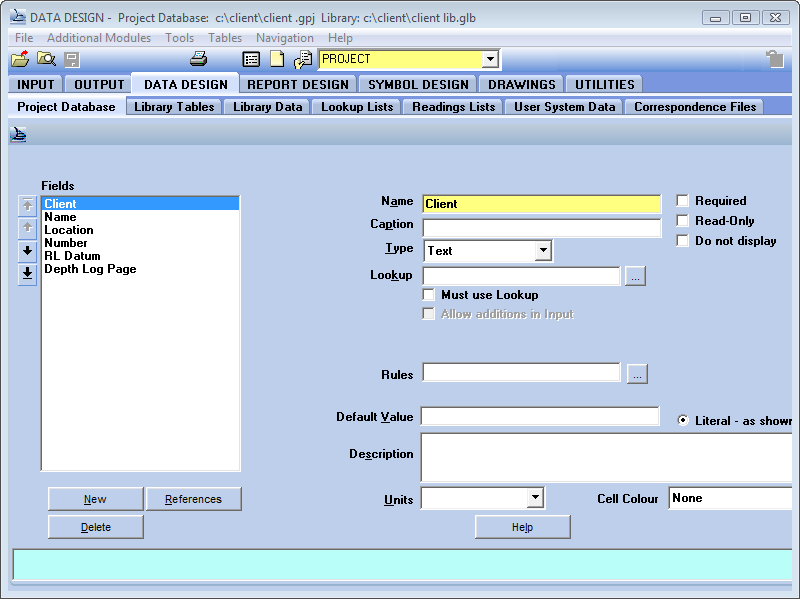
- Open your existing project/data template in DATA DESIGN | Project Database.
- If you have existing tables for CPT data or old tables for the CPT Tool, you should delete them now. A simple way to delete multiple tables is to select Tables > List… or click the toolbar button
 , select the tables to delete, click the delete key, and click OK.
 - Select Tables > Import Multiple Tables... then browse for either file datgel cpt tool dgd #.## <unit>.gpj or datgel cpt tool dgd #.## <unit>.gdt.
- At the minimum, select the tables to import as shown in the following examples plus and tables that start with CPT_, and click OK. The selected blue rows are required. The tables indicated by red boxes are used by reports and should be merged if your project doesn't have existing equivalent tables. The rest of the tables are generally ItemKey tables and are used as lookup lists by fields.
- DGD
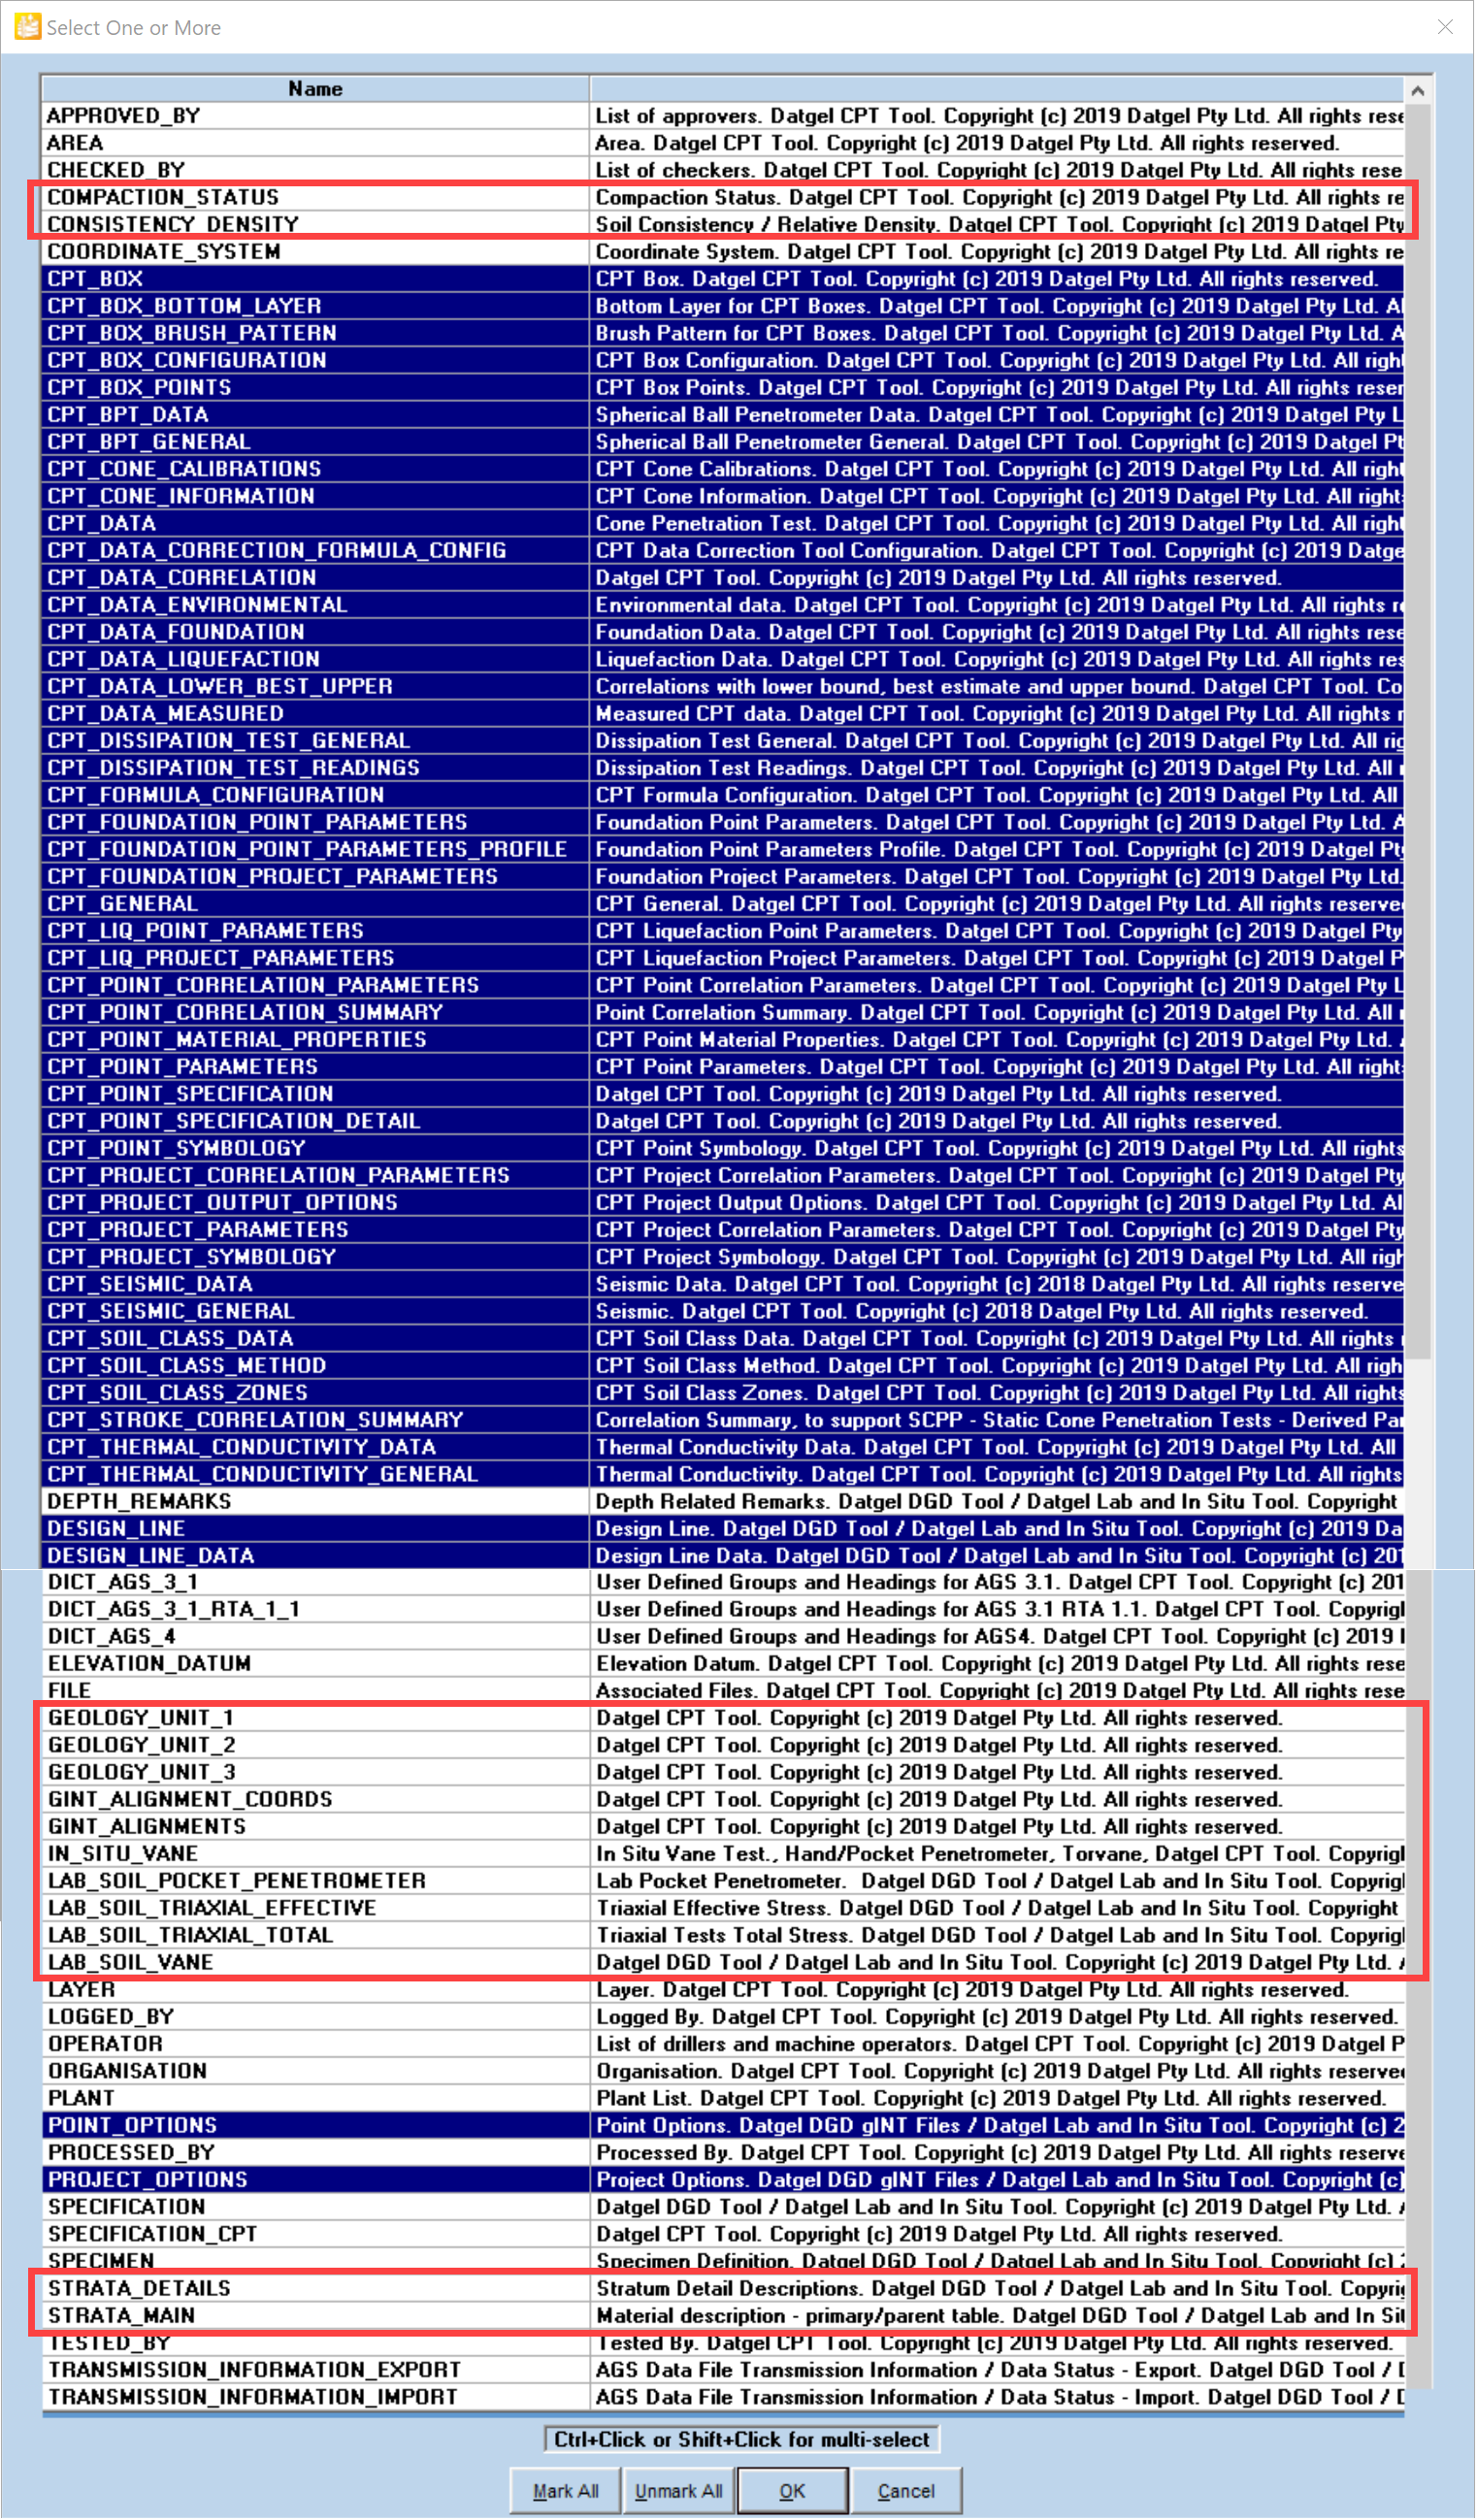
- AGS RTA
Select all tables starting with CPT_.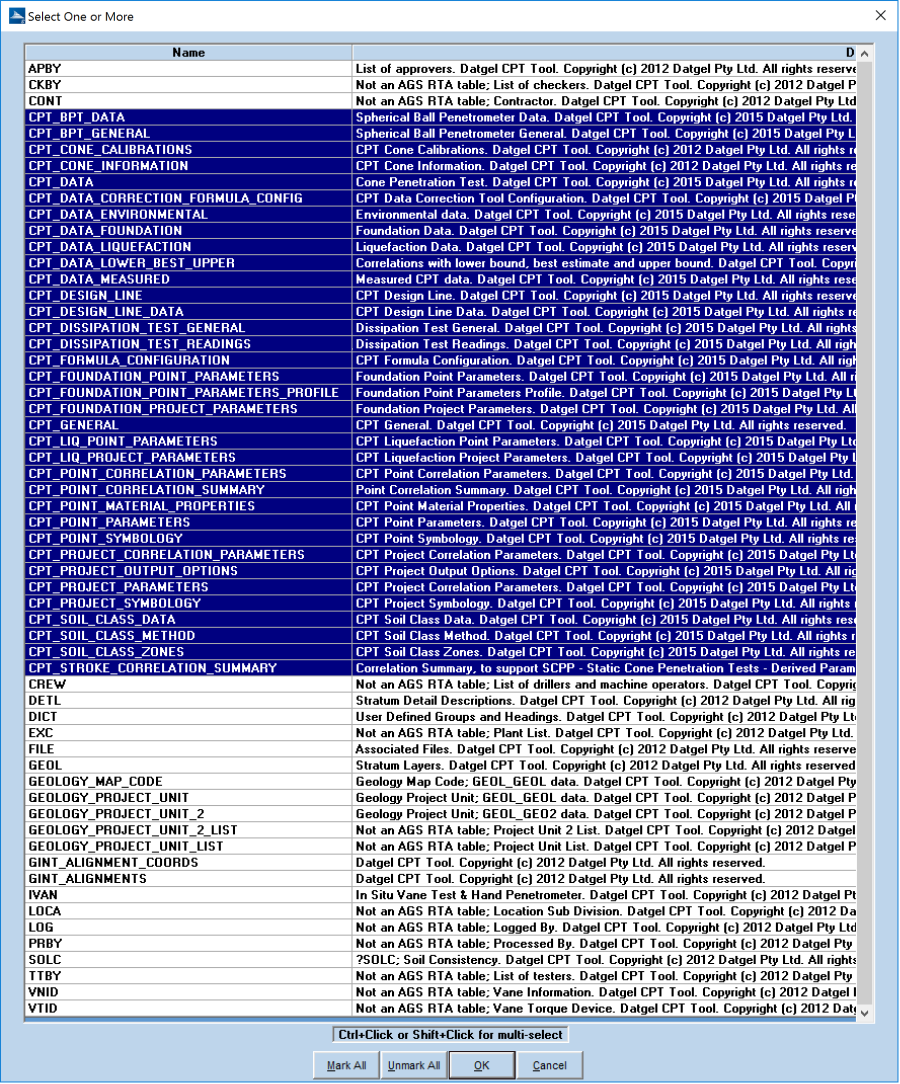
- DGD
- Merge fields from POINT. Change the object selector to POINT, and select Tables > Merge fields from other file…, select datgel cpt tool dgd #.## <unit>.gpj or datgel cpt tool dgd #.## <unit>.gdt, then select POINT, and select the fields to merge. If you are uncertain, we suggest merging them all and reconciling them later.
- Merge fields from PROJECT. Follow a similar process to that for POINT.
- Consider report changes to suit your custom project database.
Many of the gINT reports provided with the CPT Tool reference the red boxed tables, and you may need to update the field references in the reports to work with your custom project database. In particular you need to consider fields on the POINT and PROJECT tables.
The DATA DESIGN | Project Database | Tools > Compare Databases function will list the table, field, and property differences between databases. Use this to compare your company's project file to the CPT Tool project file.
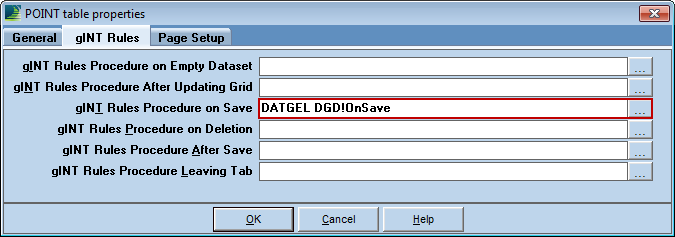
The DATA DESIGN | Project Database | Tools > Replace Field Names function will assist you to update the CPT library objects to use the fields and tables in your custom project file. - In DATA DESIGN | Project Database change the yellow object selector list to the POINT table, select Tables > Properties... move to the gINT Rules tab, and place DATGEL DGD!OnSave in the gINT Rules Procedure on Save text box. (This can also be configured in INPUT)
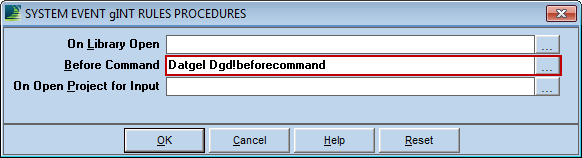
- In INPUT select gINT Rules > System Events... and place Datgel Dgd!beforecommand in the Before Command text box. (This can also be configured in DATA DESIGN | Library Data)
- Move to INPUT, and run the Add-Ins > Datgel Administrator Tools > Lookup List Check Tool to search for broken lookup list references, and rectify as needed. This step requires the Datgel Administrator Tools to be installed and licensed.
- If you have existing tables for CPT data or old tables for the CPT Tool, you should delete them now. A simple way to delete multiple tables is to select Tables > List… or click the toolbar button
Initial Configuration
After the library and project merge steps, the following items should be configured:
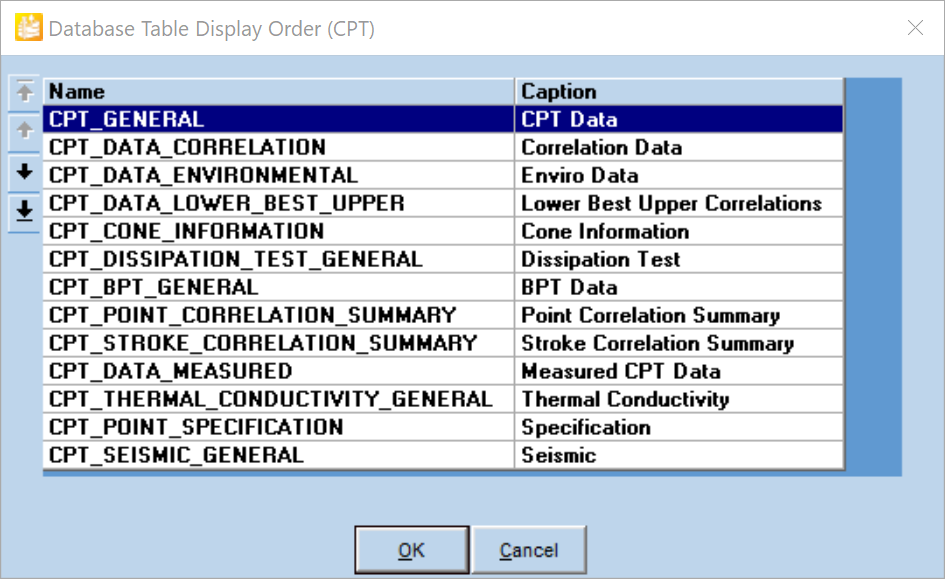
- Move to INPUT and reorder the tables within the CPT table group. Select the Table Group, and select Tables > Input Sequence…
- CPT
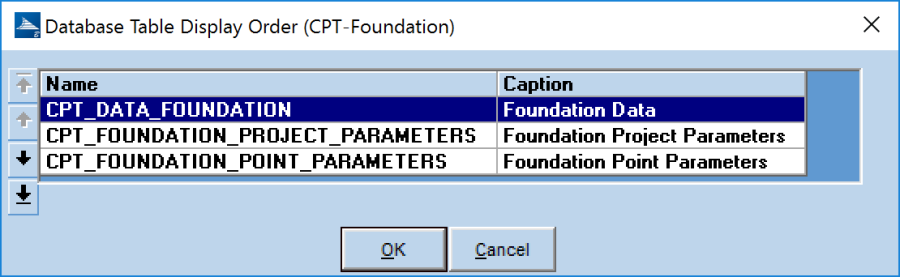
- CPT-Foundation
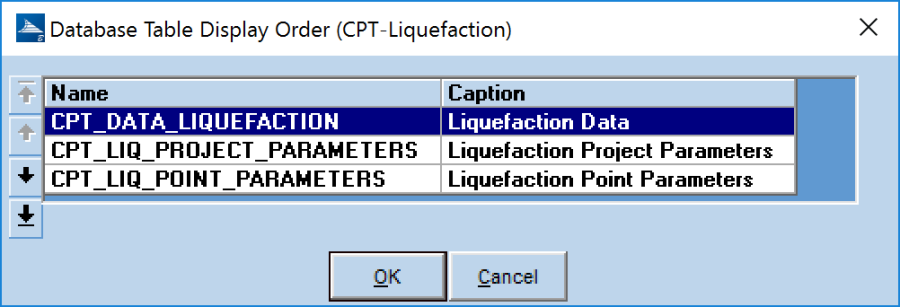
- CPT-Liquefaction
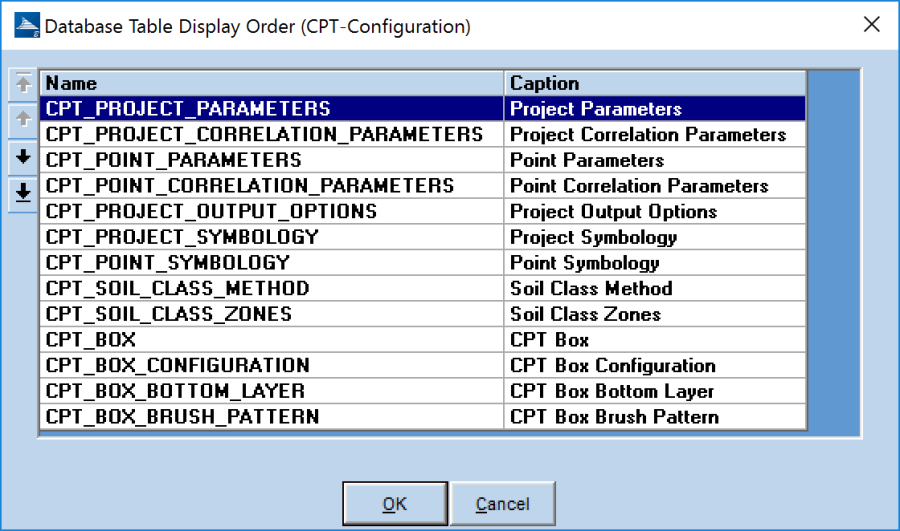
- CPT-Configuration
- CPT-Foundation
- Ensure project tables CPT_DATA_CORRECTION_FORMULA_CONFIG and CPT_FORMULA_CONFIGURATION are hidden. This can be set in the Tables List form.
- Move to DATA DESIGN | Library Data, and configure the Graphic_1 and Graphic_2 fields on DG_CPT_SOIL_CLASS_ZONES library table; see DG_CPT_SOIL_CLASS_ZONES. Select the most appropriate graphics in your library for each soil type zone.
- Configure PROJECT_OPTIONS.Classification_Standard, and set the default value. Make a new data template to save the default.
- Move to INPUT and configure the table and field names for Lithology/Stratigraphy and Consistency/Density as described in Configuration of description and consistency summary transfer.
- Update the import correspondence files (*.gci) for the numerous CPT formats to work with your custom gINT project file. Particularly the POINT and PROJECT tables.
- Assign correct page sizes and printer to reports. In order to export a report to pdf or other image format the correct page size must be assigned.
- Ensure a printer driver installed on your pc has A3 and 11x17 size.
- Use the command REPORT DESIGN | File > Set printer for reports, pick the printer with A3 from the printer list, and select the A3 size reports from the reports list.
- Then go to each A3 and 11x17 size report in REPORT DESIGN by changing the yellow drop down list. Display the report properties, File > Page > Properties, and set the page size to A3 or 11x17. You may also need to adjust the margins. Click OK.
- Review the page margins and outlines by clicking on Zoom Page, and move to the next report.
- If you have the Fence and Map Tool refer to Adding the CPT Tool fence stick.
If the DGD Tool is in use without the Fence and Map Tool, then;
- Navigate to Fence Blocks > Edit Fence Blocks.
- Delete DG STICK HYBRID (This convoluted procedure is needed to avoid a defect in gINT).
- Select Blocks > Replace Block Names, replace DG STICK with DG STICK HYBRID.
- Merge DG STICK HYBRID in from other library.
- Go to a REPORT DESIGN | Fence, and open CPT FENCE A3L.
- Select File > Page > Copy Report Variables, and then select all lines from Width 3 down to bottom of list. Click OK.
- Select the report FENCE A3L, and click OK.
- Go properties of FENCE A3L, and launch the User Report Variables. Edit URV qc qt Max Scale and qc Rf Plot, remove lookup reference and set value to <<To Delete>>.
- Click OK and OK.
- Select File > Page > Copy Report Variables, and then select qc qt Max Scale, qc Rf Plot and all lines from Width 3 down to bottom of list. Click OK.
- Select the fence reports named like FENCE* and click OK.
- If you have upgraded from an older version, may now reapply custom configurations such as:
- Create new fields in CPT project tables
- Merge formulas into the Formula Tool
- Configure DG_CPT_SYMBOLOGY and DG_CPT_SYMBOLOGY_SCALES_UNITS
- Configure reports
- CPT
Configuring Logos in the Library
Import a new raster file
Logos images are managed from SYMBOL DESIGN | Bitmap Symbols. You can store many different logos here, each having its own page. Non logo images can also be stored here.
Make a new Bitmap Symbol
- Create a new page

- Enter the Name and Description.
- Using the Load Raster File browser, select the file you wish to import, and click OK.
Replace existing Bitmap Symbol with a new image
- Select the item from the object selector list
- Open Page Properties

- Using the Load Raster File, browser, select the file you wish to import, and click OK.
How to add a new Office
- If required, import the raster file as described in section Import a new raster file.
- Navigate to DATA DESIGN | Library Data, and open table DG_COM_OFFICE.
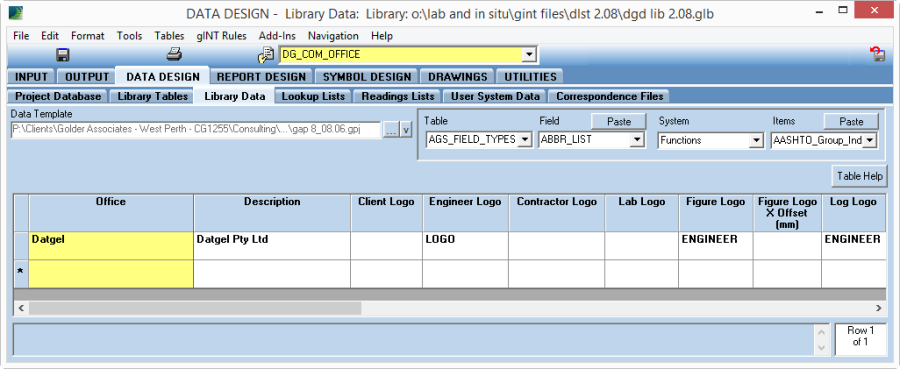
DG_COM_OFFICE - Make a new record and update the Office, Engineer_Logo, Figure_Logo, and Figure_Logo_X_Offset fields.
- Return to INPUT, and on the Project table select new item in the Office field. If you prefer to use the new office for your projects, set it as the field default, and make a new data template.
- Move to OUTPUT, and test that log and graph reports present the logo as desired. You might need to adjust the value for Figure_Logo_X_Offset to present the logo cantered in the figure title block box. Keep in mind that by default the logo will be offset by 2 mm.
Upgrading from Version 2 to Version 4
DLL program
You may simply install the DLL program over the top of a previous installation.
gINT Files
We suggest you delete all old CPT Tool specific project tables from your data template, and all CPT specific library objects from your library including Add-In commands and gINT Rules modules. Then merge the new CPT Tool into your library and data template as describe above.
You will need to design a correspondence file to migrate old project to the new project/data template structure. Two correspondence files have been provided, which you can use as a basis:
- datgel_cpt_tool_dgd_2.19_to_4.##_02.gci
- ags rta 2.21 to ags rta 4.## 00.gci
Open the relevant file above in DATA DESIGN | Correspondence Files, and do the following:
- Adjust the Source File and Target File properties to point to your old and new data template / project file.
- Click Refresh Fields All (F5).
- Save correspondence with a new name.
- Try converting one file using UTILITES | Convert Projects. Note that gINT will automatically make a backup of the project with an extension *.or#.
- Review the converted file to ensure all data was correctly converted.
When converting projects it will be faster if you a have a library open that doesn't have gINT Rules modules for the CPT Tool, so that all calculations are suppressed.
gINT*.exe.config edits
The gINT*.exe.config files for gINT versions V8i, 10.0, 10.1 and 10.2 are edited by Datgel software during installation. When Datgel's software splash screen shows it checks the edits to gINT*.exe.config files are present, and if not it will attempt to apply the changes. If your user account doesn't have administrator rights you will be prompted to enter administrator credentials. Installing a new version of gINT will return the gINT*.exe.config file to its virgin state, hence Datgel's software will need to apply the edits again next time your run it.
If you experience any difficulties in applying this procedure please contact Datgel's support team.
SQL Server Considerations
Users require the following rights to operate the CPT Tool:
- bulkadmin
- dbcreator, need to make a database, so not all user need this.
- db_datareader
- db_datawriter
- db_ddladmin
Fast access between the gINT-CPT Tool installation and the SQL Server is a must for good performance.
gINT reporting can be slow if sufficient resources are not provided to SQL Server.
Setting up a production environment SQL Server database requires SQL Server knowledge, if you require assistance Datgel can help on a consulting basis.