Quick Start Guide
Overview
This page guides you through the setup and explains basic use of the Administrator Tools.
gINT must be installed and licensed on your computer to use the Administrator Tools.
Datgel Administrator Tools Installation and Licensing
The Administrator Tools package download from datgel.com
- Full version: https://www.datgel.com/customer/downloadableproducts
- Trial version: https://www.datgel.com/trial-software
Package Content
The Download .zip folder contains all you need to install and evaluate the Datgel Administrator Tools. The content is:
- Documentation folder includes:
- Example reports
- EULA
- Links to the product and licensing online user guides
- Link to email to support.
- gINT Files folder includes:
- "datgel advanced tool X.XX.X lib trial.glb" or "datgel advanced tool X.XX.X lib.glb" (gINT library file)
- "datgel Excel Export Tool Config DGD 00.xml"
- "datgel Excel export Tool xx.xlsx"
- Installation files folder includes:
- Datgel Administrator Tools installer.
Unzip and copy the content of the folder to your local computer.
Installation
Before Installation
A few basic preparations can help ensure an effortless installation.
- Make sure that the computer where you plan to install the program meets the minimum hardware and software requirements.
- Connect your PC to Internet before installation (the process may need a working Internet connection).
The Advanced In Situ Tool requires that the Microsoft .NET 4.5.1 framework is installed on the PC prior to the installation of the Tool. If your PC does not have this, then it will be automatically downloaded and installed during the Tool installation process.
- Log into the PC with Administrator privileges before starting installation.
- It is recommended that you exit out of other applications that maybe running on your PC.
- Close gINT before you start installation.
Install DLL Program
- Extract the ZIP download, and Browse to the folder \Installation Files
- Double click the file named Setup.exe.
- Click Run to begin installation. Follow on the screen instructions when installation begins:
- Click Next on the Welcome to the Datgel Administrator Tools Setup dialog
- Scroll and carefully read the License Agreement, and choose option I Agree, and click Next.
Alternatively choose I Do Not Agree and click Cancel if you disagree with the license agreement. The installation will stop and exit. - On the Select Installation Folder dialog, either accept the default folder (recommended) or select Browse to specify the folder where you want to install the Administrator Tools Add-In.
Leave Everyone bulleted to indicate that anyone logged onto the PC can use the Administrator Tools Add-In.
Click Next when ready.
OPTIONAL Click on Disk Cost to view the disk space statistics. Click OK when done - Click Next to start installation.
- Observe the progress bar to monitor installation progress
- Click Close when the Installation Complete dialog is displayed.
Open gINT
- Start gINT
- When you open gINT if it asked for a library, then browse to the downloaded .zip folder and select the library file (.glb). Otherwise after gINT opens select File > Change Library, and browse to the aforementioned library. Note: the library is locked for the Trial version.
- Select File > Open Project. Browse to the downloaded .zip folder and select the project file (.gpj)
License Activation
Once the installation of the Administrator Tools is completed, you need to activate the license. The steps to follow are different and depend on if you are testing a Trial version or a Full Licensed version.
Validate a Single User Hardware Key
Use this procedure if you have received a Hardware Key with your license purchase.
- Make a note of the license number and serial number – you need them to complete the installation.
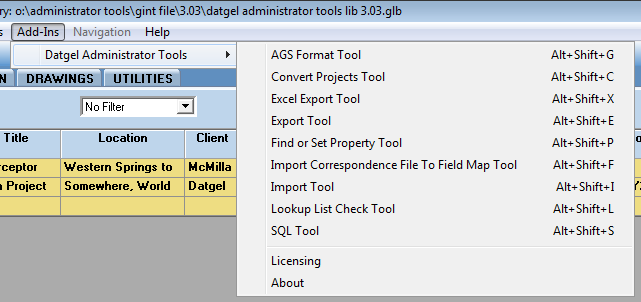
- Select Add-Ins > Datgel Administrator Tools > Licensing.
Select the option for Use a hardware key license.
Click Next. Select the option for I have an active hardware key and need to enter or update the license number, serial number [or server name].
Click Next.- Select the Contact Details tab and enter relevant information.
- Select the License Details tab and enter relevant details in the Single User Hardware Key area.
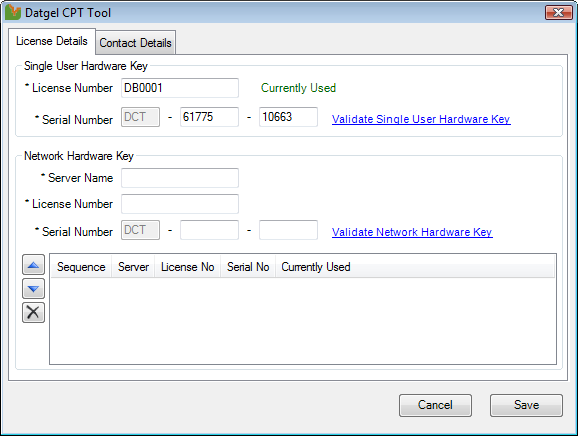
- Click Validate Single User Hardware Key.
- Click Close.
If the license is not validated successfully, check the following:- Serial Number and License Number has been entered correctly
- The Hardware Key is attached to your PC and is the correct key for this product
- On the Datgel Tool dialog, click Save.
- Click Close.
If you need to validate a Network Key License refer to License Administration.
If you are converting from a software licence to a Single User Hardware Key License, you must deactivate the Software Key License first (refer to Deactivate a Single User Software Key License).
Using the tool
Select the INPUT | Add-Ins > Datgel Administrator Tools then select a menu item.